How To Map A Network Drive Windows 10
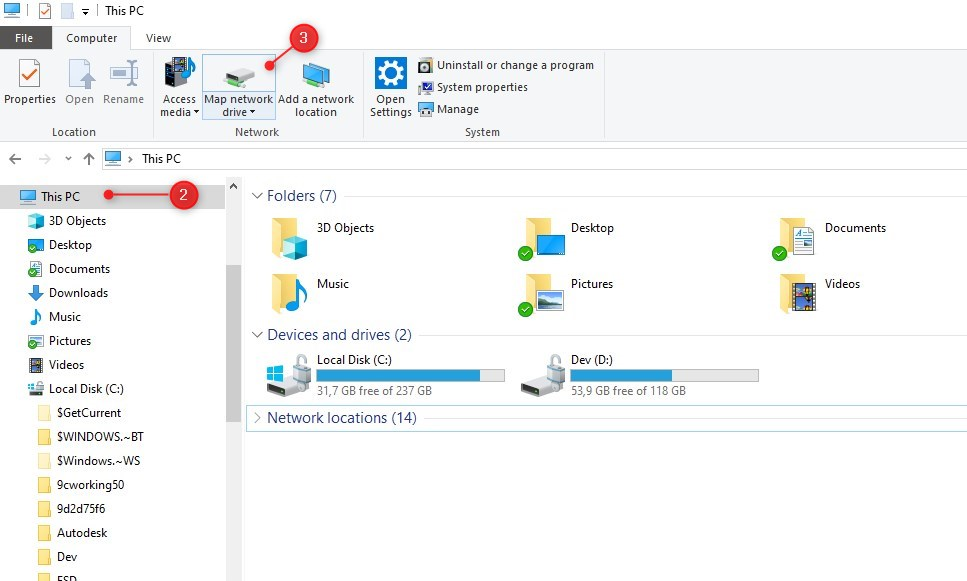
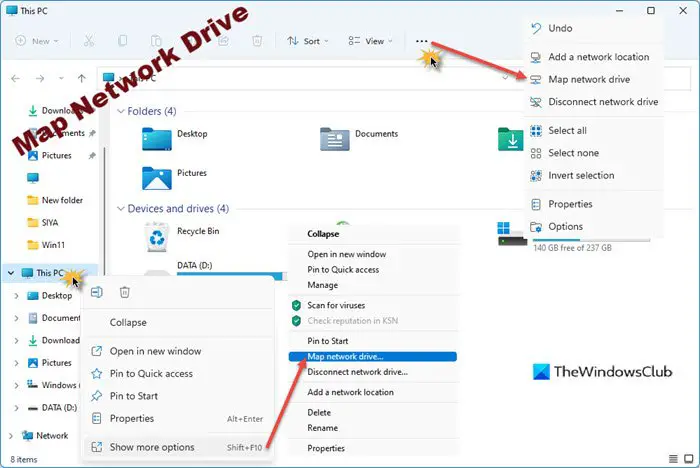
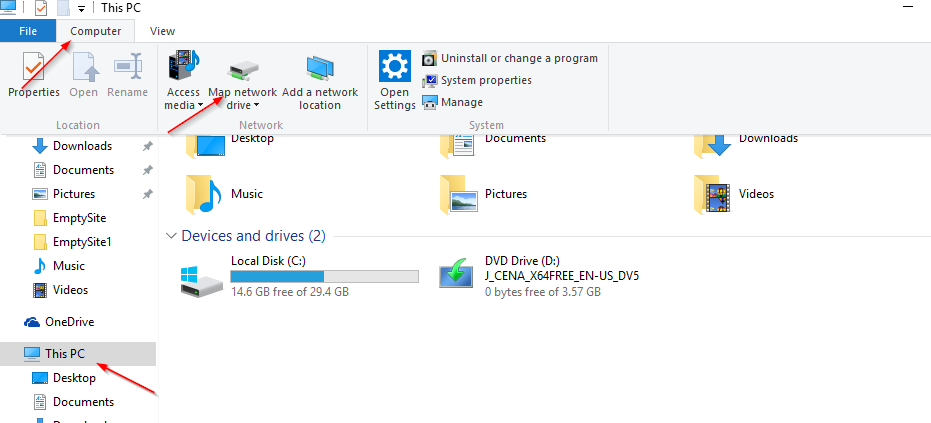
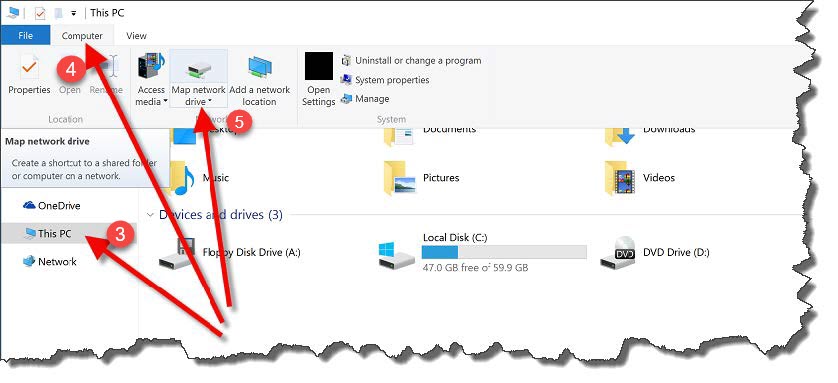
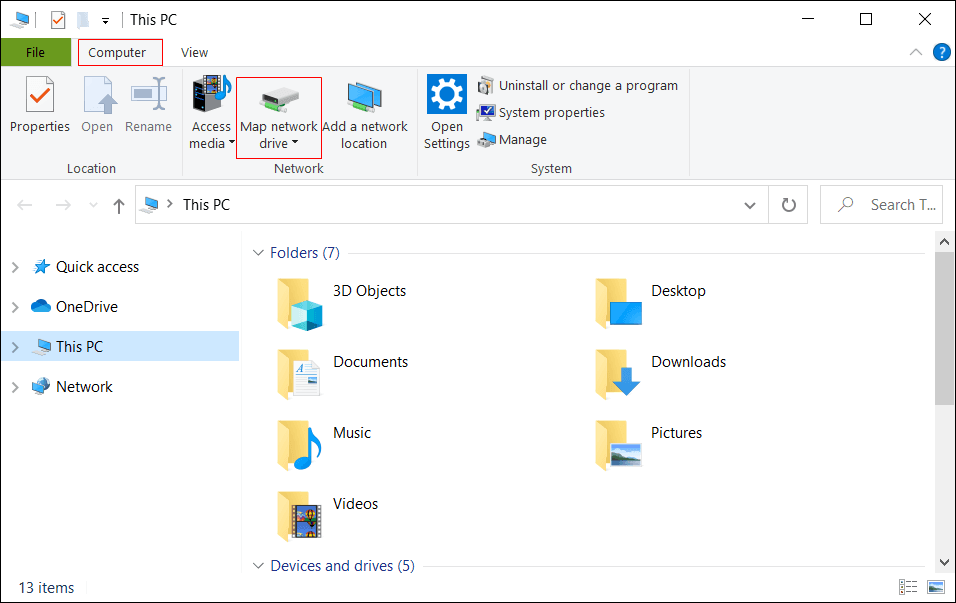
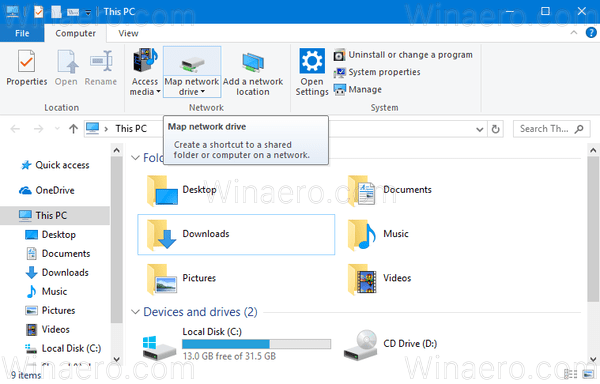
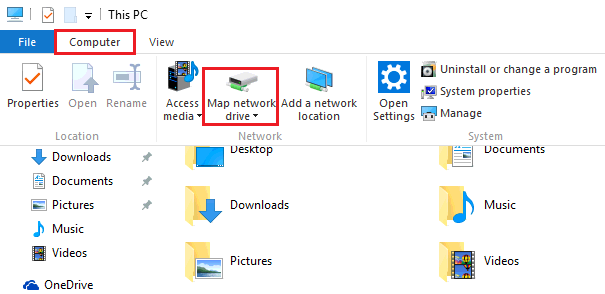
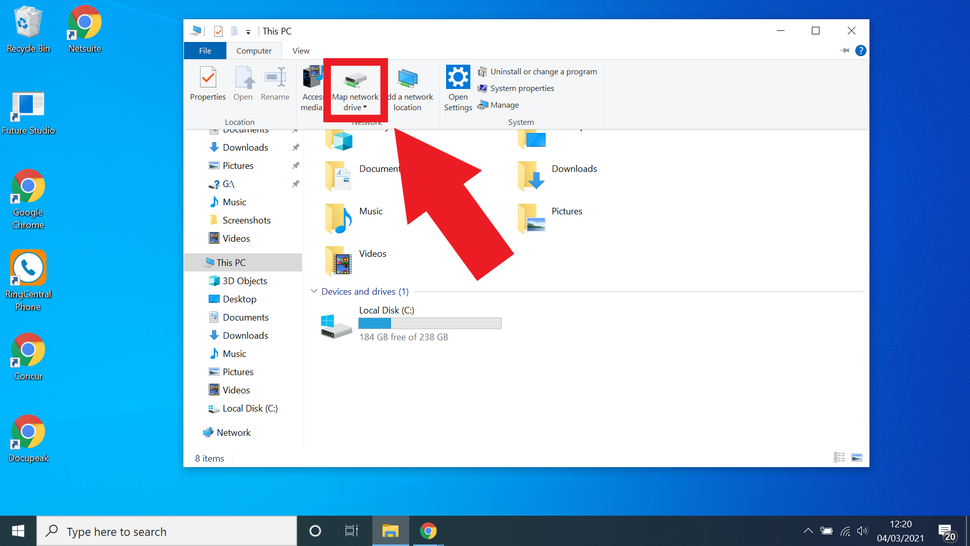
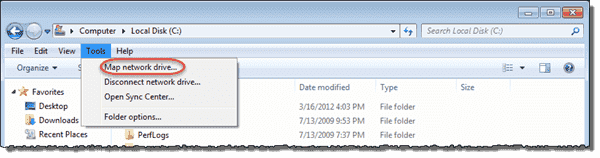
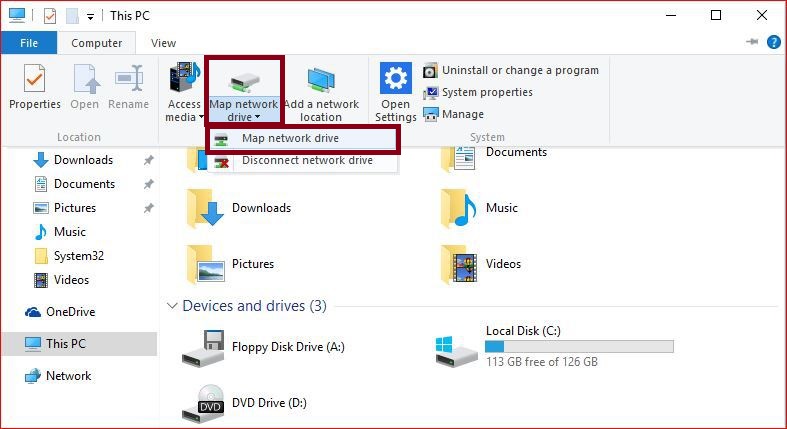
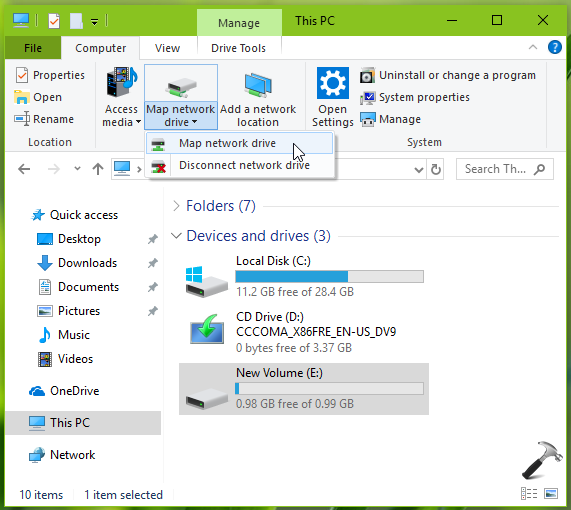
Open File Explorer from the taskbar or the Start menu, or press the Windows logo key + E. Select This PC from the left pane. Then, on the File Explorer ribbon, select More > Map network drive. In the Drive list, select a drive letter. (Any available letter will do.) Map a Network Drive With network discovery turned on, you can now map a network drive. First, open File Explorer and then click "This PC" in the left-hand pane. Next, click "Map Network Drive" in the Network group of the Computer tab. The Map Network Drive window will appear.
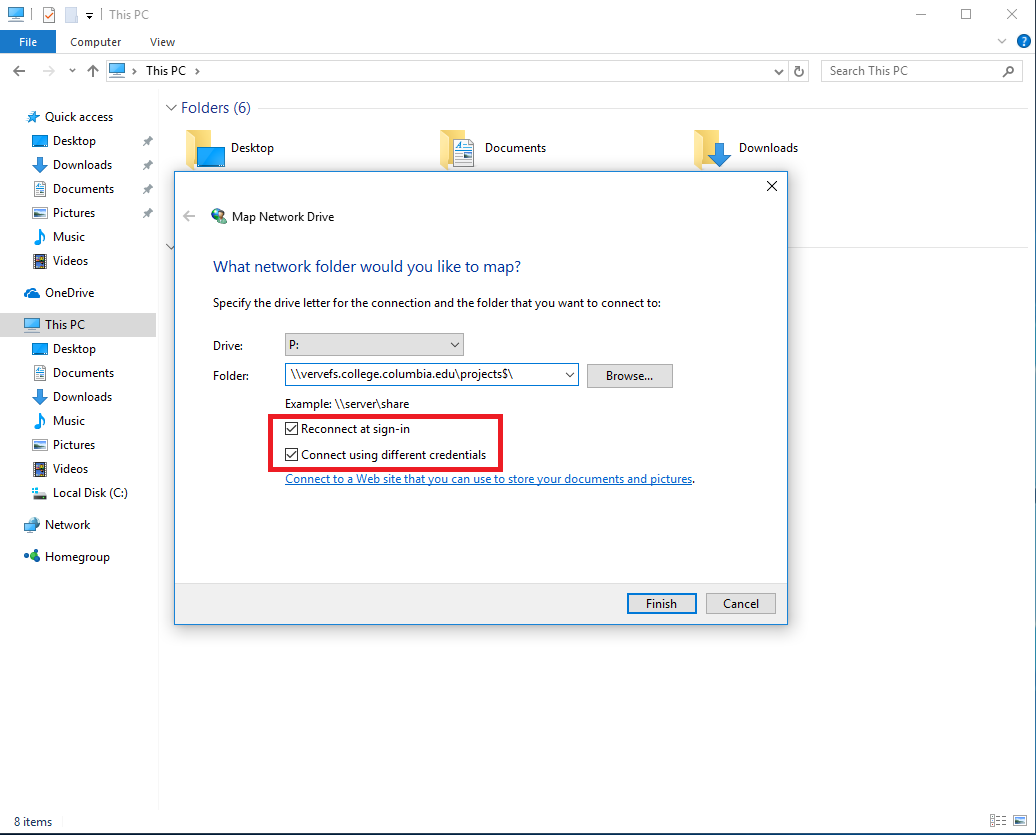
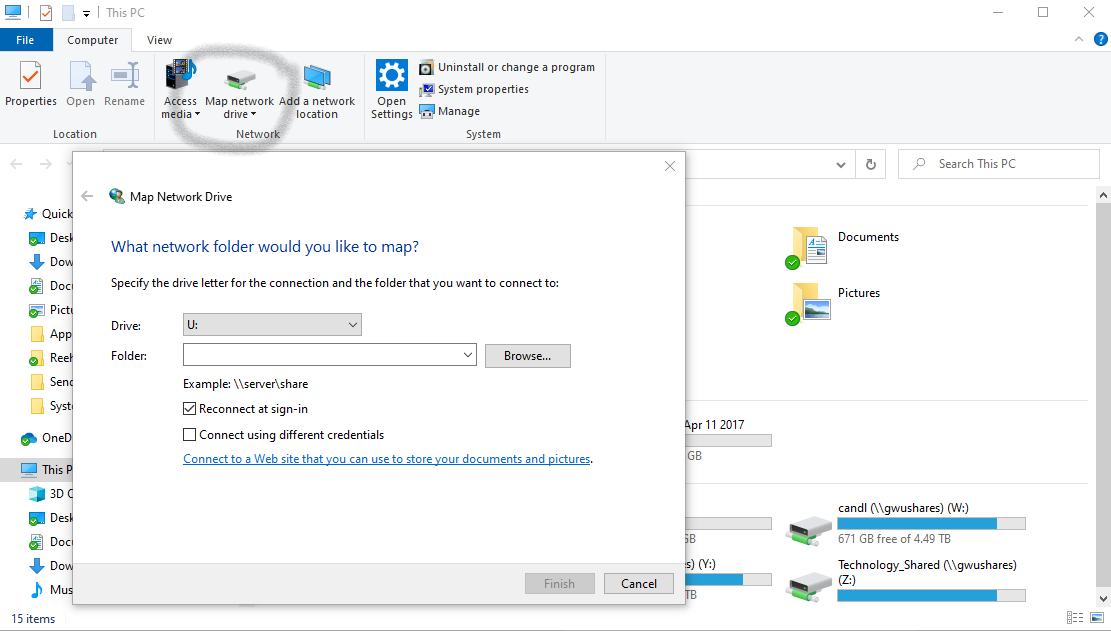
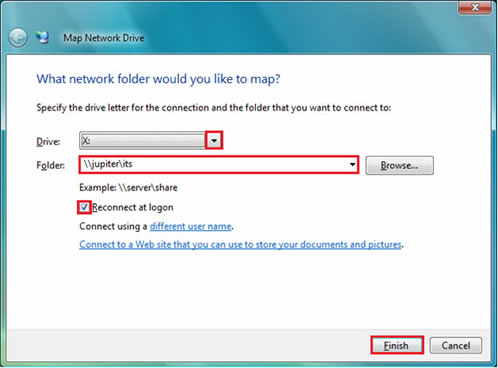
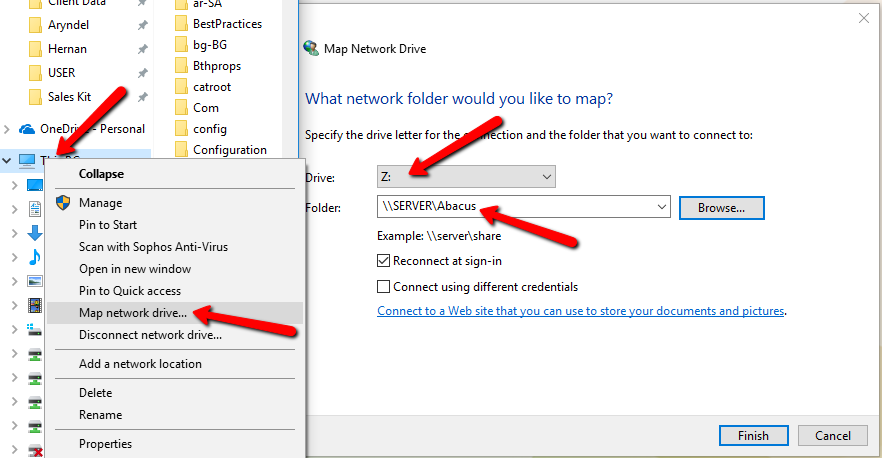
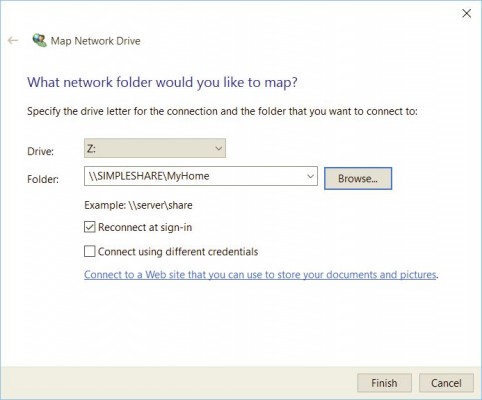
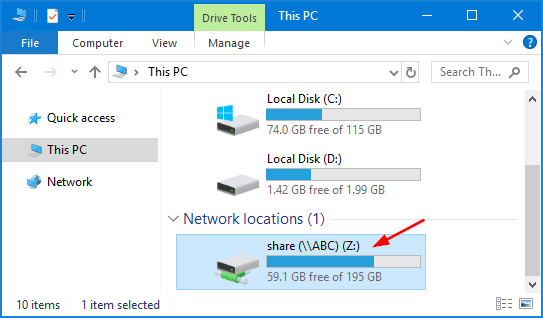
In the "Map Network Drive" window, click the "Drive" drop-down menu and select a drive letter that you will assign to the network drive. It can be any letter in the list, depending on your personal preference. In the "Folder" field, enter the network device and share name. Once you've opened up File Explorer, navigate over to the This PC menu and then open up the Computer tab from the bar at the top of the window. 8. Select map network drive (Image credit:.
Related Posts of How To Map A Network Drive Windows 10 :

Map network drive in Windows 8 1 Windows 8 and Windows 7 4sysops
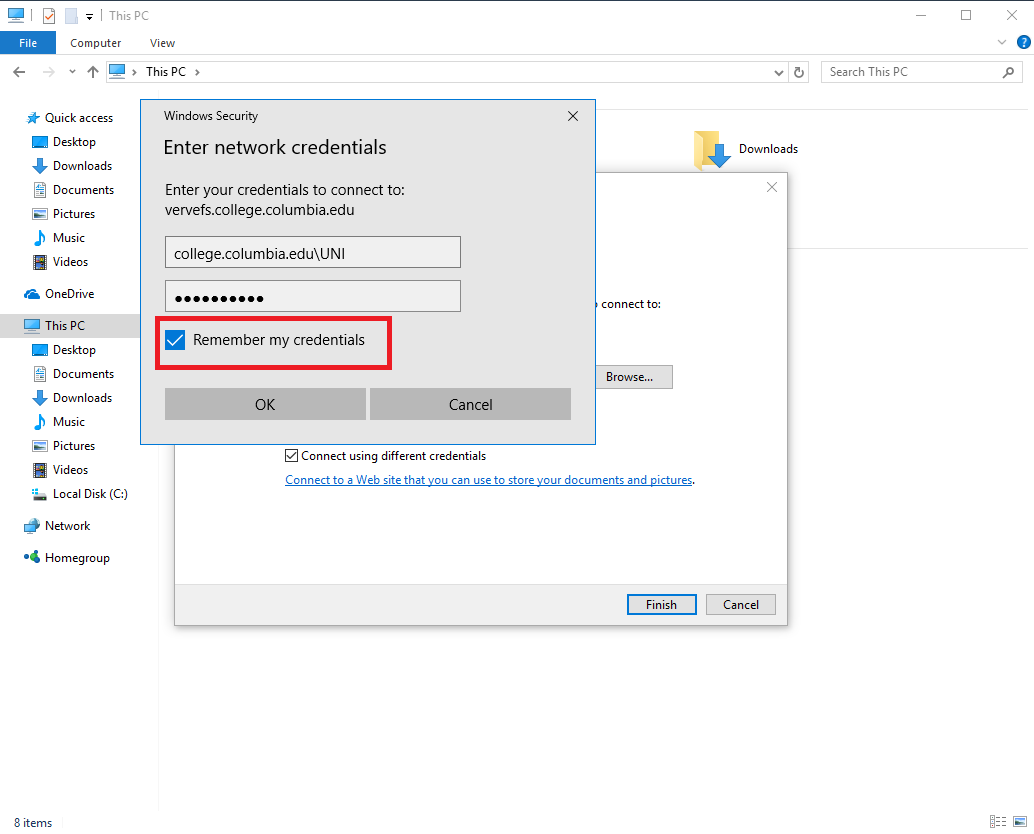
How to Map Network Drives in Windows 10 Columbia College Information
Map Network Drive in Windows 10 Tutorials

How to Map a Network Drive on Windows 10 Howchoo
How to Map a Network Drive on Windows 10 11 Computers Software Tested
Windows Map network drive ITS Services for D MTEC
35+ Images of How To Map A Network Drive Windows 10
How to Map a Network Drive in Windows 10 1. Open File Explorer and select This PC. 2. Click the Map network drive drop-down in the ribbon menu at the top, then select "Map network.
Follow the sets below to enable network discovery on Windows: Press Win + I to open the Settings app. Head over to Network & internet from the left pane and click on Advanced network settings on the right. Next, click on the Advanced sharing settings option under More Settings.
Here's how to map a network drive. 1. Click the Start Menu icon in the taskbar. 2. In the Start menu, click the Settings icon. 3. Click on "Network & Internet" in Windows Settings. 4. Under.
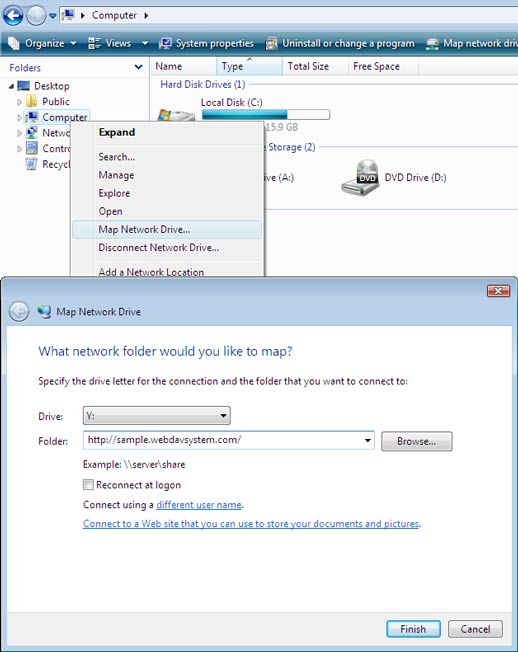
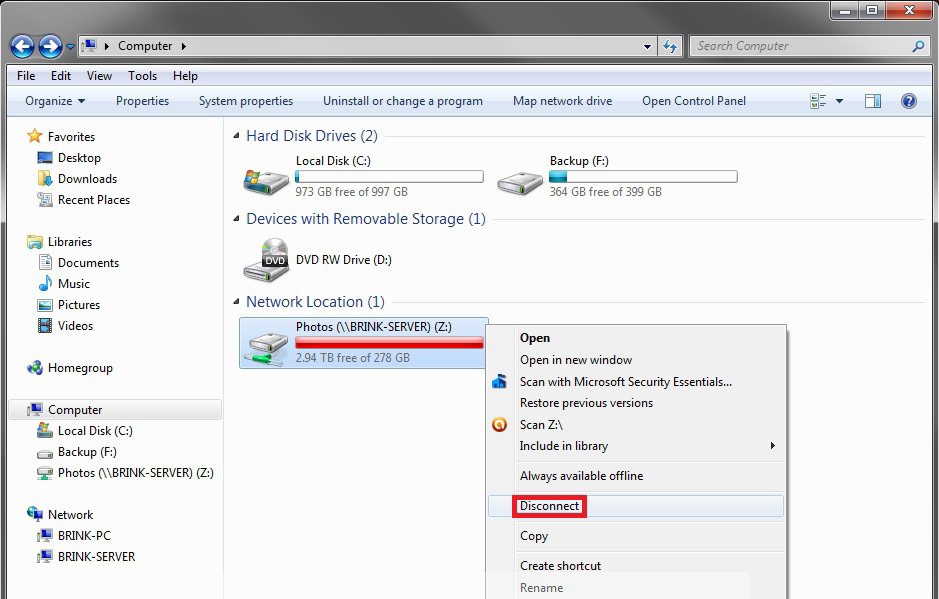
In Windows 8.x, open File Explorer and go to "This PC", and select the network drive you want to remove. Expand the "Computer" tab on the ribbon and click or tap the arrow for "Map network drive". A small menu is displayed, which includes an option that says "Disconnect network drive".
Connect your network drive to your router Most drives should offer some instructions, but generally the process is the same. Plug the drive into the wall via the included power adapter, and.
You can map a network drive on both Windows and Mac computers. Method 1 On Windows Download Article 1 Open Start . Click the Windows logo in the bottom-left corner of the screen. 2 Open File Explorer . Click the folder-shaped icon in the lower-left side of the Start window. 3 Click This PC.
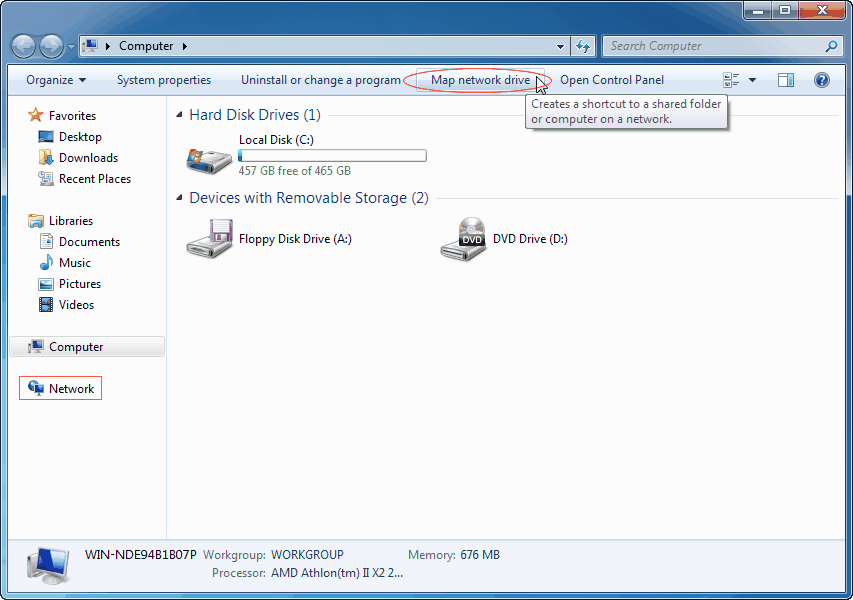
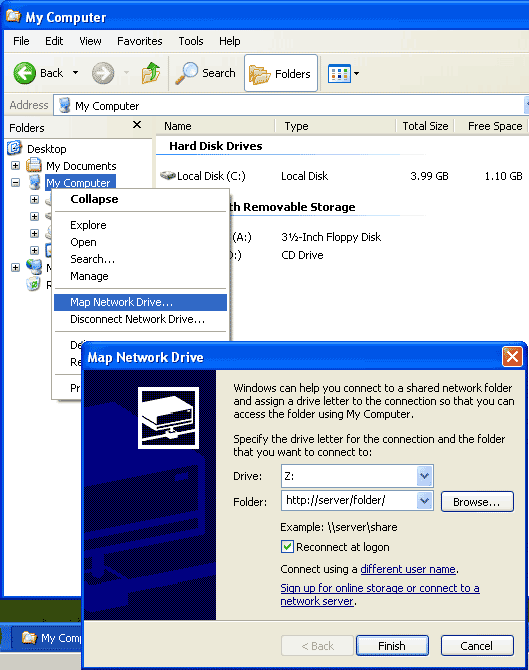
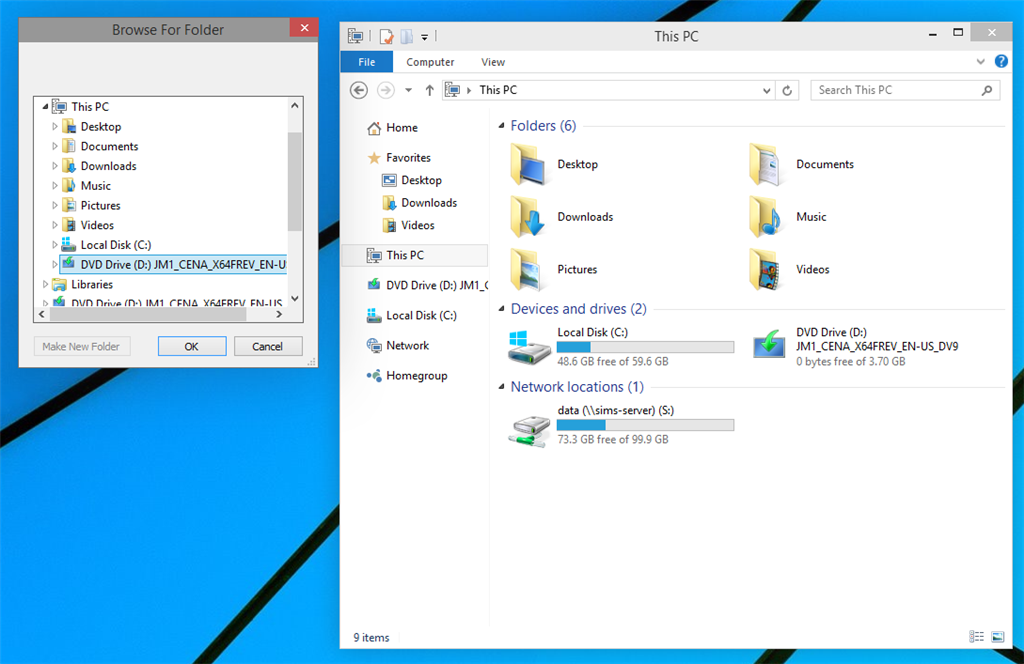
Select Start > Computer > Map Network Drive. 3. In the Drive list, select any available drive letter. 4. In the Folder box, type the path of the folder or computer, or select Browse to find the folder or computer. To connect every time you log on to your computer, select the Reconnect at logon check box. 5. Select Finish.
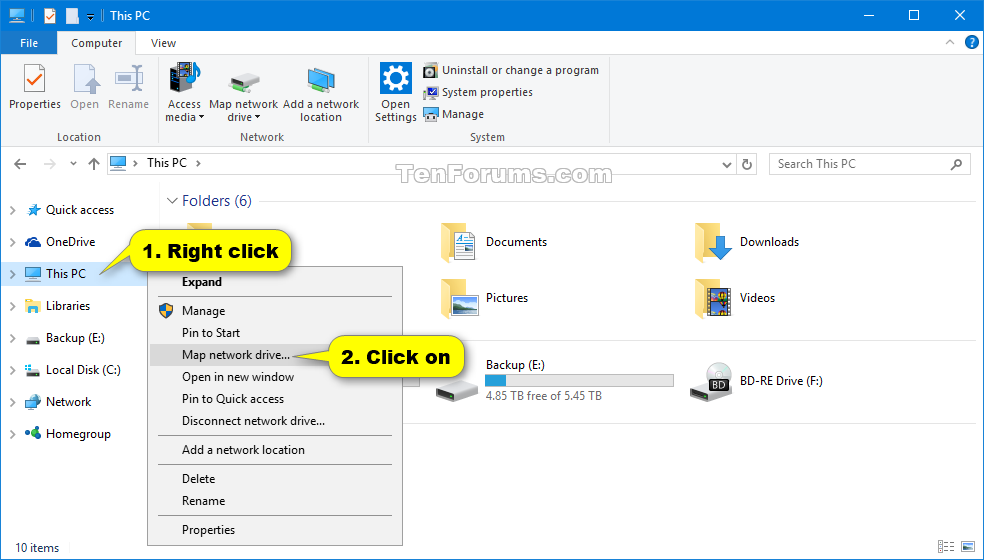
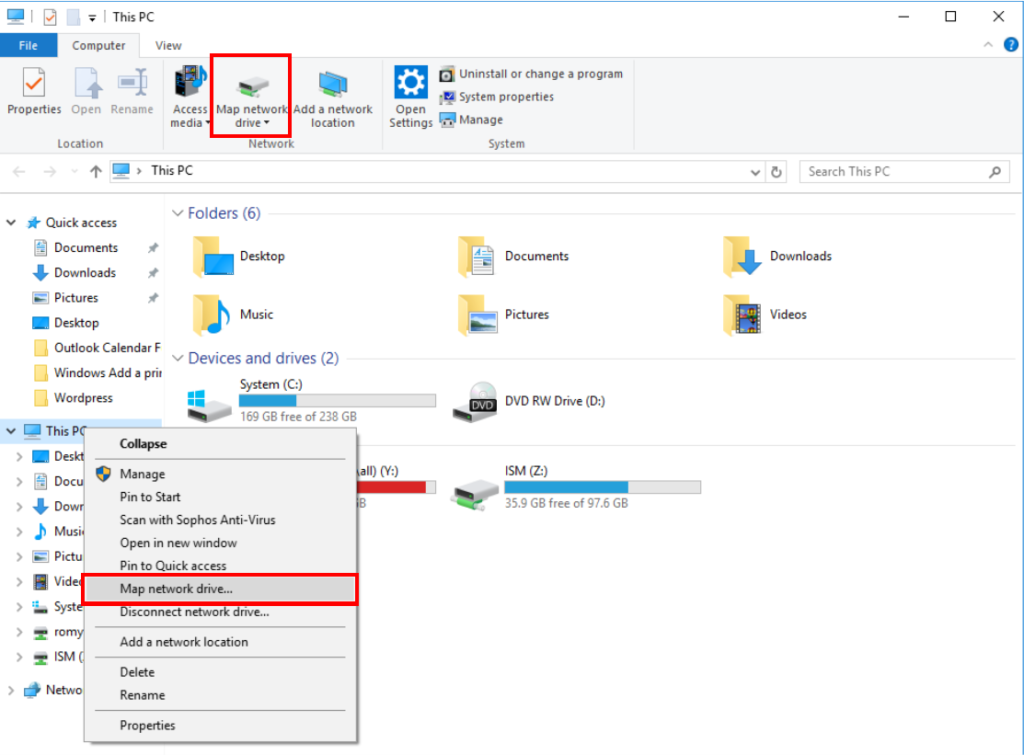
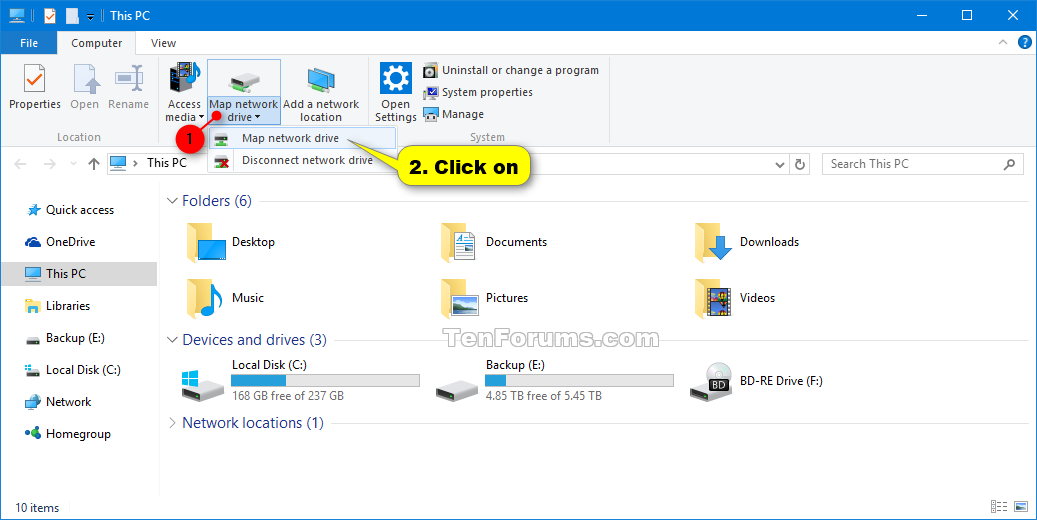
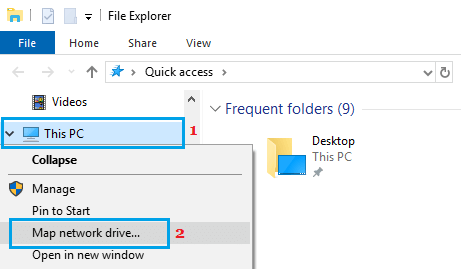
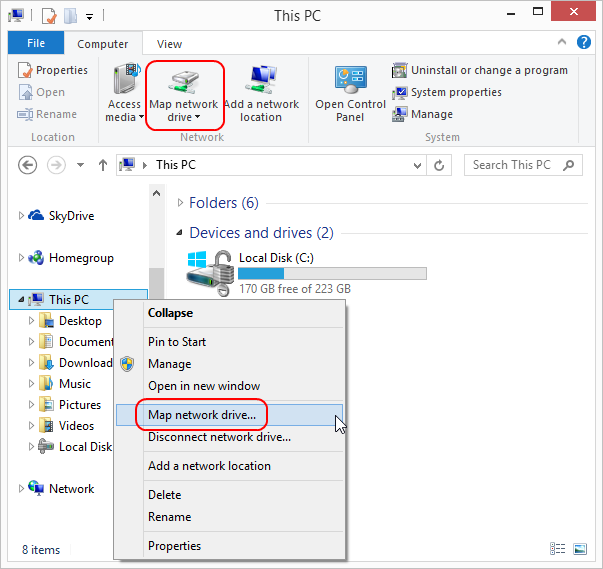
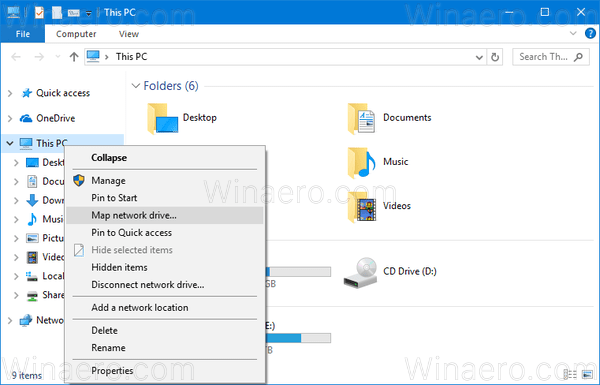
2 Open This PC in File Explorer, click/tap on the Computer tab, click/tap on the Map network drive button in the ribbon, and go to step 5 below. (see screenshot below) 3 Open File Explorer, right click or press and hold on This PC in the navigation pane, click/tap on Map network drive, and go to step 5 below. (see screenshot below)
Open File Explorer by pressing the Windows key + E. Click on "This PC" in the left-hand sidebar. Click on "Map network drive" in the toolbar at the top. In the "Map network drive" window, select a drive letter to use for the mapped drive. In the "Folder" field, enter the UNC path to the network folder you want to map.
1. Open "File Explorer" and click on "This PC" on the right pane. 2. Select the computer tab, and in the ribbon menu at the top, click on "Map network drive" and select "Map network drive.". 3. Select an alphabet to represent the drive folder from the drive drop-down list. click Browse. (The other computer has to be in the.
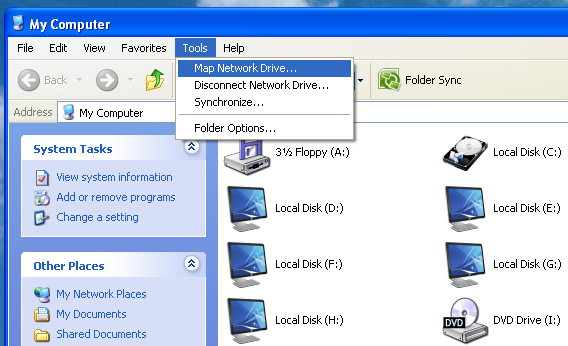
Mapping a network drive in these older Windows versions is simpler. On the Start menu or desktop, click Computer and then select Map network drive. Select the drive letter for the network drive you want to map. In the Folder field, enter the UNC path and then click Finish.
Having enabled network discovery, you may now map a network drive. After launching File Explorer, click "This PC" in the left pane. Next, click "Map Network Drive" in the Network group of the Computer tab. The window Map Network Drive will display. In the text box adjacent to "Drive," pick the desired drive letter.
After turning your PC's network discovery option on, follow the steps down below to map a network drive. Open File Explorer by pressing Win + E and click on This PC in the left-hand tab. While in This PC, hit Computer in the top left corner, and then go to Map network drive > Map network drive. In the Map Network Drive panel, choose a drive.
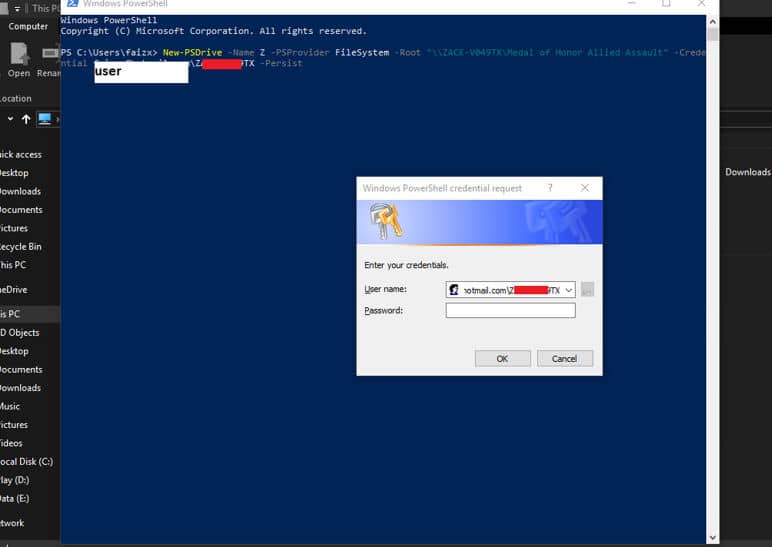
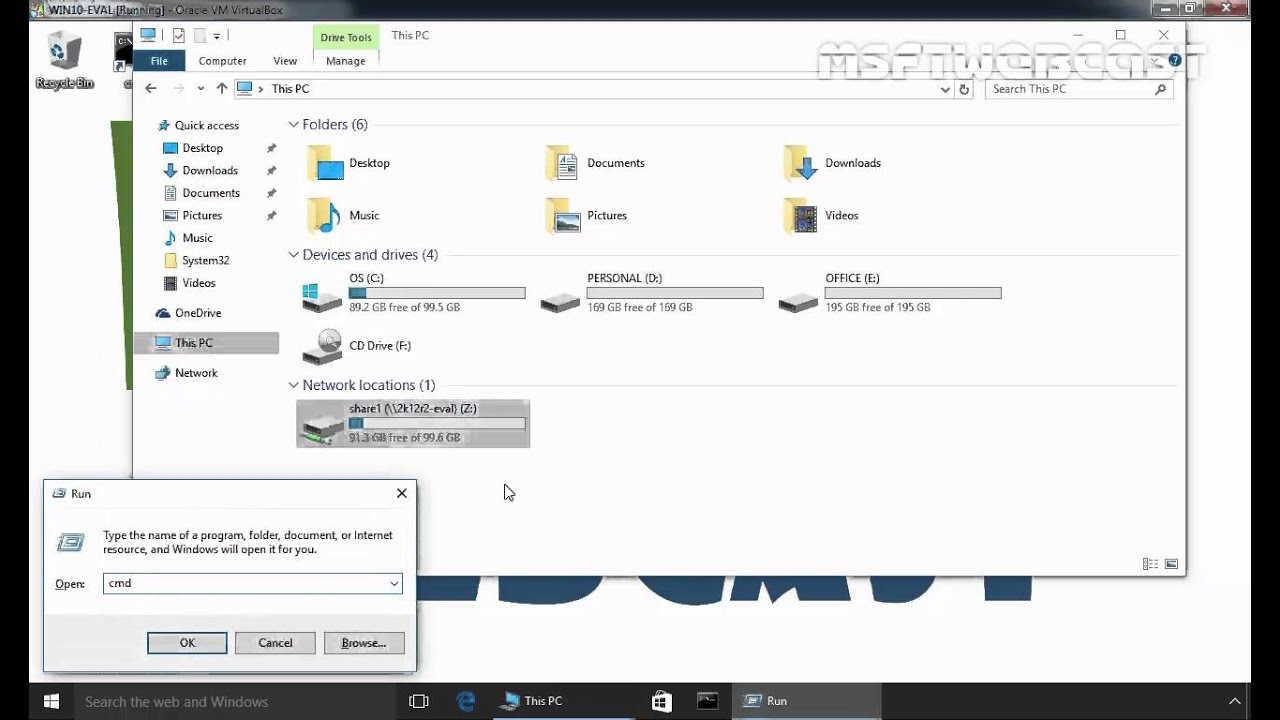
The two most common shared devices are mapped drive and printer. That said, you can configure or remove any mapped drive and network printer with the help of the net use command on your Windows computer. Net Use command parameters#. To map a network drive using net use command in Windows 11/10, you need to use the following command: Before.
Map a Network Drive in Windows 10. Launch File Explorer on the Taskbar or Start menu, and select This PC (formerly My Computer) in the Navigation Pane. Next select Map Network Drive under the.
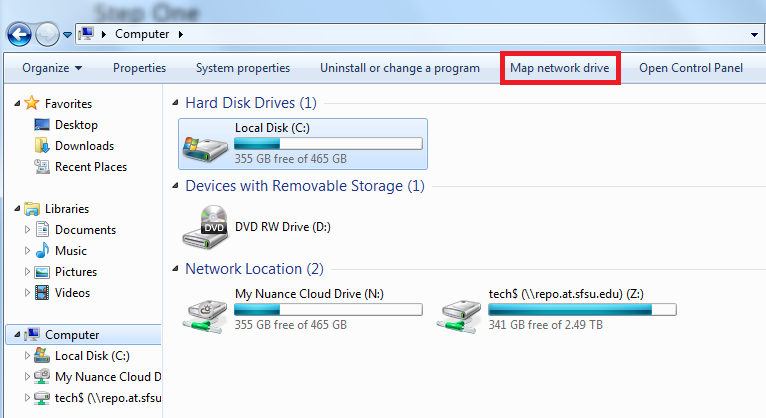
To map a network drive in Windows 10 or Windows 8: Click the Start button. In the search box, type This PC, then select This PC from the search results. Click Computer and then click Map network drive. In the window that opens, choose an available letter from the Drive list.
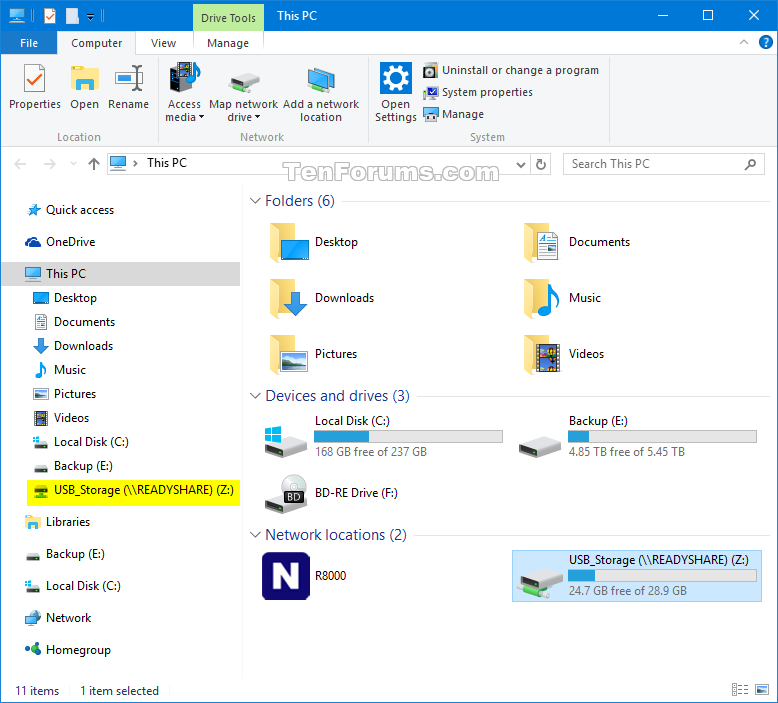
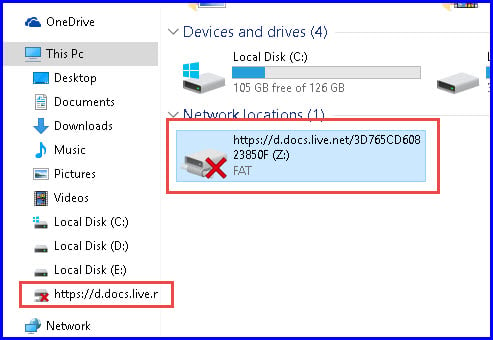
Mapping a Network drive in Windows 10 will basically create a Shortcut pointing to another Drive or Shared Folder located on your network. The mapped Drive or Folder will appear under This PC in File Explorer, allowing you to quickly access the Shared Folder, just like you would access any other Folder on your Local hard disk.
How to map a network drive in Windows 10? 1 Open File Explorer from the taskbar or the Start menu, or press the Windows logo key + E. 2 2. Select This PC from the left pane. Then, on the Computer tab, select Map network drive. See More….
Here are the steps to use this utility: Press Win + E and select This PC from the left pane. Click on the triple-dot icon and select Map Network Drive. Select a drive letter that's not in use. In the Folder box, enter the name of the computer and the folder you're trying to access.
Interested in how to map a network drive in Windows 10?This video will show you how to do it!This procedure is useful in many cases - but some of you might n.
Network drive mapping is one of the Windows 10 features that ensure ease of access, consistency, and network setup efficiency. However, most users reported that, after updating from v1909 to v2004, Windows 10 couldn't map the network drive. So, this article will show you a series of solutions to help you fix this issue.
How To Map A Network Drive In Windows 10.👍💕Subscribe for the next update notification: http://youtube.com/techreviewbangla?sub_confirmation=1Shared network.
Gallery of How To Map A Network Drive Windows 10 :
How to Map A Network Drive on a Windows 10 PC Tech How To
Mapping a Network Drive in Windows 10 How To LazyAdmin
Map Network Drive in Windows 10 Tutorials
How to map a Network Drive or add an FTP Drive in Windows 11 10
Map a Network Drive in Windows 10 Information Technology Services

How to Map a Network Drive in Windows

How To Map Network Drive Windows 10 Maping Resources
Map Network Drive in Windows 10 Tutorials
How to Map a Network Drive in Windows 10 8 and 7 Step by Step
How to map a network drive in Windows 10
Map Network Drive Windows Xp Sunday River Trail Map
How to Map Network Drive in Windows 10

Map network drive in Windows 8 1 Windows 8 and Windows 7 4sysops

Map Network Drive in Windows 10 Tutorials
How to map a network drive Windows 7 Academic Technology Help Center

PCSC Map Network Drive Tutorial
:max_bytes(150000):strip_icc()/002-map-a-network-drive-windows-10-4689016-1f4a3773ac3e471fa5f2eb38d492dd08.jpg)
How to Map a Network Drive

map drive QNAP NAS Community Forum
How to Map a Network Drive in Windows 7 or Above AbacusNext Client

How to Map a Network Drive on Windows 10 Howchoo
map drive QNAP NAS Community Forum
How to Map a Network Drive in Windows 7 or Above AbacusNext Client
How to Map a Network Drive on Windows 10 Howchoo

How to Map Network Drive in Windows 7 Modem Friendly
How do I map a network drive on Windows 10 EVE Support
How to Map a Network Drive in Windows 10 8 and 7 Step by Step

How to Map a Network Drive in Windows 10
How To Easily Map A Network Drive In Windows 10
How to Map a Network Drive in Windows 10 Laptop Mag

How to Map a Network Drive in Windows 7 Windows 8 Mac OS X Digital
How to Map Network Drive in Windows 10
Map A Network Drive Windows 7 Gadgets 2018

How to Map A Network Drive From Windows XP To Windows 7
Map Network Drive Windows 8 Vector U S Map

How To Easily Map A Network Drive In Windows 10

How to Map a Network Drive in Windows 10
Map Network Drive Command Line Password Recovery
/CMD2-4f3f6965094449f684aadc80e19de89f.png)
How to Map a Network Drive in Windows 7 and 8
How to map a network drive in Windows 10 TechRadar

How To Map a Network Drive in Windows

How To Easily Map A Network Drive In Windows 10

How to Map A Network Drive on a Windows 10 PC Tech How To

Map network drive in Windows 8 1 Windows 8 and Windows 7 4sysops
How do I map a network drive in Windows Answer NETGEAR Support

How To How To Map A Network Drive In The Windows 10 System
Mapping a network drive in Windows 10 Here s how to do it Tom s Guide
Map network drive in Windows 8 1 Windows 8 and Windows 7 4sysops

How to Map Network Drive Windows 10 5 Methods Itechguides com
How to map a network drive in Windows 10 TechRadar
How To Map a Network Drive in Windows
How To Easily Map A Network Drive In Windows 10
How to Map A Network Drive on a Windows 10 PC Tech How To
Map network drive in Windows 8 1 Windows 8 and Windows 7 4sysops
How do I map a network drive in Windows Answer NETGEAR Support
How To How To Map A Network Drive In The Windows 10 System
Mapping a network drive in Windows 10 Here s how to do it Tom s Guide
Map network drive in Windows 8 1 Windows 8 and Windows 7 4sysops
How to Map Network Drive Windows 10 5 Methods Itechguides com

Map a Network Drive in Windows 10 Better Host Review
how to remove map network drive in windows 10 Windows 10 Forums
:max_bytes(150000):strip_icc()/001-how-to-map-a-network-drive-in-windows-7-and-8-d0afa6084dba45aa855eb8ea77f973cf.jpg)
How to Map a Network Drive in Windows 7 and 8

How to Map a Network Drive Windows 7 and Windows 10 or in Virtual
How to Map Network Drive in Windows 10

How to Map Network Drive Windows 10
Windows 10 Map Network Drive Missing Living Room Design 2020
Map a Network Drive Windows 10 Information Technology

How to map a network drive in Windows 10 ITS Knowledge Base Bethel

How to map Network Drive Windows 10 Tutorial
How to Map a Network Drive in Windows 10 YouTube

Map network drive option in Windows 8
Map Network Drive in Windows 10 Tutorials

Windows 10 How to Map a Network Drive YouTube
Cisco Ccna Exam Questions Mapping a Network Drive How to Map a
How To Map A Network Drive In Windows 10
How to Map a Network Drive in Windows 7 Windows 7 Support
How to Map Network Drive Windows 10
How To Map A Network Drive Windows 10 - The pictures related to be able to How To Map A Network Drive Windows 10 in the following paragraphs, hopefully they will can be useful and will increase your knowledge. Appreciate you for making the effort to be able to visit our website and even read our articles. Cya ~.