How To Map A Network Drive
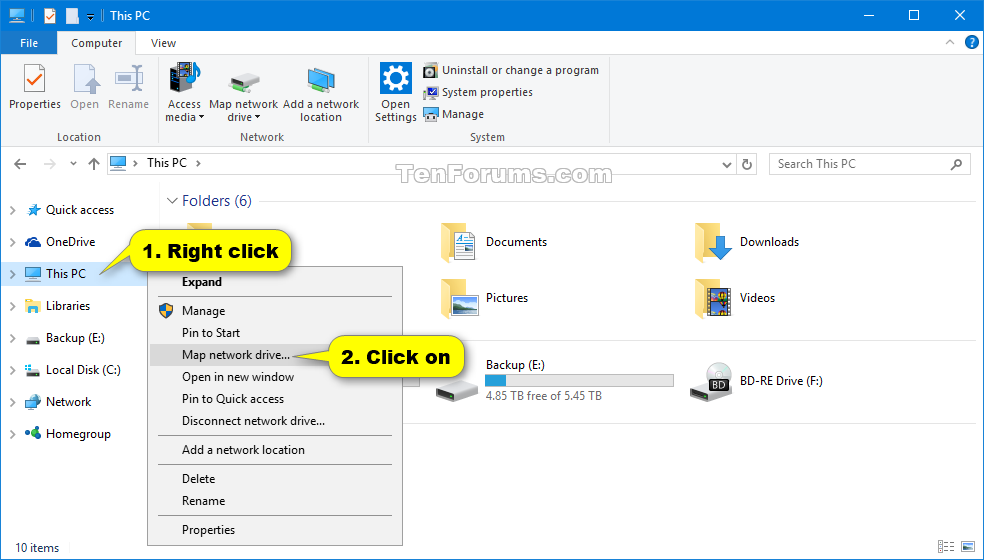
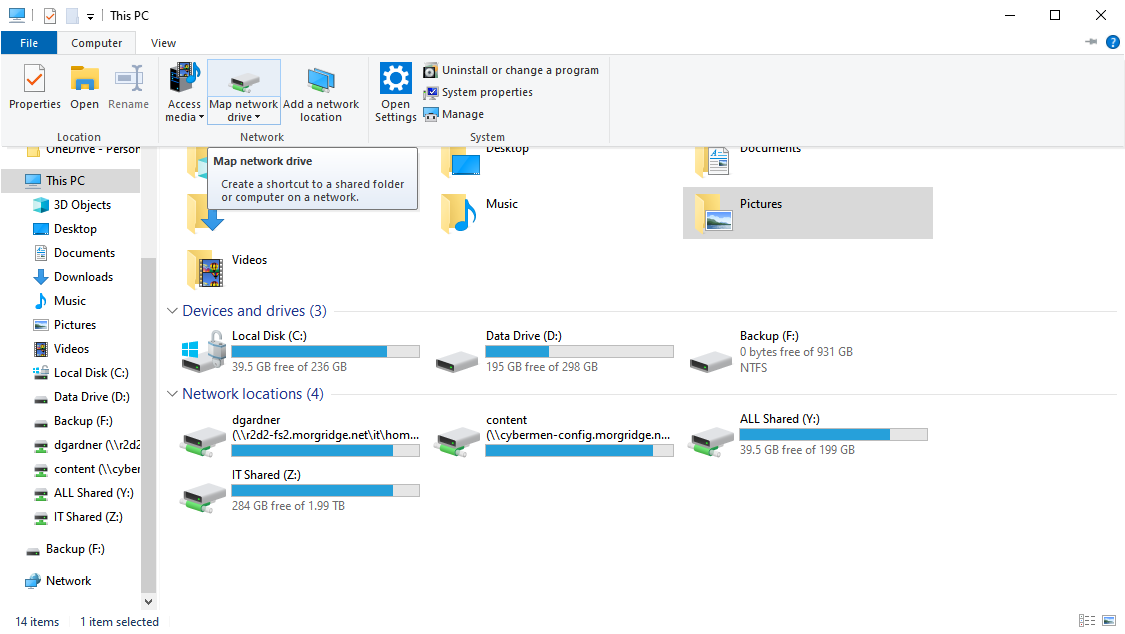
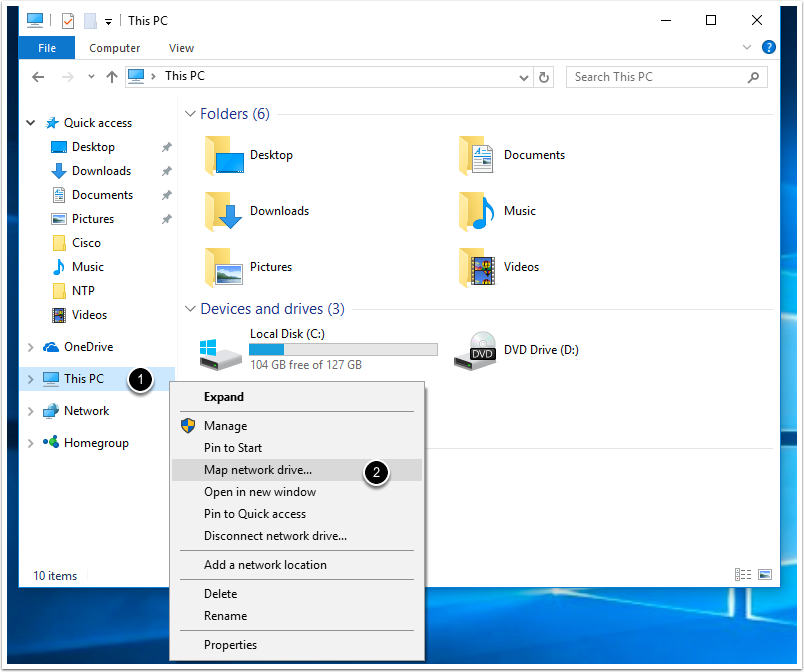
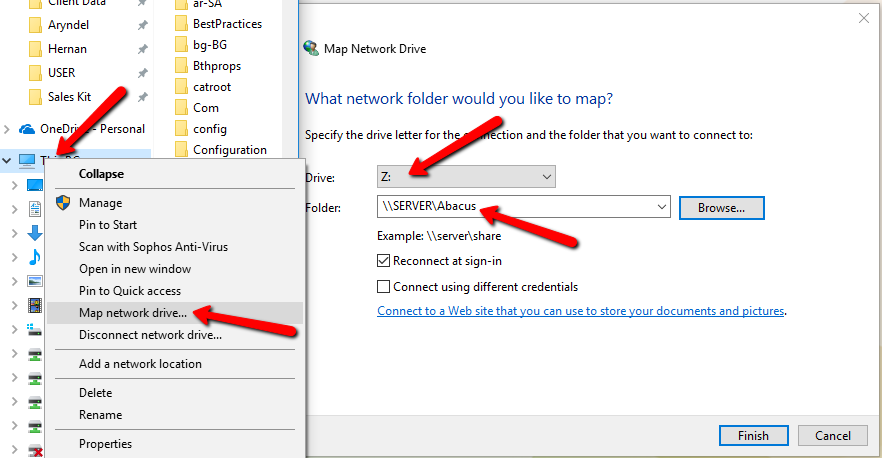
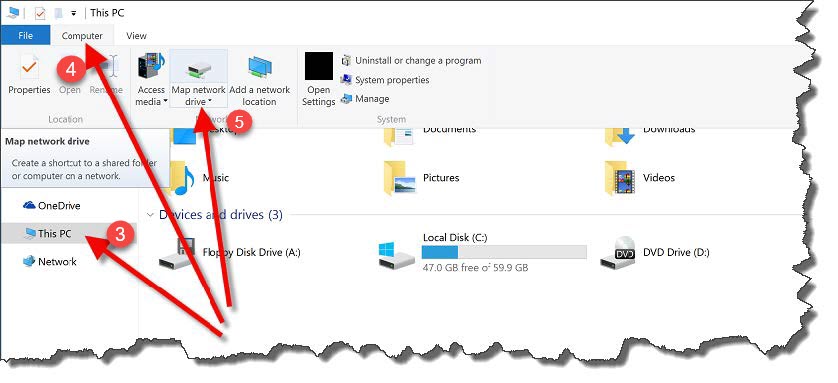
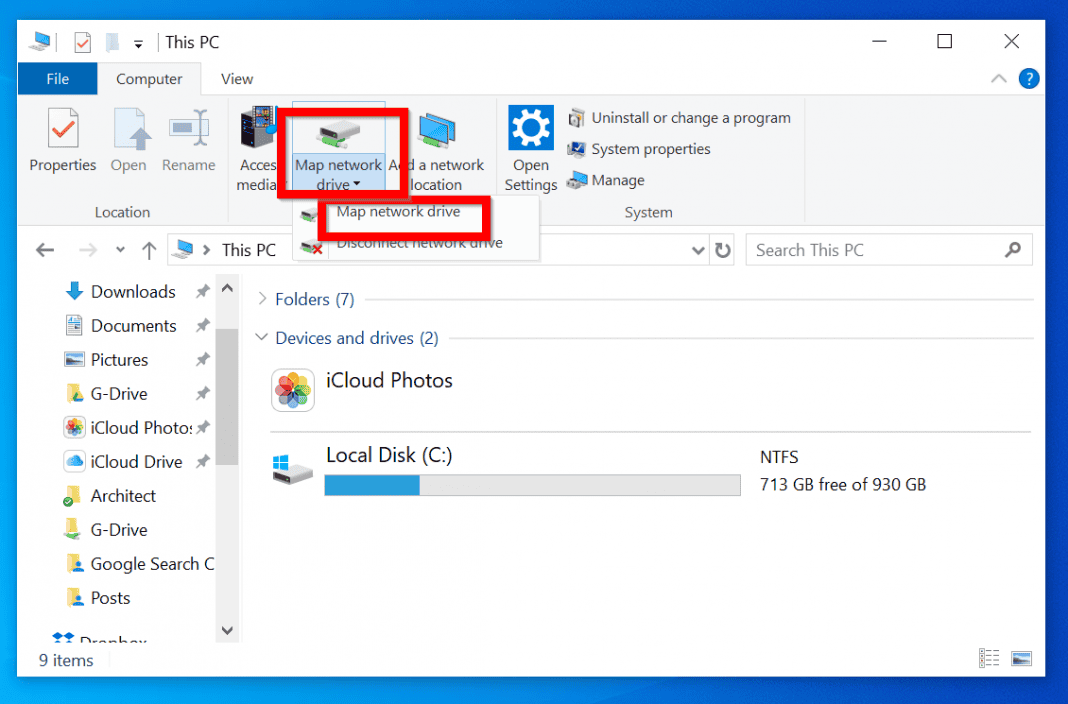
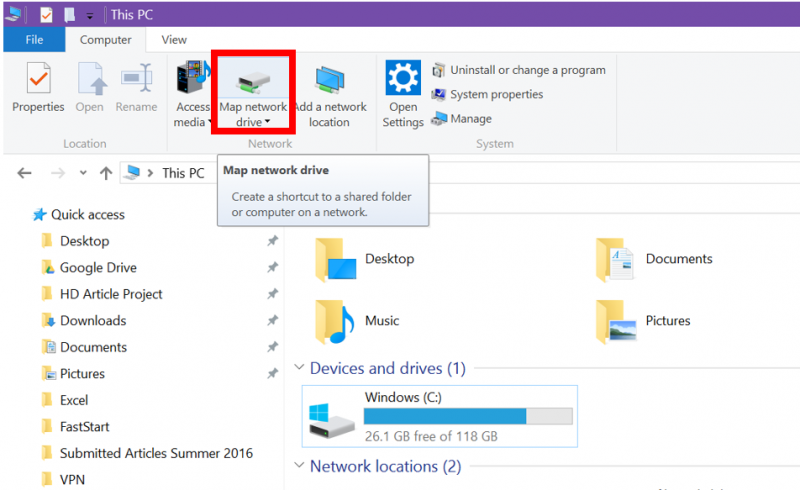
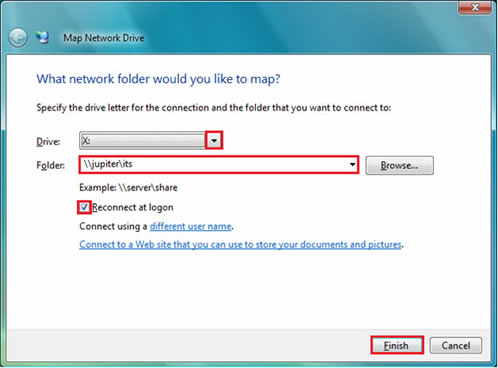
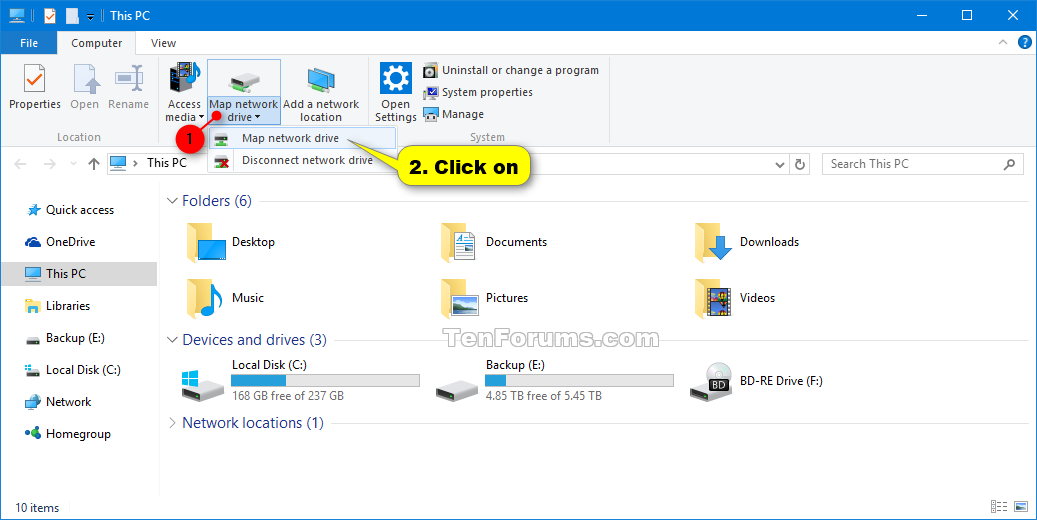
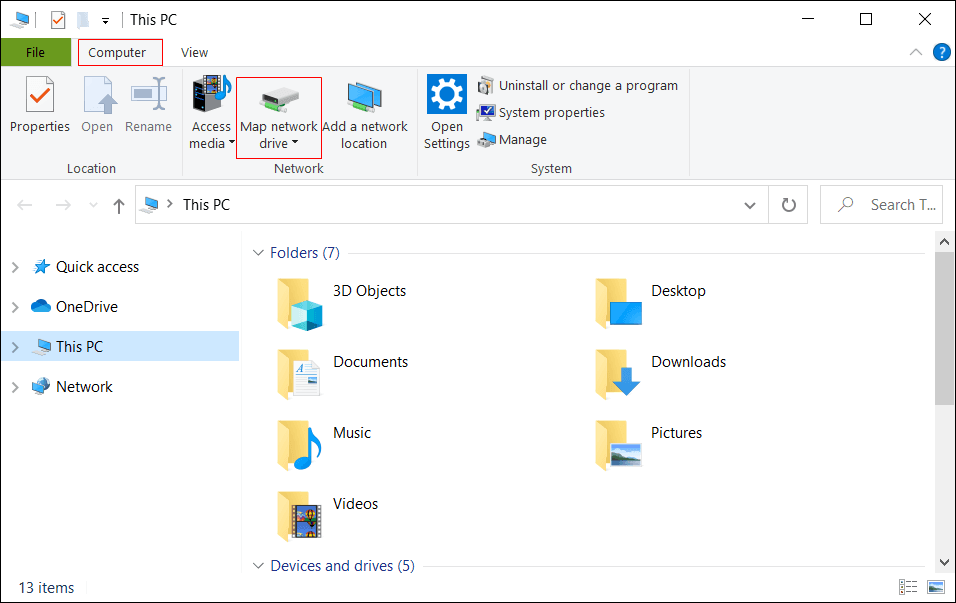
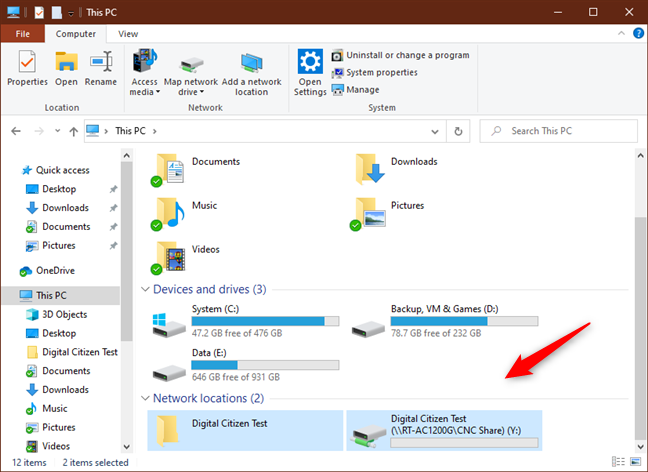
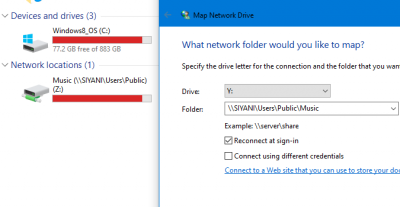
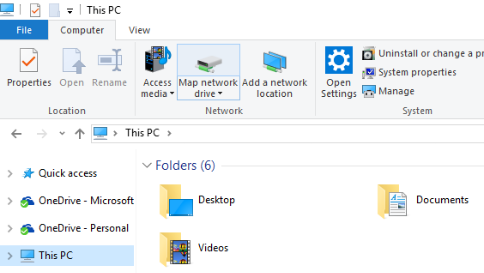
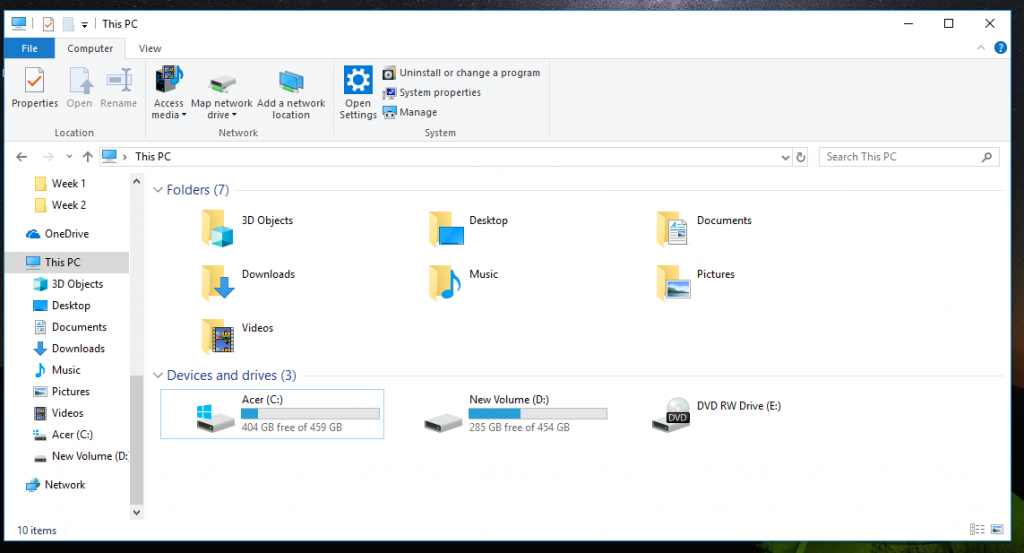
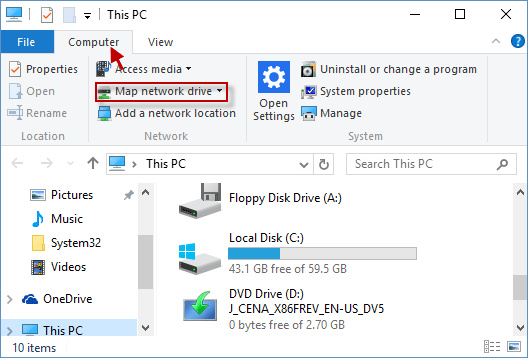
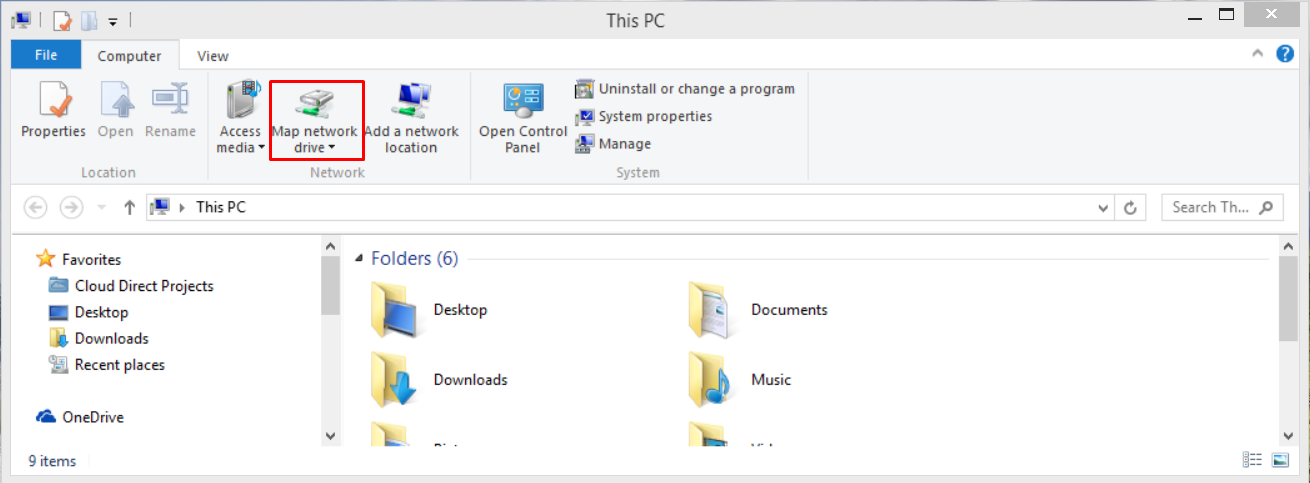
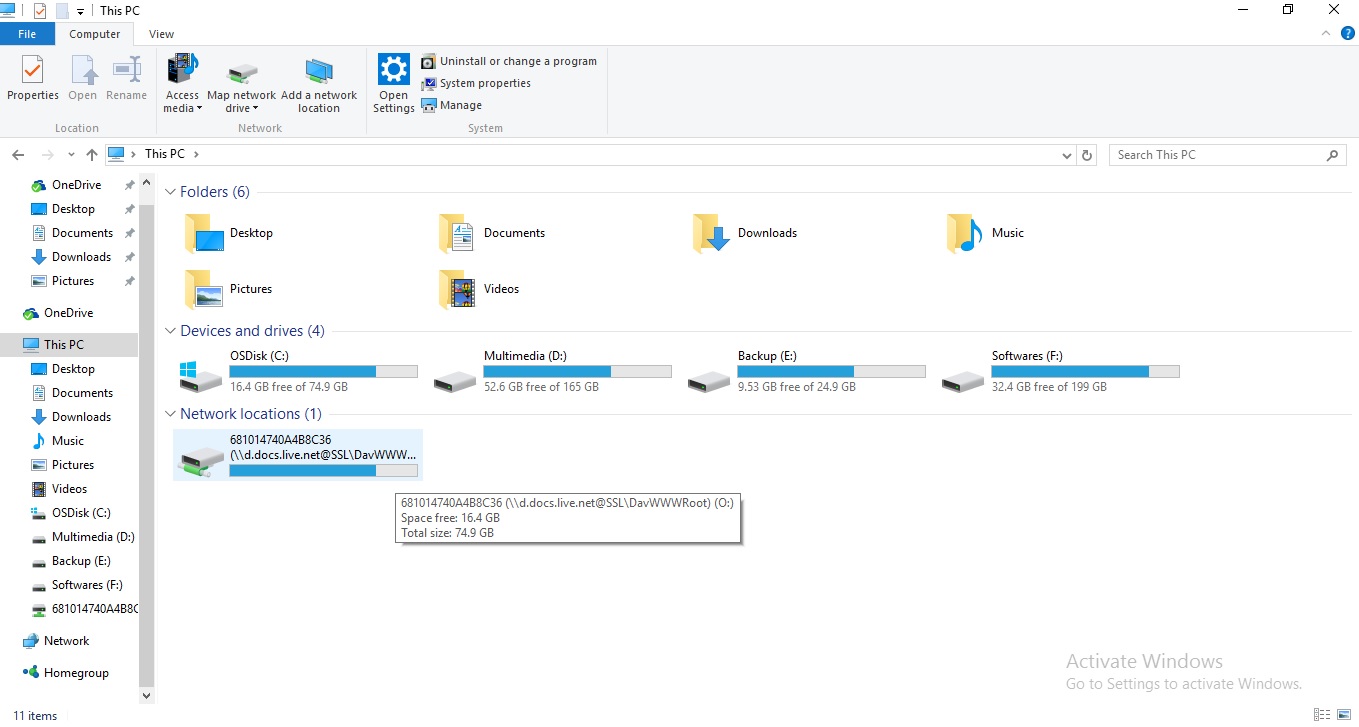
Open File Explorer from the taskbar or the Start menu, or press the Windows logo key + E. Select This PC from the left pane. Then, on the File Explorer ribbon, select More > Map network drive. In the Drive list, select a drive letter. (Any available letter will do.) Map a Network Drive With network discovery turned on, you can now map a network drive. First, open File Explorer and then click "This PC" in the left-hand pane. Next, click "Map Network Drive" in the Network group of the Computer tab. The Map Network Drive window will appear.
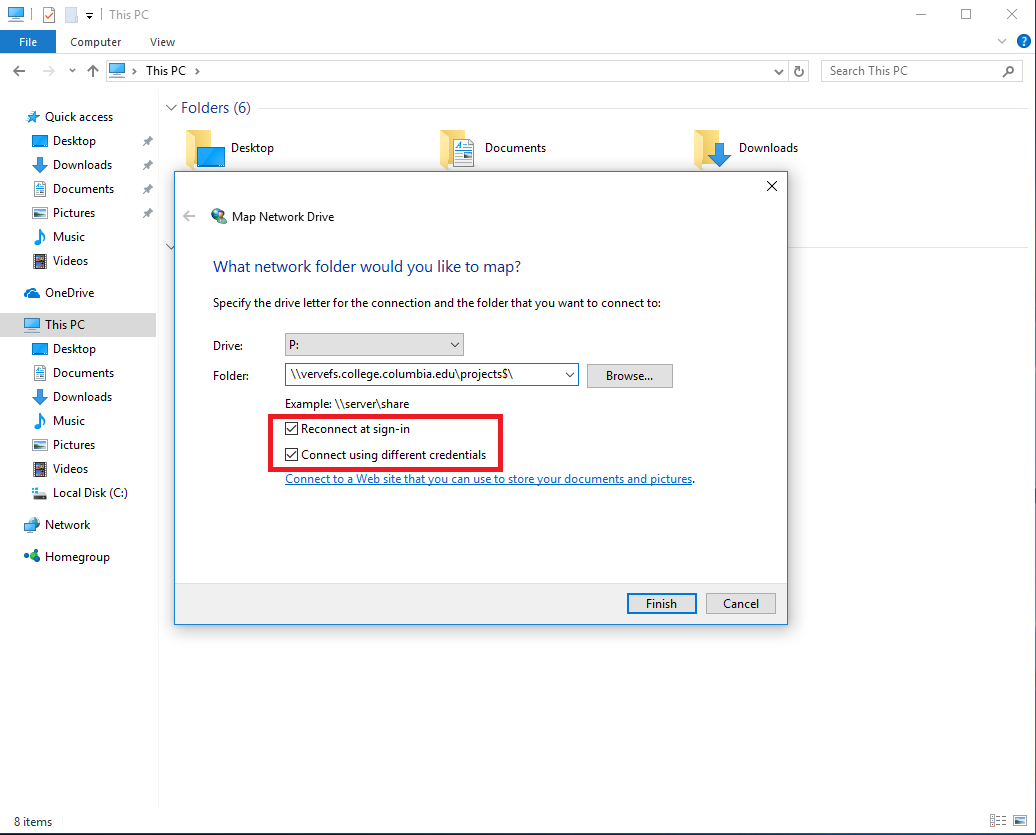
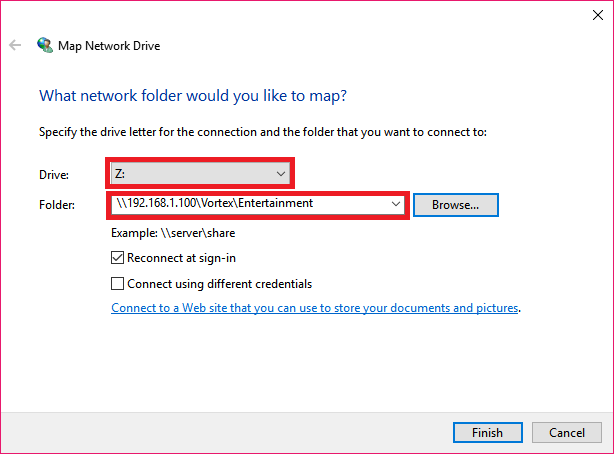
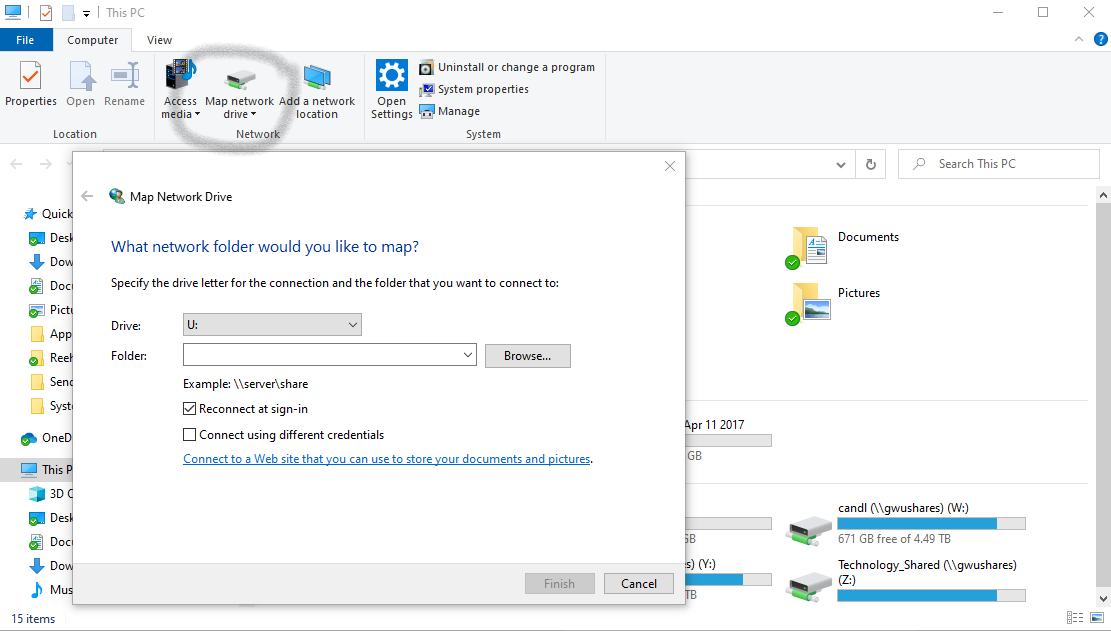
You can map a network drive on both Windows and Mac computers. Method 1 On Windows Download Article 1 Open Start . Click the Windows logo in the bottom-left corner of the screen. 2 Open File Explorer . Click the folder-shaped icon in the lower-left side of the Start window. 3 Click This PC. In the "Map Network Drive" window, click the "Drive" drop-down menu and select a drive letter that you will assign to the network drive. It can be any letter in the list, depending on your personal preference. In the "Folder" field, enter the network device and share name.
Related Posts of How To Map A Network Drive :
Map Network Drive in Windows 10 Tutorials
How to Map Network Drives in Windows 10 Columbia College Information
How To Map A Network Drive In Windows 11 24htech Asia Mobile Legends

How do I map a network drive Help Desk

How To Map Network Drive World Map 07
map a network drive png Networking Network drive Music pictures
26+ Images of How To Map A Network Drive

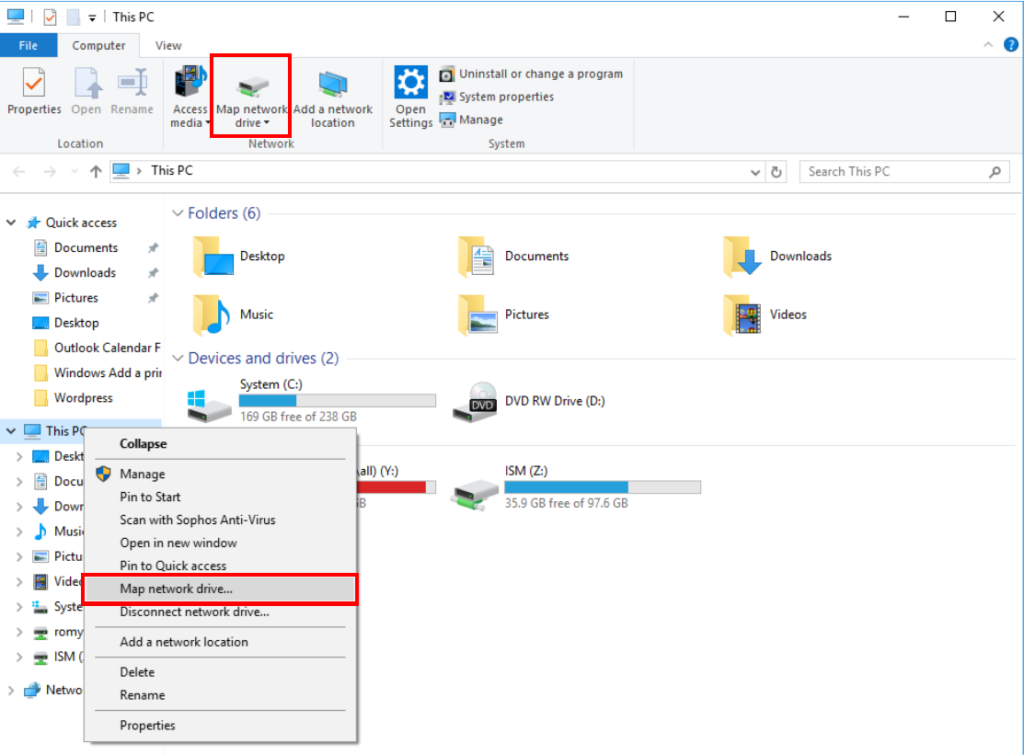
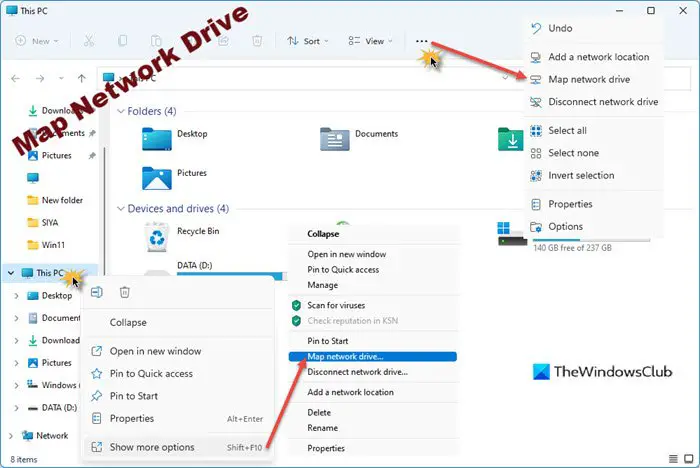
How to Map a Network Drive in Windows 11 It takes just a few steps to map a network drive via the This PC window. Open File Explorer ( WIN+E ). Right-click This PC from the left column, and select Map network drive. If you don't see anything in a left column, go to View > Show > Navigation pane.
4. Select a folder. Click a folder on the left side of the Finder window to open it, then click a folder that you want to use as the network drive to select the folder. 5. Click File. It's a menu item at the top of the screen. Clicking it prompts a drop-down menu.
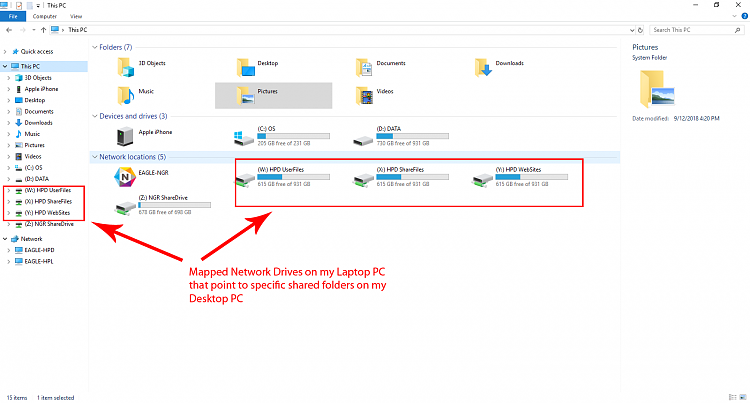
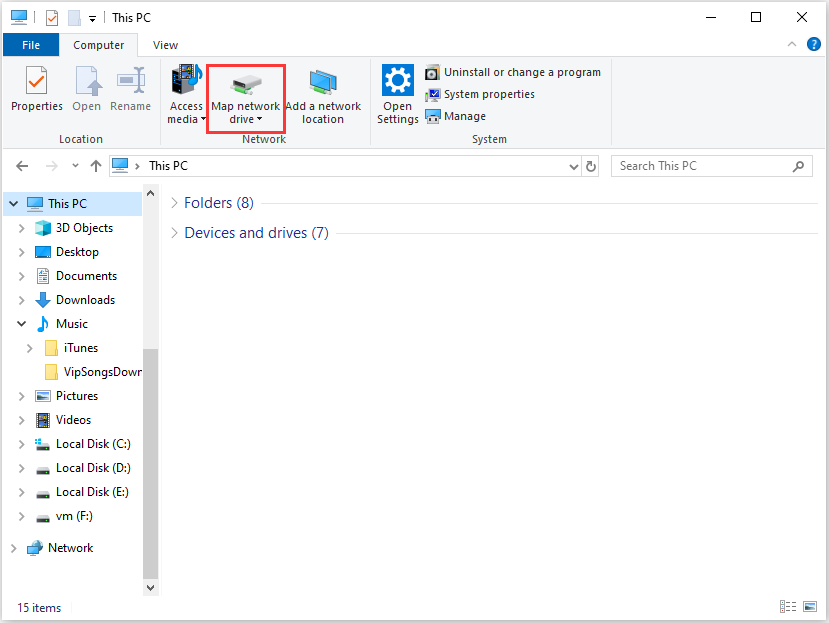
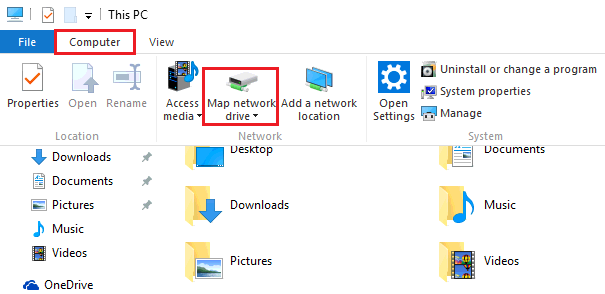
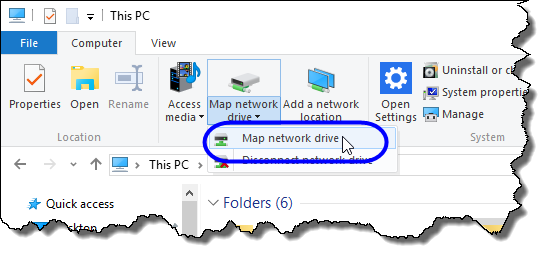
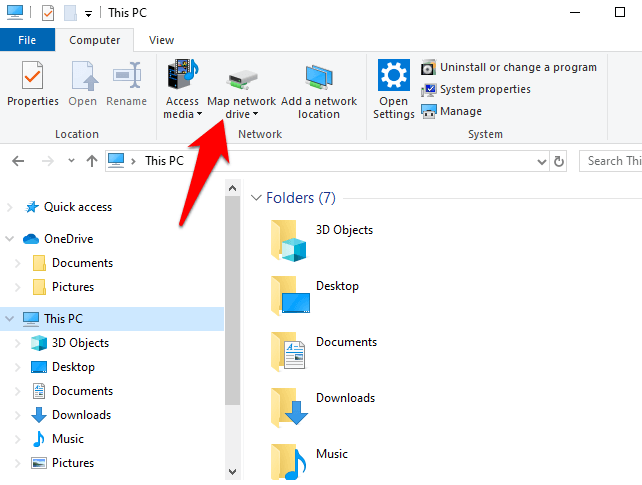
1. Open File Explorer and select This PC. 2. Click the Map network drive drop-down in the ribbon menu at the top, then select "Map network drive." (This is under the Computer tab, which.
1. Map a Network Drive Using File Explorer. Once you have turned on network discovery, you can map a network drive in Windows 11 using File Explorer. Press Win + E to open File Explorer directly, and click on This PC in the left pane. Right-click on This PC and select the Map network drive. button in the context menu that appears.
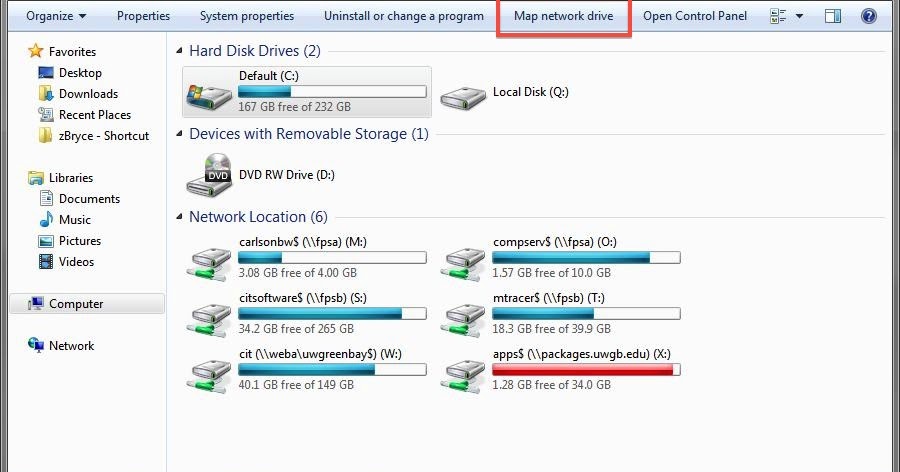
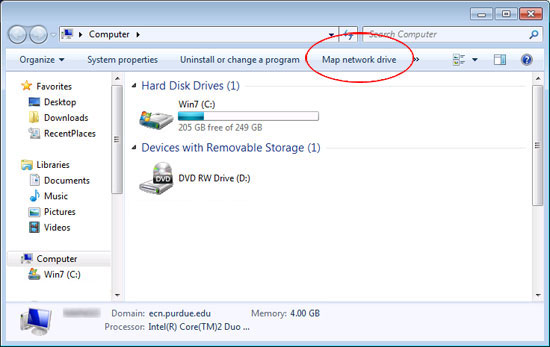
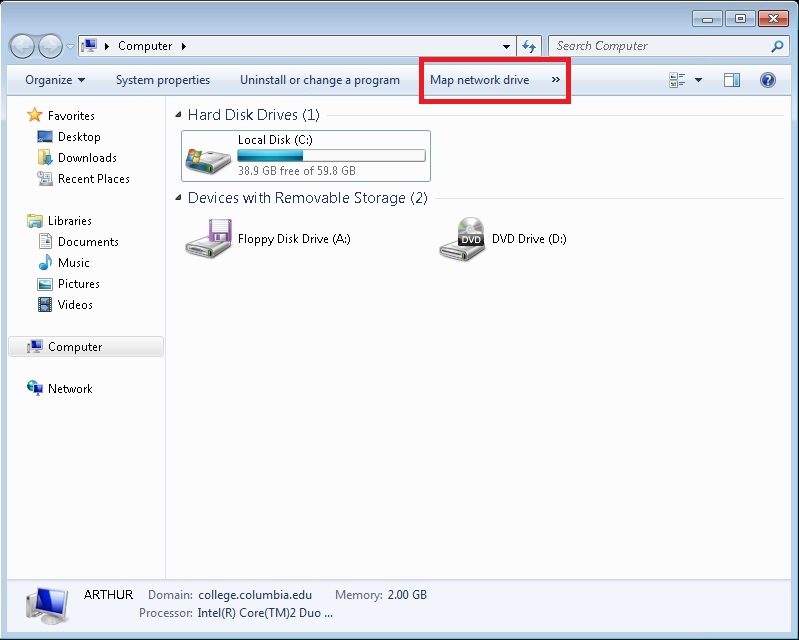
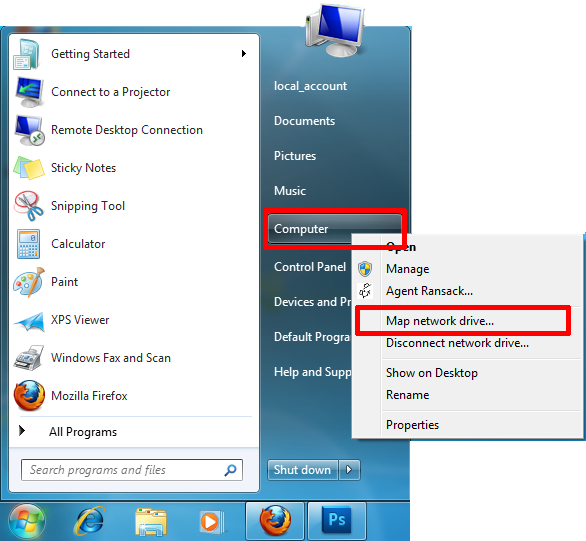
To map a network drive in Windows 10 or Windows 8: Click the Start button. In the search box, type This PC, then select This PC from the search results. Click Computer and then click Map network drive. In the window that opens, choose an available letter from the Drive list.
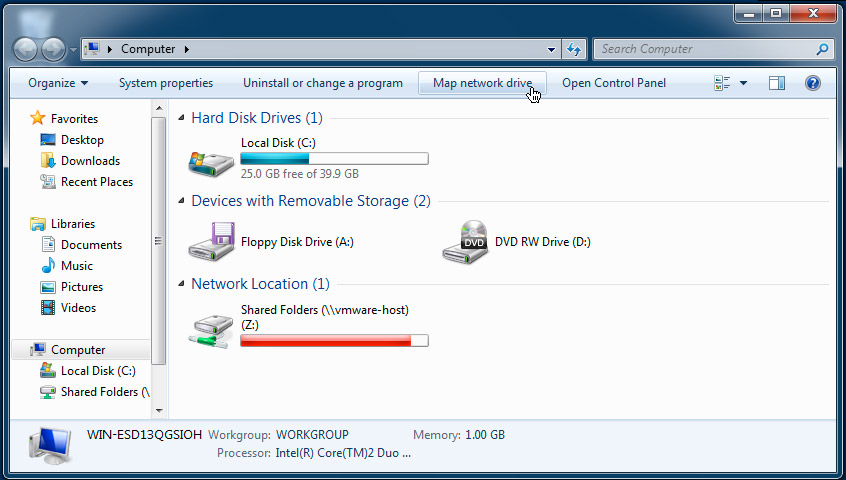
In Windows 10 and 8.1, select This PC > Computer > Map network drive. On Windows 7, it's Computer > Map network drive. From the Map Network Drive window, choose the drive letter you wish to use.
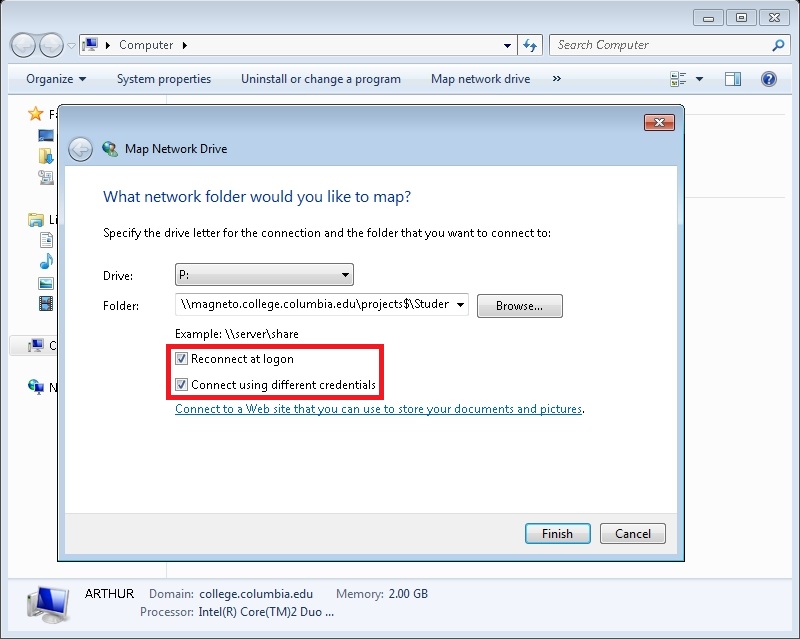
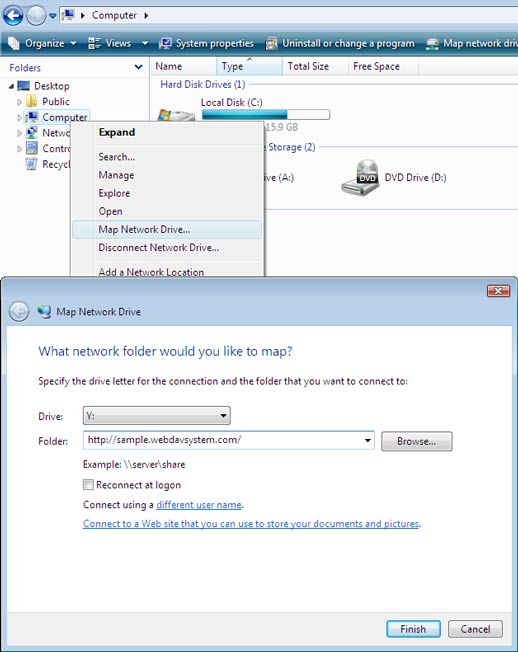
1. Select Start > Computer > Map Network Drive. 3. In the Drive list, select any available drive letter. 4. In the Folder box, type the path of the folder or computer, or select Browse to find the folder or computer. To connect every time you log on to your computer, select the Reconnect at logon check box.
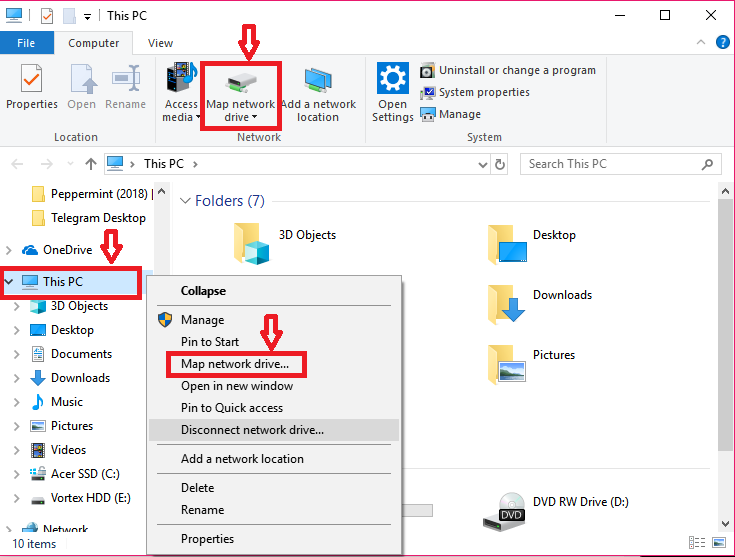
2 Open This PC in File Explorer, click/tap on the Computer tab, click/tap on the Map network drive button in the ribbon, and go to step 5 below. (see screenshot below) 3 Open File Explorer, right click or press and hold on This PC in the navigation pane, click/tap on Map network drive, and go to step 5 below. (see screenshot below)
Connect your network drive to your router Most drives should offer some instructions, but generally the process is the same. Plug the drive into the wall via the included power adapter, and.
After turning your PC's network discovery option on, follow the steps down below to map a network drive. Open File Explorer by pressing Win + E and click on This PC in the left-hand tab. While in This PC, hit Computer in the top left corner, and then go to Map network drive > Map network drive. In the Map Network Drive panel, choose a drive.
Here's how to map a network drive. 1. Click the Start Menu icon in the taskbar. 2. In the Start menu, click the Settings icon. 3. Click on "Network & Internet" in Windows Settings. 4. Under.
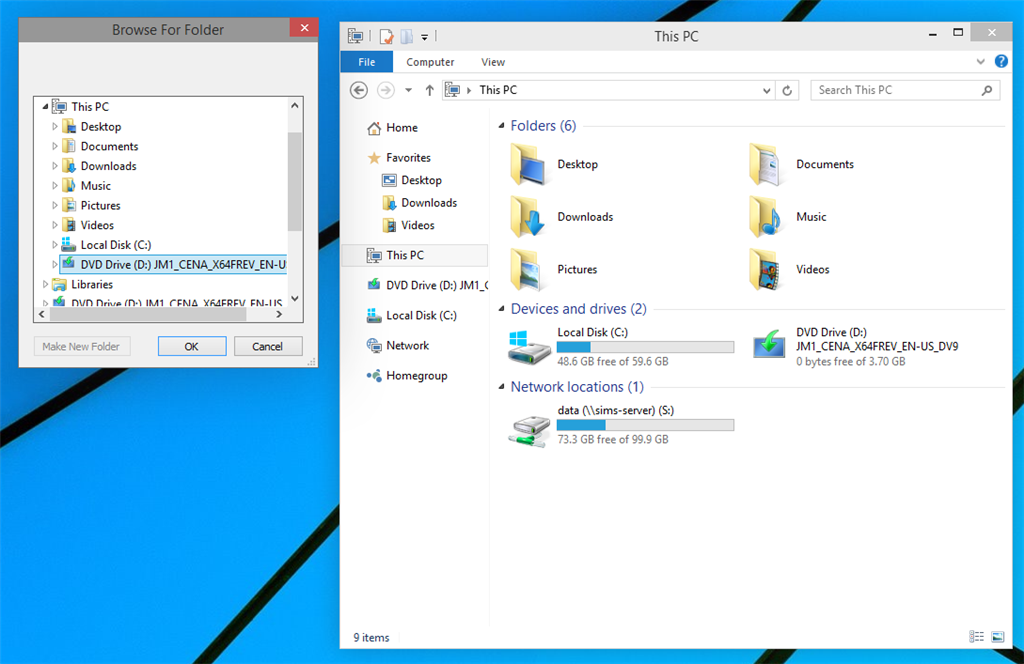
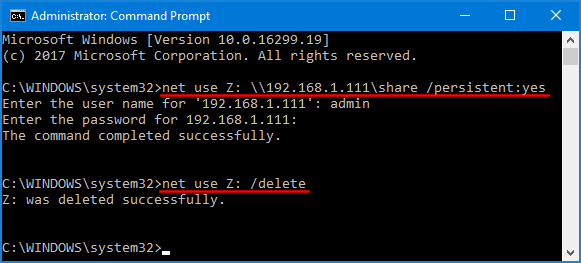
When typing the network path, you must start with "\\" followed by the name of the computer that is sharing the folder you want to map, followed by "\" and the name of the shared network folder. If you don't really know these details, you can always click or tap "Browse".
1. Open "File Explorer" and click on "This PC" on the right pane. 2. Select the computer tab, and in the ribbon menu at the top, click on "Map network drive" and select "Map network drive.". 3. Select an alphabet to represent the drive folder from the drive drop-down list. click Browse. (The other computer has to be in the.
How To Map A Network Drive In Windows 10.👍💕Subscribe for the next update notification: http://youtube.com/techreviewbangla?sub_confirmation=1Shared network.
Here are the steps to use this utility: Press Win + E and select This PC from the left pane. Click on the triple-dot icon and select Map Network Drive. Select a drive letter that's not in use. In the Folder box, enter the name of the computer and the folder you're trying to access.
Gallery of How To Map A Network Drive :
How To Map A Drive Windows 7 Cape May County Map

How do I map a network drive Help Desk
Home Drive Not Mapping Windows 10

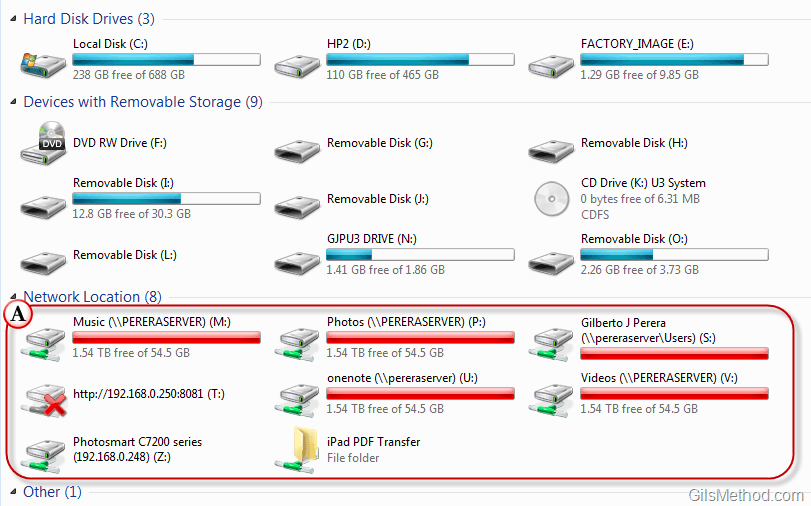
Windows Networking How to Work With Network Drives Network Locations
How to Map Network Drive Windows 10 5 Methods Itechguides com
How To Map A Network Drive In Windows 11 24htech Asia Mobile Legends
15 How to map a network drive in windows image HD Wallpaper
26 Map A Network Drive Windows 7 Online Map Around The World
What is a Network Drive How is it Set Up Modem Friendly
Windows Map network drive ITS Services for D GESS

How to map a network drive in Windows 10
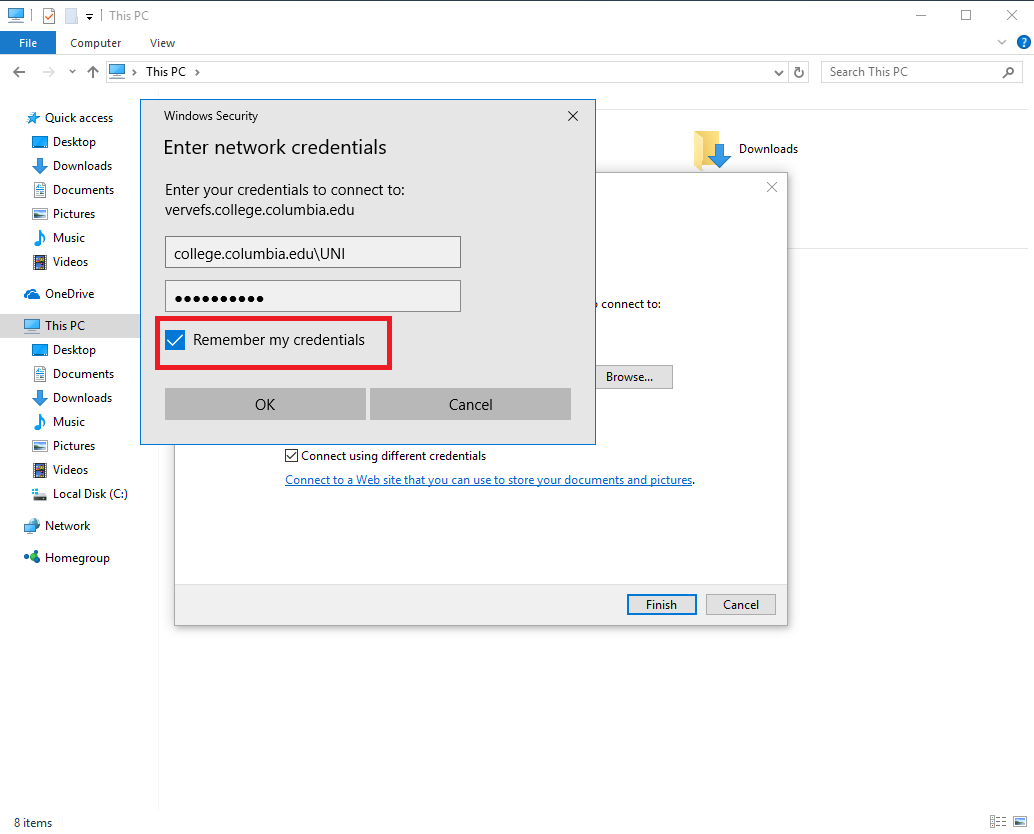
How to Map Network Drives in Windows 10 Columbia College Information
How To Map A Network Drive Windows 7 Maping Resources
Map a Network Drive in Windows 10 Information Technology Services
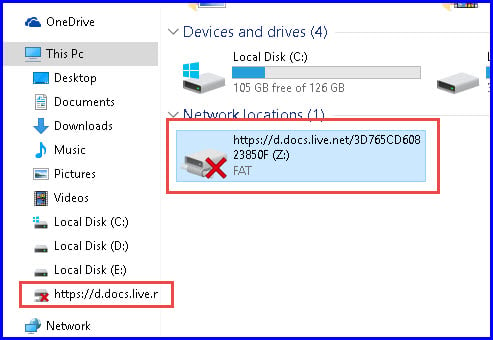
Network drive mapped as X can be seen be not accessed Page 2
How to Mount and Map a Network Drive in Windows 10 Dignited
Dealing with network drive mappings in Citrix environments JAMES
Map Network Drive in Windows 10 Tutorials
How to map a Network Drive or add an FTP Drive in Windows 11 10

How to Map a Network Drive on Windows 10 Howchoo

Information Technology Services Configuring a Personal Network Drive
How to Map a Network Drive in Windows 10 8 and 7 Step by Step

How To Map A Network Drive On Windows 10 Pc 2022 Tip Bollyinside
How to Map A Network Drive on a Windows 10 PC Tech How To
How to Mount and Map a Network Drive in Windows 10 Dignited

How to Map Network Drive using Group Policy
Map Network Drive in Windows 10 Tutorials

IT Computers Solutions Securities How to Create Map Network Drive In

How to Map a Network Drive in Windows 10 Laptop Mag

How to Set Up and Use a Network Drive

Windows 10 Networking Guide How To Map Network Drive In 2021 Mobile

What Is Network Drive And How To Map It Bitwarsoft

How to Map OneDrive as a Network Drive AvoidErrors
2 Ways To Map Network Drive In Windows 10 Techcult Mobile Legends
15 How to map a network drive in windows image HD Wallpaper
:max_bytes(150000):strip_icc()/networkdriveinfinderwindow-92d62c1eadd242d8bc12b4ef8225f71f.jpg)
How to Map a Network Drive on a Mac
15 How to map a network drive in windows image HD Wallpaper

2 Ways To Map Network Drive in Windows 10 TechCult
Windows 10 Networking Guide How to Map Network Drive in 2021
How to Map Network Drives in Windows 10 8 1 7 Tutorial The
How to map a network drive Windows 10 Academic Technology Help Center

How to Map a Network Drive in Windows 7 Windows 8 Mac OS X Digital
Network Drive What Is It and How to Map It on Windows 10

How to Map a Network Drive in Windows 7 and Windows 8

How do I map a network drive Help Desk
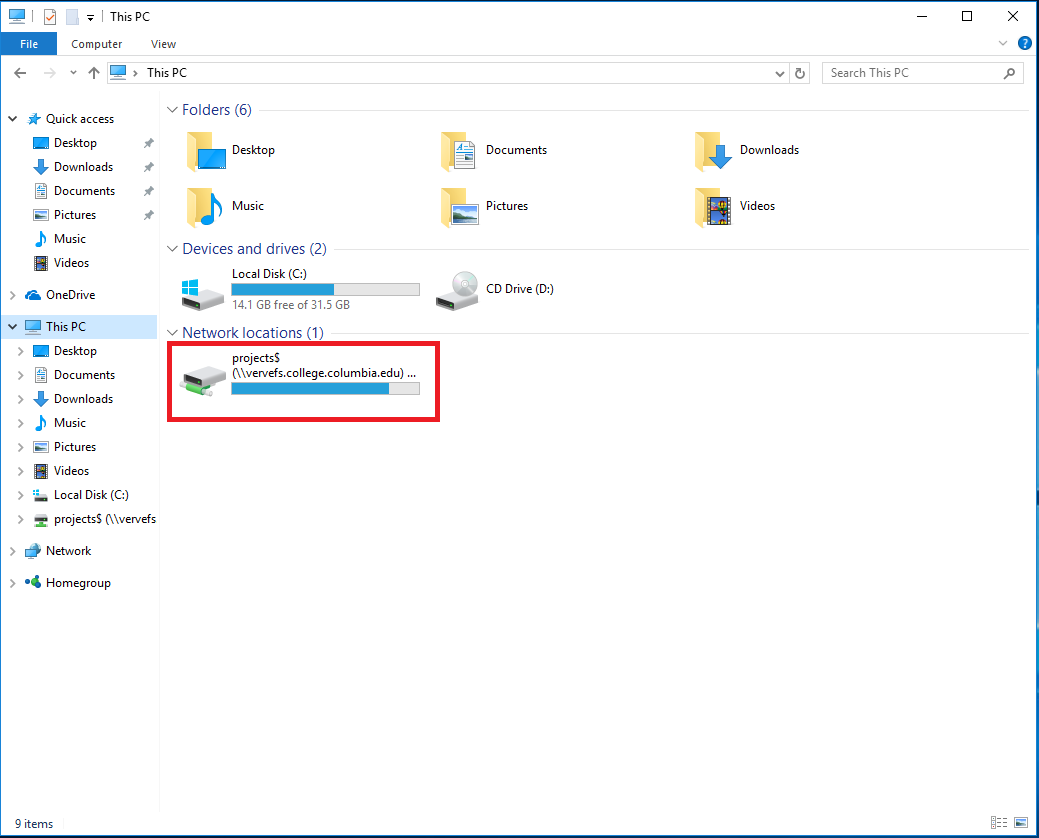
How to Map Network Drives in Windows 10 Columbia College Information
15 How to map a network drive in windows image HD Wallpaper

Map Network Drive Using Ip Address Windows 10 Living Room Design 2020
Brenau University Helpdesk How do I map to a network drive

Information Technology Services Configuring a Shared Network Drive

How to Map a Drive in Windows 11
Windows 10 Map Network Drive Missing Living Room Design 2020
:max_bytes(150000):strip_icc()/additem-f32796130b64451cafd6246a060e9eb5.jpg)
How to Map a Network Drive on a Mac

How Do I Map A Network Drive Maps For You

How To Map A Network Drive On Windows 11 Systems ZOHAL

Map Network Drive

How to Map a Network Drive with Pictures wikiHow
How to Map a Network Drive Free Easy to Follow Windows Tutorials
Map a Network Drive in Windows 7 Information Technology Services

Stop Mapping Network Drives Confessions Of a H I T Man
Mapping a Network Drive University Information Services Georgetown
How to Map a Network Drive in Windows 10 map drive windows 7 tin

Map network drive in Windows 8 1 Windows 8 and Windows 7 4sysops
/ScreenShot2019-07-31at11.04.57PM-0ded4b9a84844fd6addd11b39840e48f.png)
How to Map a Network Drive on a Mac

Map a Network Drive in Windows 7 Information Technology Group
15 How to map a network drive in windows image HD Wallpaper

How To How To Map A Network Drive In The Windows 10 System

How to Map a Network Drive in Windows 10 LaptrinhX

Windows 10 on VMware Workstation 11 Improved VMware Tools Shared Folder

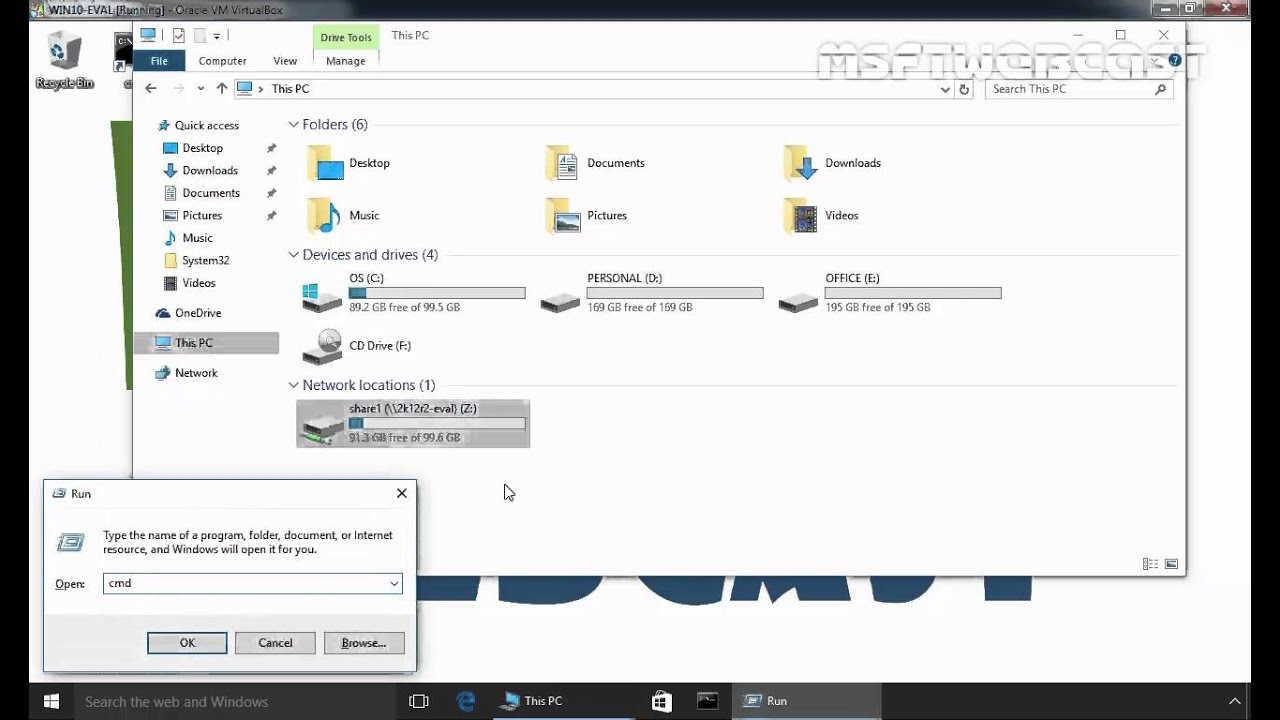
How to Map Network Drives From the Command Prompt in Windows
How to Map a Network Drive on Windows 10 Computers Software Tested
27 How To Map A Network Drive On A Mac Maps Online For You
Information Technology Services Configuring a Personal Network Drive

How to Map Network Drives From the Command Prompt in Windows

Mapping a WebDAV network drive Kentico 10 Documentation
How to Map Network Drive Windows 10 11 via External Hard Drives

How to map a network drive on Windows ISD 192 Farmington Schools

Map Network Drive Cmd Living Room Design 2020

Map a Network Drive from XP to Windows 7
Mapping a SharePoint site as a network drive Clifton Systems

Remove drive mapping Windows Forum Spiceworks

How to map a Network Drive to a Shared Folder Network Folder
Map Network Drive Windows 10 Password Recovery
Mapping Network Drive on Windows 7 Vista Windows XP and Windows
To Map a Network Drive from Network Neighborhood on Windows NT

How to add Map Network Drive FTP drive on Windows 7 8 10
How to Map OneDrive as Map Network Drive Ask My Tips

How to Map a Drive in Windows 11
How to Map a Network Drive in Windows
:max_bytes(150000):strip_icc()/CMD2-4f3f6965094449f684aadc80e19de89f.png)
How to Map a Network Drive in Windows 7 and 8
how to remove map network drive in windows 10 Windows 10 Forums

How to Map a Network Drive MMC Corp Helpdesk
How To Map A Network Drive - The pictures related to be able to How To Map A Network Drive in the following paragraphs, hopefully they will can be useful and will increase your knowledge. Appreciate you for making the effort to be able to visit our website and even read our articles. Cya ~.