How To Map The Drive
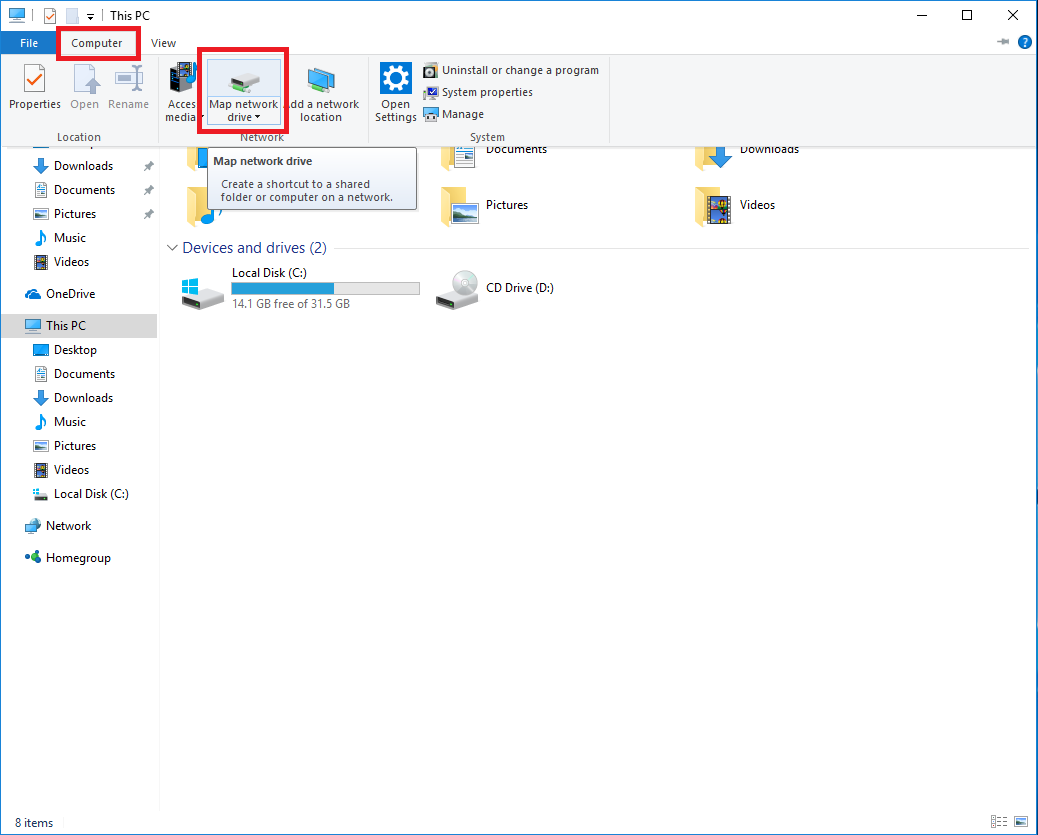
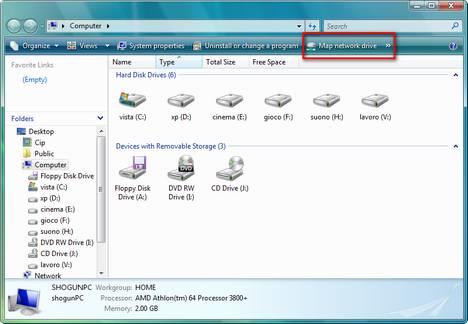
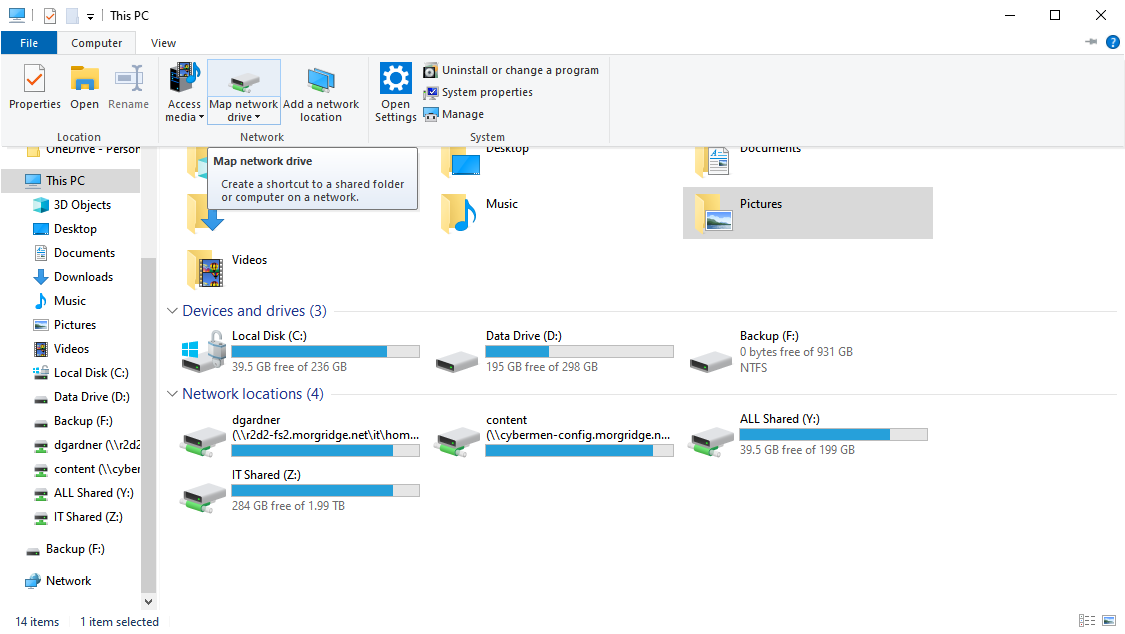
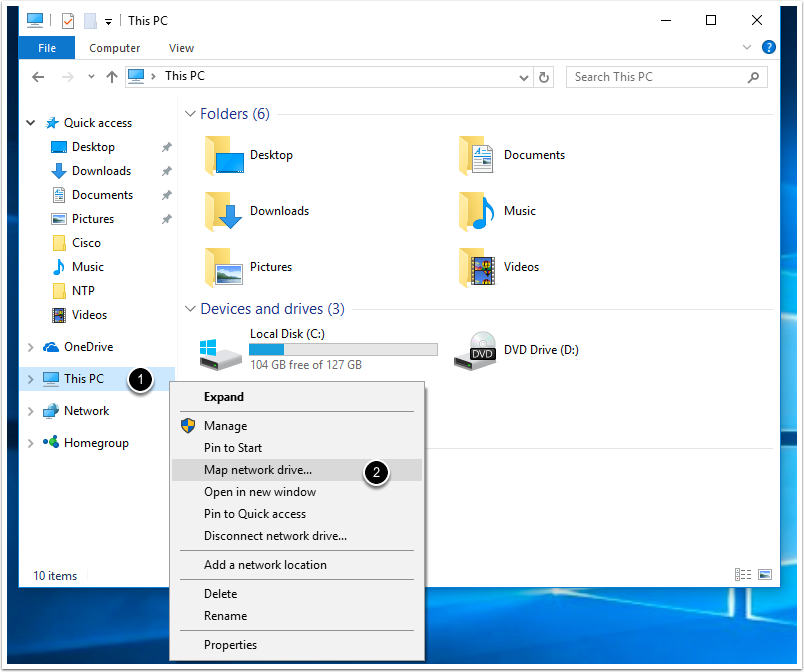
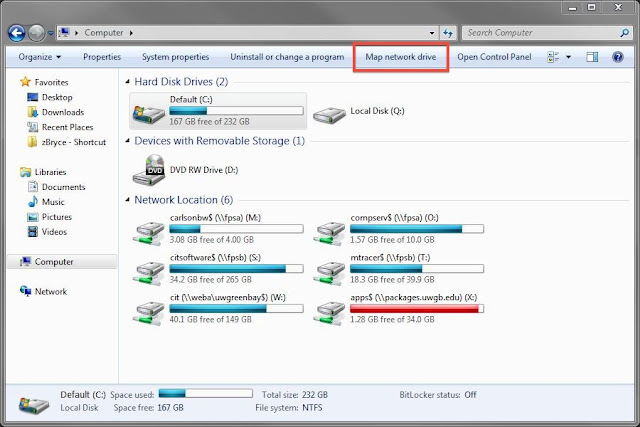
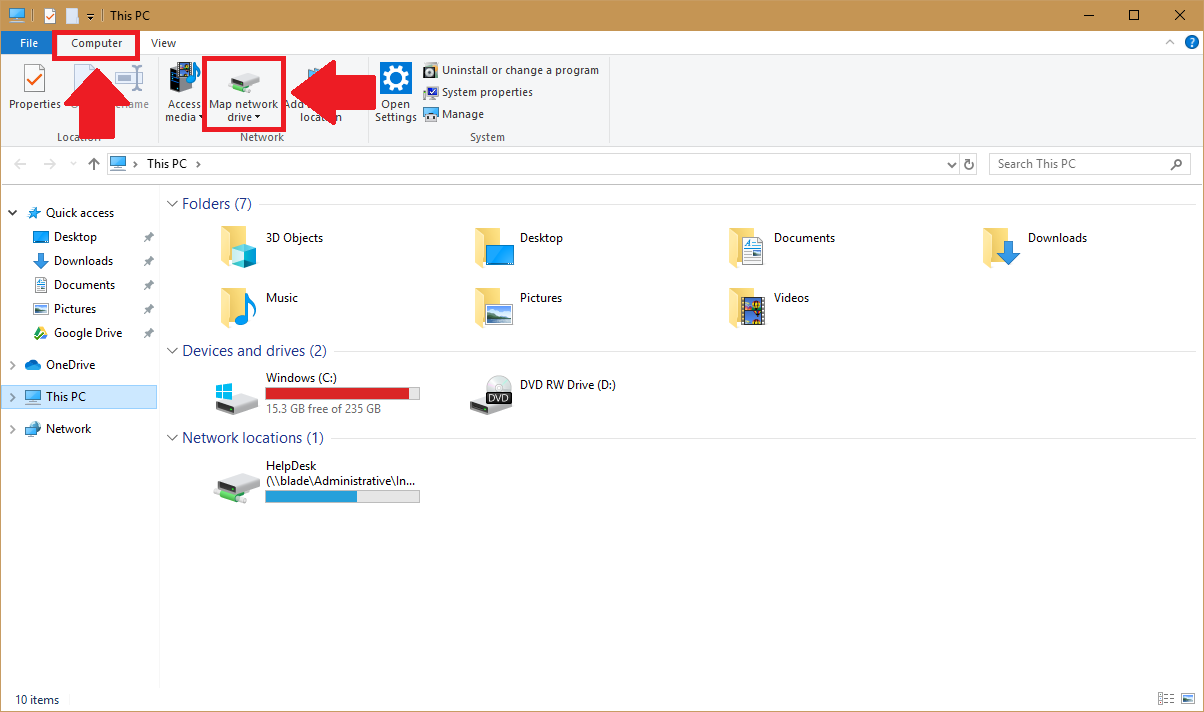
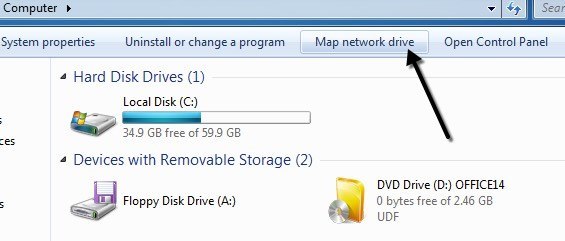
Open File Explorer from the taskbar or the Start menu, or press the Windows logo key + E. Select This PC from the left pane. Then, on the File Explorer ribbon, select More > Map network drive. In the Drive list, select a drive letter. (Any available letter will do.) Map a Network Drive With network discovery turned on, you can now map a network drive. First, open File Explorer and then click "This PC" in the left-hand pane. Next, click "Map Network Drive" in the Network group of the Computer tab. The Map Network Drive window will appear.
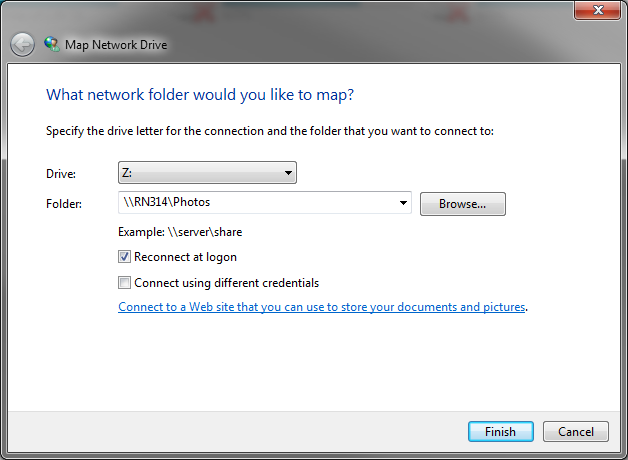
You can map a network drive on both Windows and Mac computers. Method 1 On Windows Download Article 1 Open Start . Click the Windows logo in the bottom-left corner of the screen. 2 Open File Explorer . Click the folder-shaped icon in the lower-left side of the Start window. 3 Click This PC. In the "Map Network Drive" window, click the "Drive" drop-down menu and select a drive letter that you will assign to the network drive. It can be any letter in the list, depending on your personal preference. In the "Folder" field, enter the network device and share name.
Related Posts of How To Map The Drive :

How To Map Network Drive World Map 07
How to Map Network Drives in Windows 10 Columbia College Information

Information Technology Services Configuring a Personal Network Drive
How to Map Network Drives in Windows 10 Columbia College Information
:max_bytes(150000):strip_icc()/map-network-drive-windows-10-1a25a45151cb44c7b2f680b89b22bb7b.png)
What Is a Mapped Drive

Map network drive in Windows 8 1 Windows 8 and Windows 7 4sysops
28+ Images of How To Map The Drive

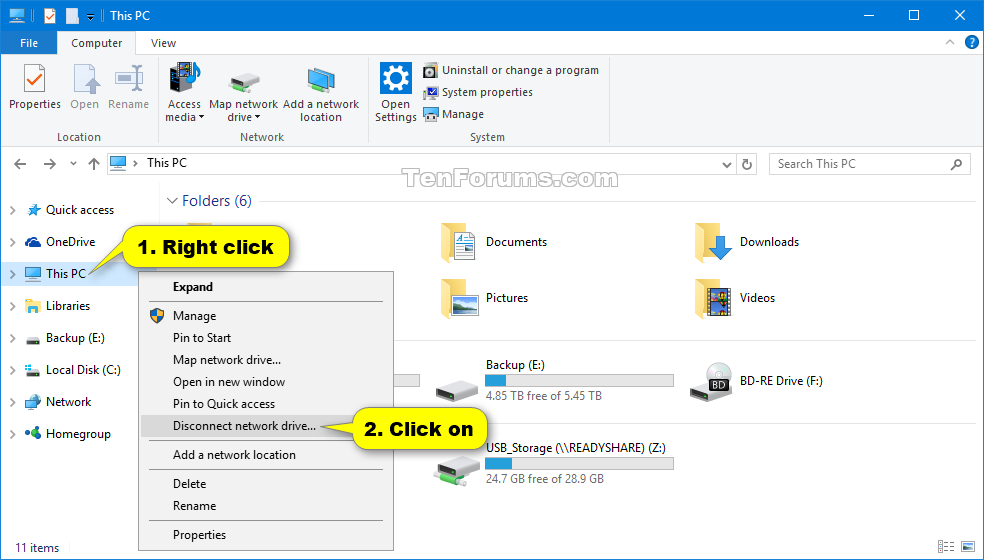
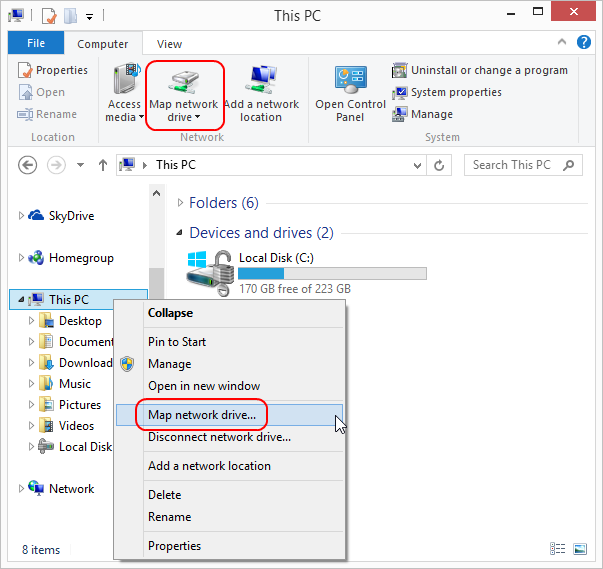
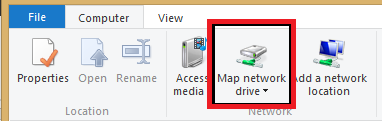
It takes just a few steps to map a network drive via the This PC window. Open File Explorer ( WIN+E ). Right-click This PC from the left column, and select Map network drive. If you don't see anything in a left column, go to View > Show > Navigation pane. Pick a letter from the menu you want the network drive to be identified as.
1. Open File Explorer and select This PC. 2. Click the Map network drive drop-down in the ribbon menu at the top, then select "Map network drive." (This is under the Computer tab, which.
To map a network drive in Windows 10 or Windows 8: Click the Start button. In the search box, type This PC, then select This PC from the search results. Click Computer and then click Map network drive. In the window that opens, choose an available letter from the Drive list.
1. Click This PC first, then Computer tab at the top, and the Map network drive button that shows up on the ribbon. 2. Navigate to the server that has the shared folder you want to map, right click on that folder and choose Map Drive 3. You can also go to Home tab at the top, click Easy access that shows up in the ribbon, and choose Map as drive.
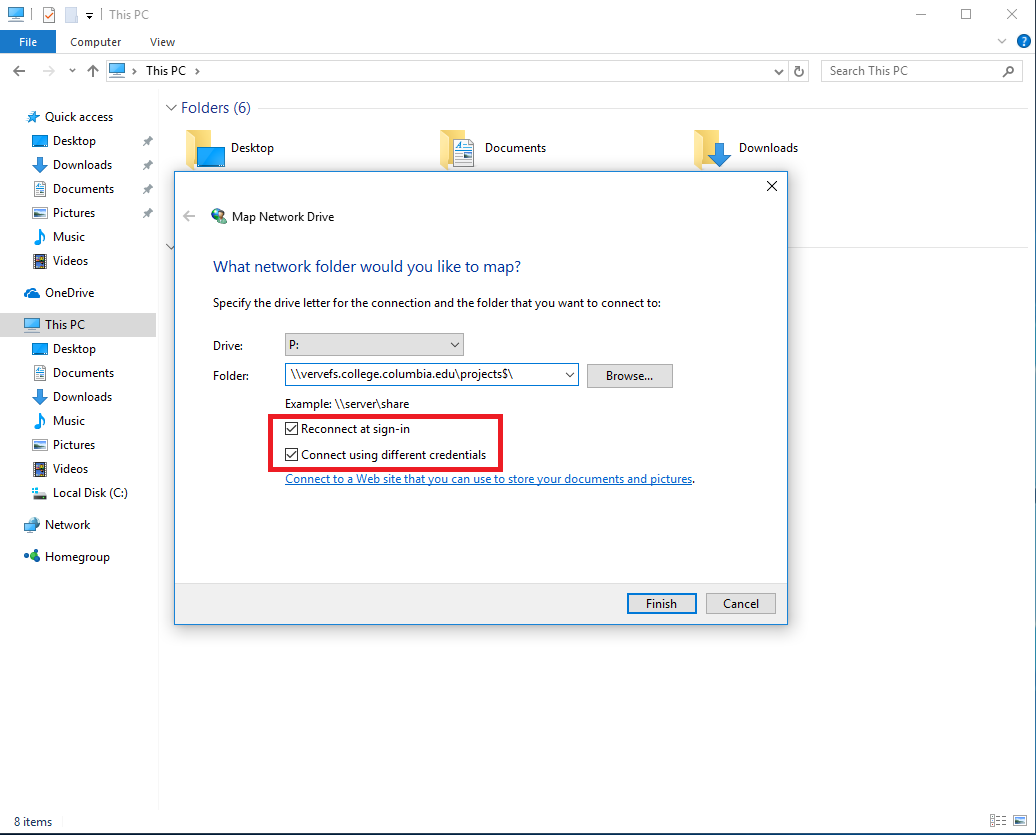
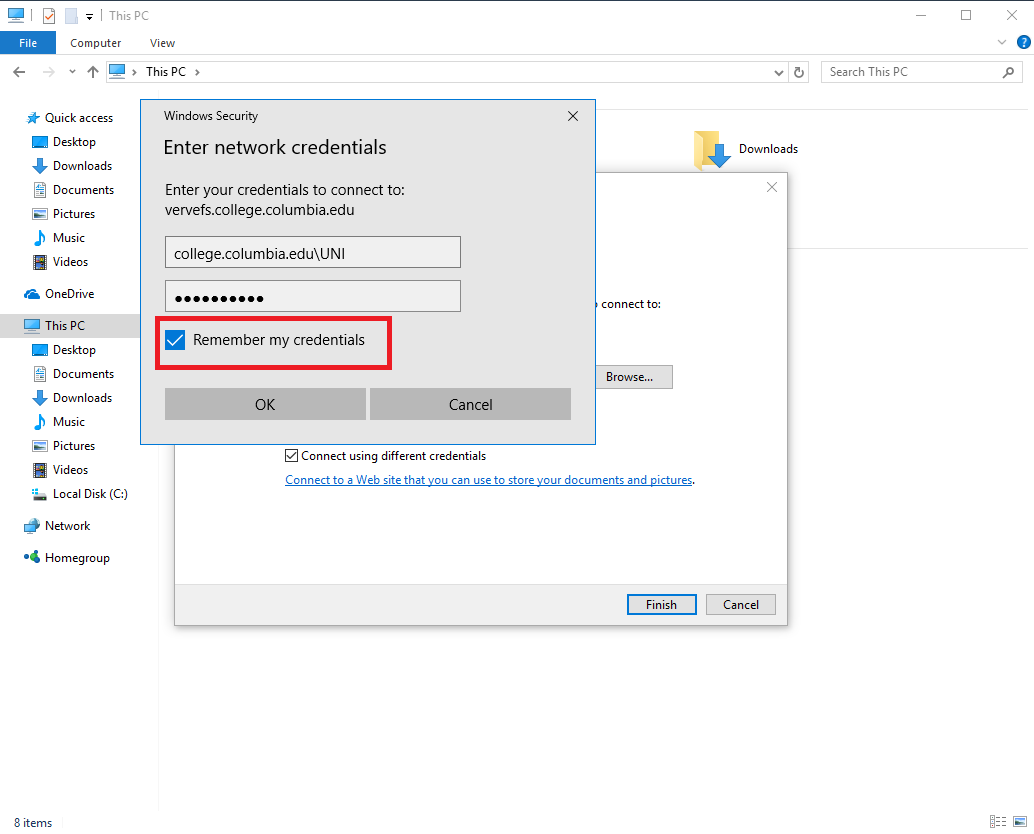
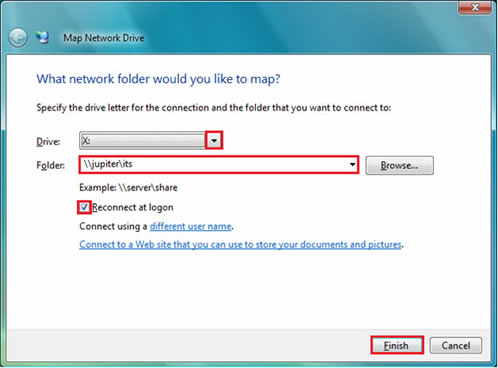
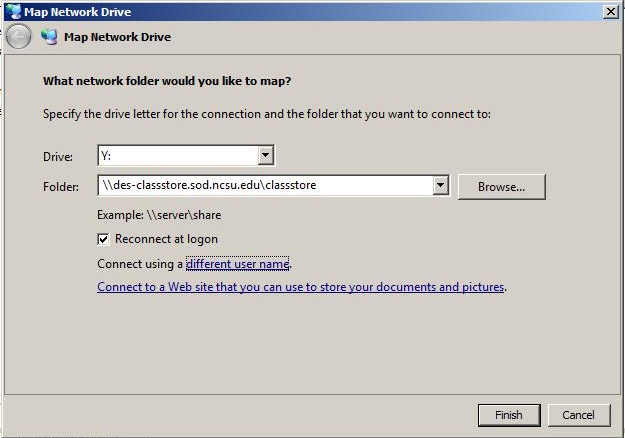
Map a Network Drive - Windows 7. On the Start menu, click Computer. In the next window, click Map Network Drive. In the Folder box, type the path to the server. Click Connect Using Different Credentials, and then click Finish. In the User name box, type your email login for the domain.
Follow steps below: 1) Open File Explorer and access This PC. 2) Click Computer then click Map Network Drive. 3) In the Drive section, select a drive letter from the drop down menu. 4) In the Folder section, enter the address of the shared folder you wish to access. The address would be like: \\IP address\share folder.
Press Win + E to open File Explorer directly, and click on This PC in the left pane. Right-click on This PC and select the Map network drive. button in the context menu that appears. Choose a unique drive letter in the Map Network Drive window. This is the drive you'll use to access the shared folder from your computer.
Plug the drive into the wall via the included power adapter, and then connect it via network cable (hopefully included) to one of the ports on the back of your router. You can then continue the.
Open File Explorer by pressing the Windows key + E. Click on "This PC" in the left-hand sidebar. Click on "Map network drive" in the toolbar at the top. In the "Map network drive" window, select a drive letter to use for the mapped drive. In the "Folder" field, enter the UNC path to the network folder you want to map.
Close the program and restart your computer. Try accessing the network drive to see if these repairs worked. Fixed Can't Map a Network Drive in Windows 10 Issue. Mapping a network drive in Windows 10 is normally a simple process without a lot of hassle. However, if you're having issues, hopefully one of the methods above fixed your issue.
On the Start menu or desktop, click Computer and then select Map network drive. Select the drive letter for the network drive you want to map. In the Folder field, enter the UNC path and then click Finish . Windows XP has several different methods to map a network drive, but the above steps use Windows Explorer to map the drive.
1. Select Start > Computer > Map Network Drive. 3. In the Drive list, select any available drive letter. 4. In the Folder box, type the path of the folder or computer, or select Browse to find the folder or computer. To connect every time you log on to your computer, select the Reconnect at logon check box.
1. Click the Start Menu icon in the taskbar. (Image credit: Tom's Hardware) 2. In the Start menu, click the Settings icon. (Image credit: Tom's Hardware) 3. Click on "Network & Internet" in Windows.
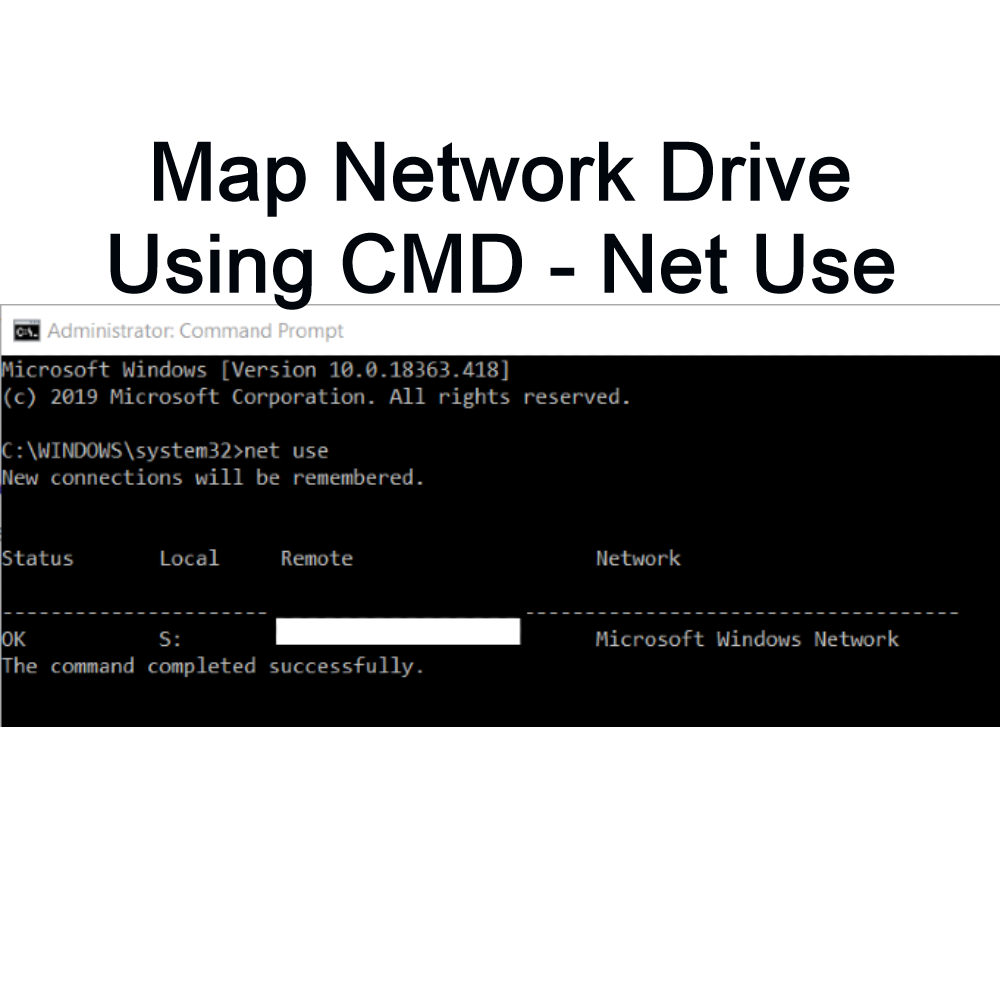
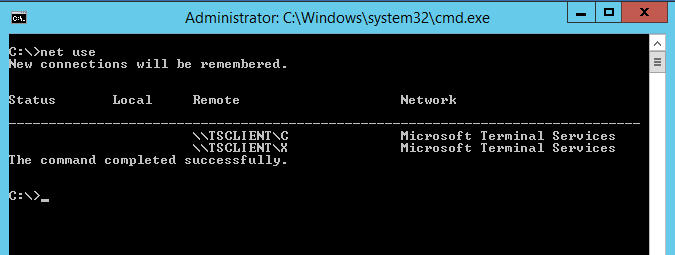
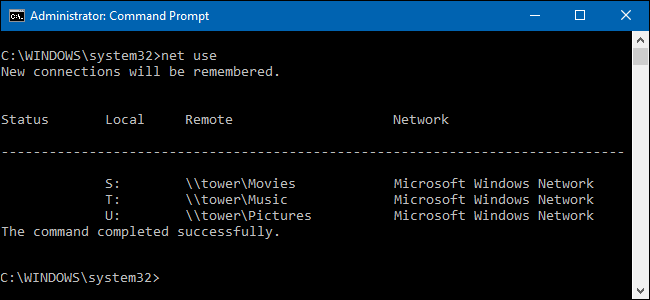
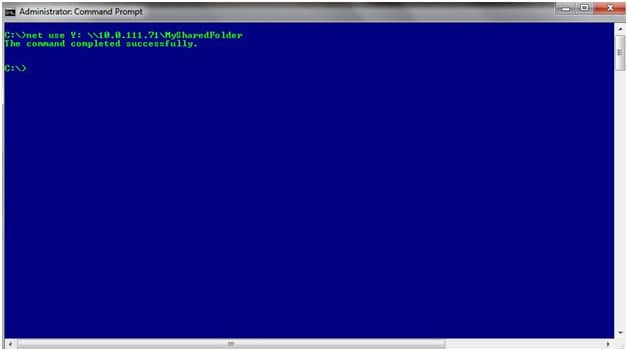
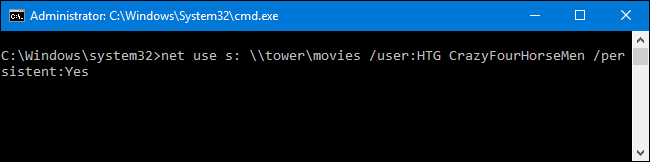
To map a network drive, type the following command and then hit Enter: net use DRIVE: PATH DRIVE is the drive letter you want to use and PATH is the full UNC path to the share. So, for example, if we wanted to map drive letter S to the share \\tower\movies, we'd use the following command: net use s: \\tower\movies
Launch Finder in the Mac Dock. Select Go in the menu bar at the top of the screen and choose Connect to Server. Enter the path for the network drive and select Connect. Click Connect again to confirm. When the drive is mapped, it appears on the desktop as a mounted drive or under Locations in a Finder window. This article explains how to set up.
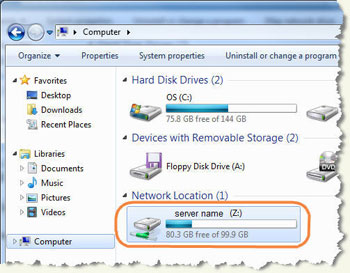
A mapped drive is just a shortcut to a drive that's physically located on a different computer. The shortcut on your computer looks just like one for a local hard drive (like the C drive) with its own letter assigned to it, and opens as if it were, but all the files in the mapped drive are actually physically stored on another computer .
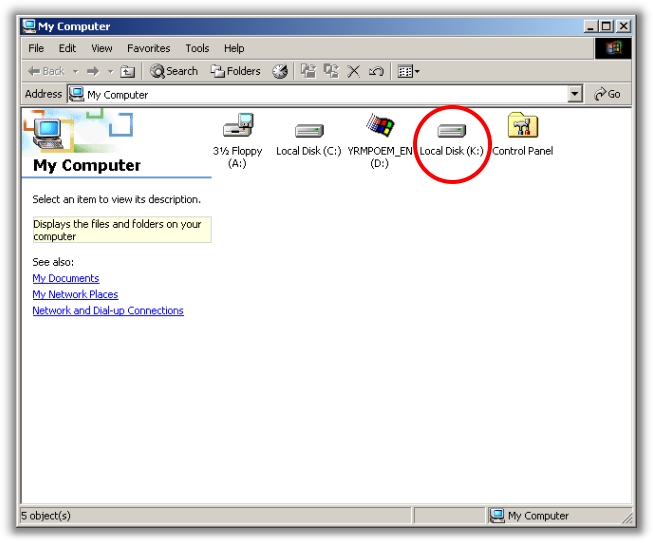
Step 1. To connect a drive from My Computer, click on Start, right-click My Computer, and then click Explore. Alternatively, to connect a drive from Windows Explorer, right-click on Start, and.
To Map Network Drive in This PC. 1 Do step 2, step 3, or step 4 below for how you would like to map a network drive in This PC. 2 Open This PC in File Explorer, click/tap on the Computer tab, click/tap on the Map network drive button in the ribbon, and go to step 5 below. (see screenshot below) 3 Open File Explorer, right click or press and.
The benefit of mapping a hard drive that is on a network drive is that you may access the shared drive or folders on the drive without having to type in the file path every time. This saves a lot of time for users in a shared networking environment. This article will teach you how to map a hard drive on your PC computer. You will learn how to.
The Drive Team brings you trusted, expert reviews of your next new car and is home to the best new car awards program in Australia. Read more about Drive Team. Trending News.
Game manuals, wikis, cheats etc: https://games-manuals.com The cheapest games and lots of sales: http://bit.ly/Cheapest-Games Instagram: https://www.in.
Gallery of How To Map The Drive :
Map Network Drive in Windows 10 Tutorials
How to Map Network Drives in Windows 10 Columbia College Information
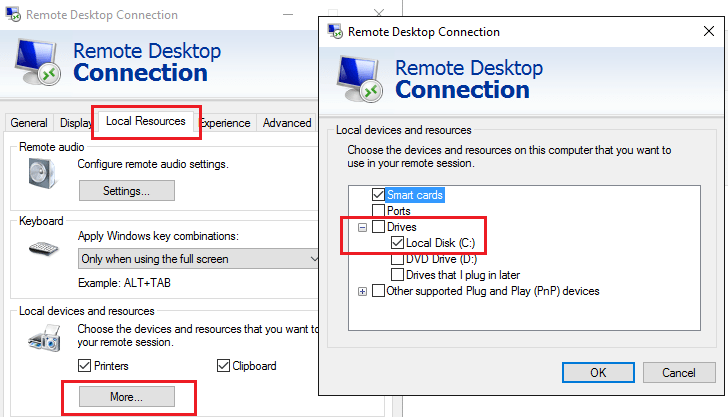
Map a network drive from remote desktop back to local computer
How to Map Network Drives in Windows 10 Columbia College Information

Mapping a Network Drive IT Services

Map a Network Drive Missing CloudConnect Technical Support
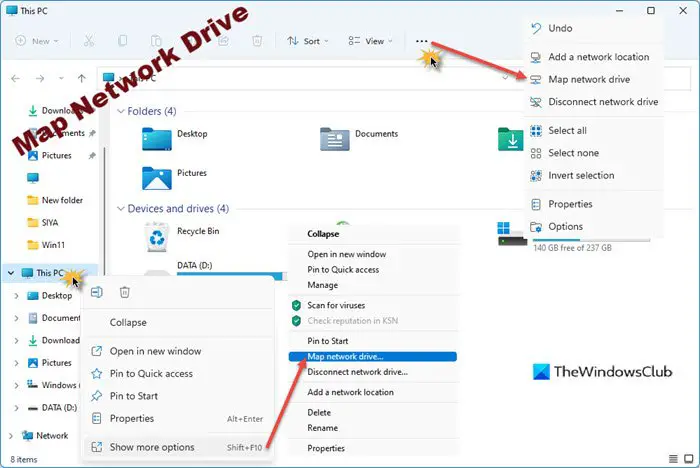
How to map a Network Drive or add an FTP Drive in Windows 11 10

nachalern
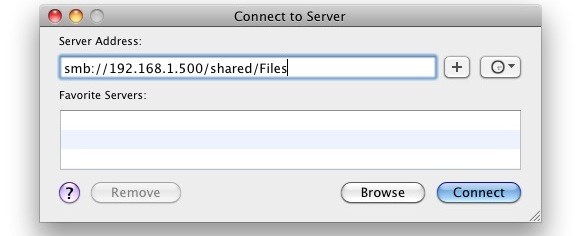
Map a Network Drive on a Mac

How to map S Drive eSolutions

How to Set Up and Use a Network Drive
How to Map a Network Drive Windows Tutorials

How to Map a Network Drive in Windows 7 and Windows 8

How to Map Network Drive on Windows Linglom com

How to Map Network Drives Websites and FTP Locations in Windows 7
Net Use Command To Map Drive Pinellas County Elevation Map
Mapping a Network Drive in Windows 10

How to Map Network Drives Websites and FTP Locations in Windows 7
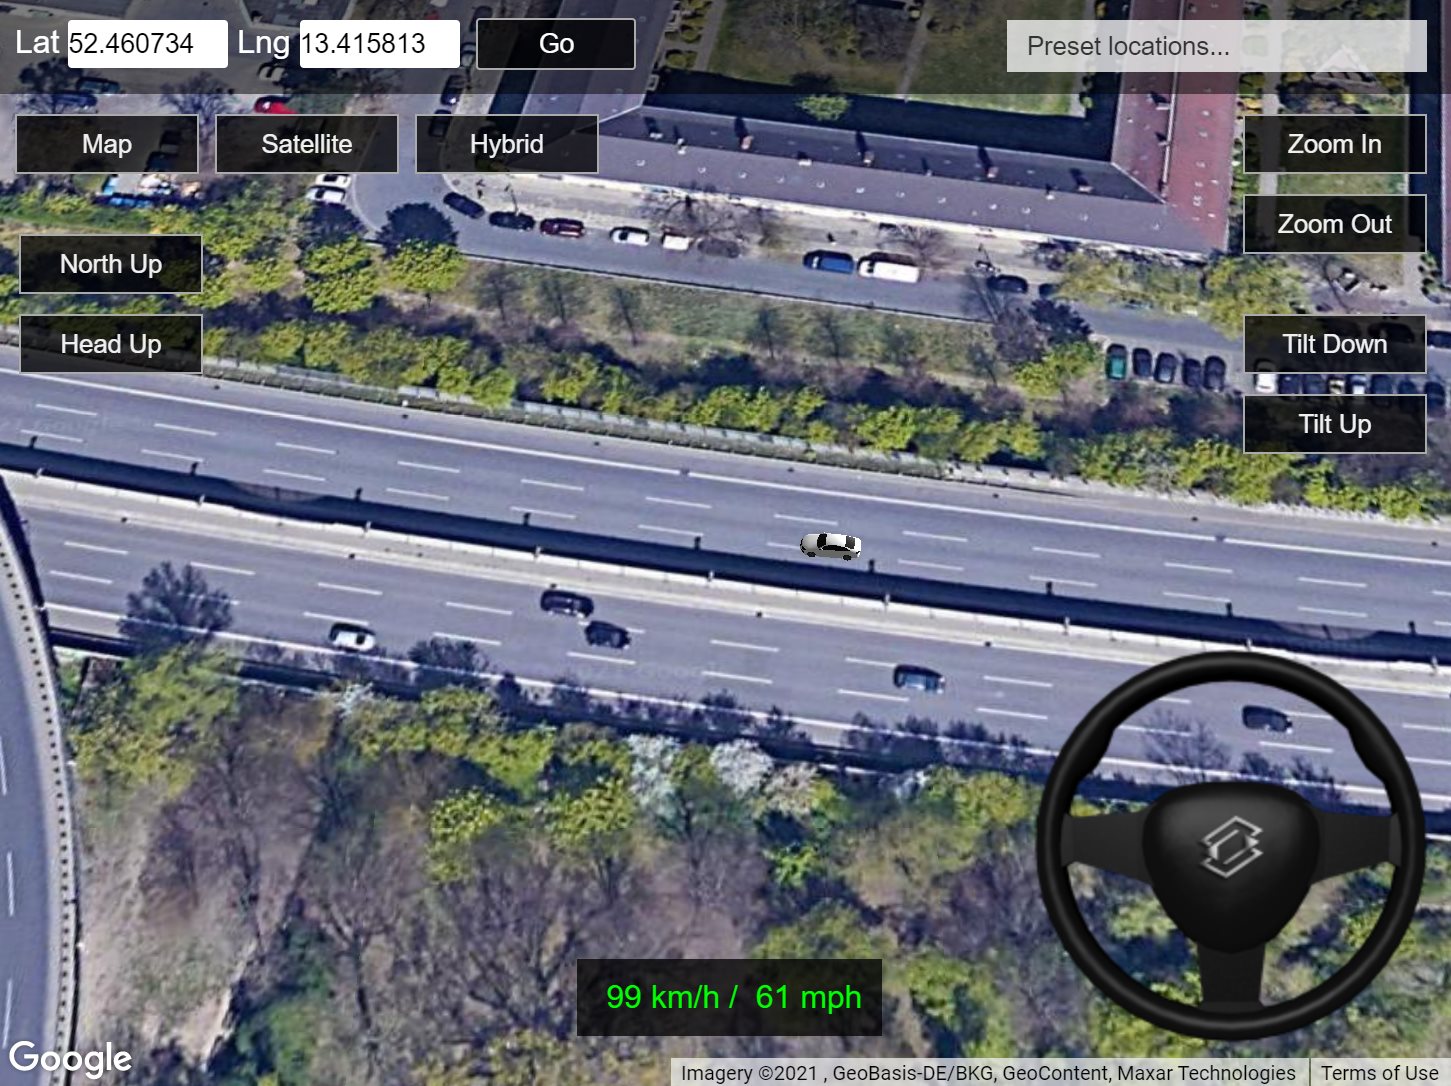
This Awesome Google Maps Game Lets You Drive a Car Anywhere in the

Map to Drive
This Awesome Google Maps Game Lets You Drive a Car Anywhere in the
Map to Drive
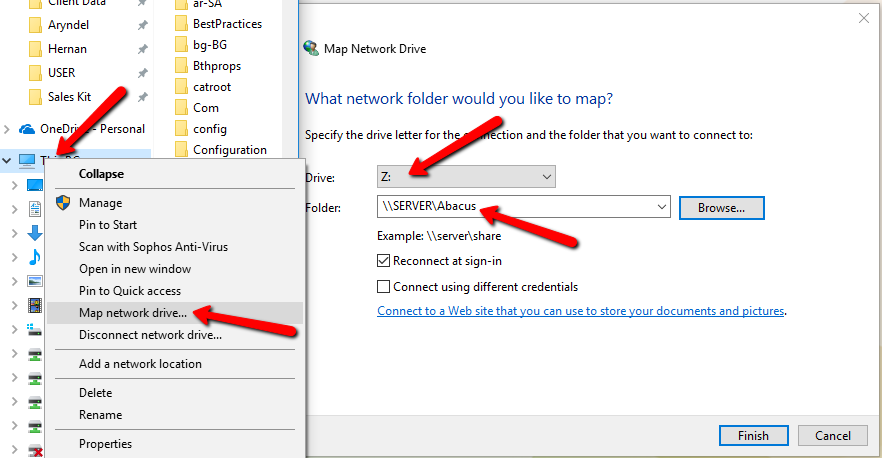
How to Map a Network Drive in Windows 7 or Above AbacusNext Client
How To Map A Network Drive Map Of The World
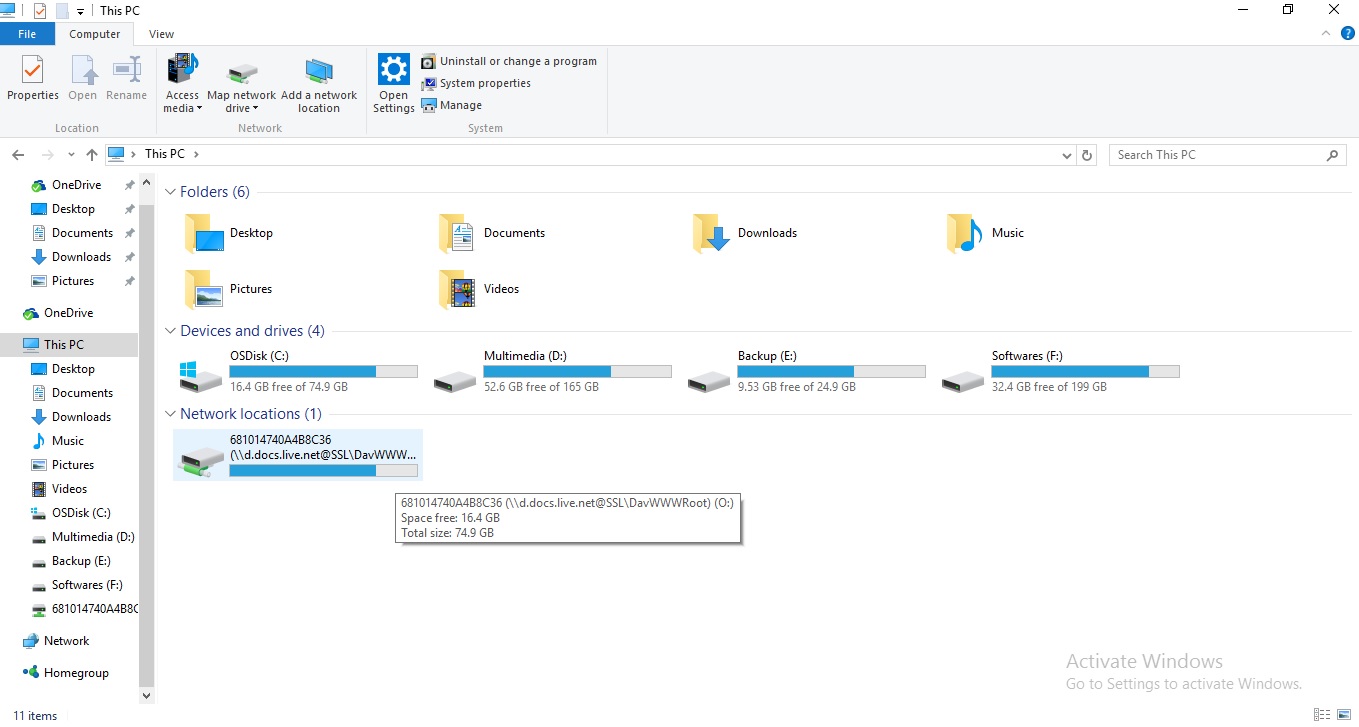
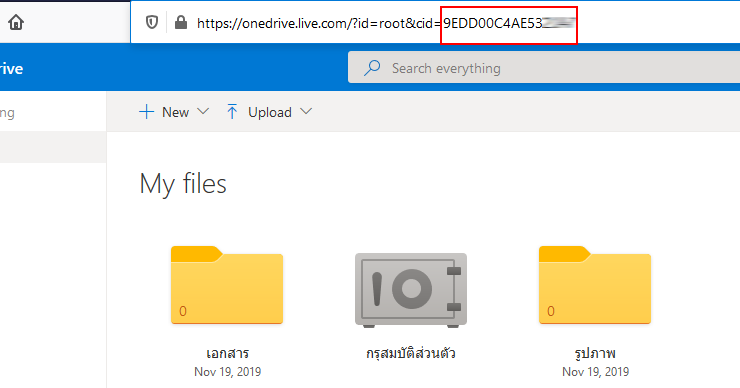
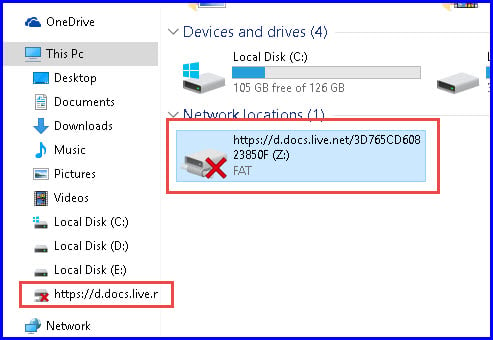
How to Map OneDrive as Map Network Drive Ask My Tips
Map a network drive from remote desktop back to local computer

Map Of I Drive Orlando Zip Code Map
Map a Drive IT Cornell

Drive Time Maps Custom Drive Time Maps from Mapping Analytics

Drive Mapping

CCleaner com Understanding the Drive Map

Mapping Drives Windows 8
Map Network Drive Windows 8 Vector U S Map
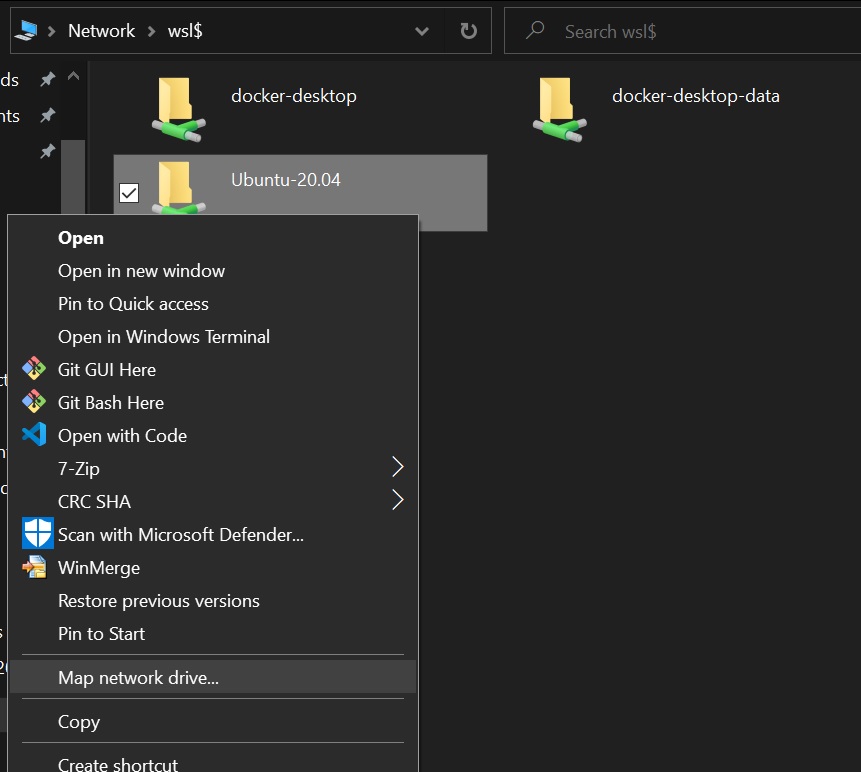
Setting up Windows for developers with WSL2 Kenny on IT

How To Create A Shared Drive In Windows

Map a network drive in Windows 10

IT Computers Solutions amp Securities How to Create Map Network Drive In
/ScreenShot2019-07-31at11.04.57PM-0ded4b9a84844fd6addd11b39840e48f.png)
How to Map a Network Drive on a Mac
Connect to the madteamdrives share from home using windows Algonquin
How to Map a Network Drive to Windows Machine net use Command Example
How do I map a network drive in Windows Answer NETGEAR Support

How to Map a Network Drive Windows Tutorials
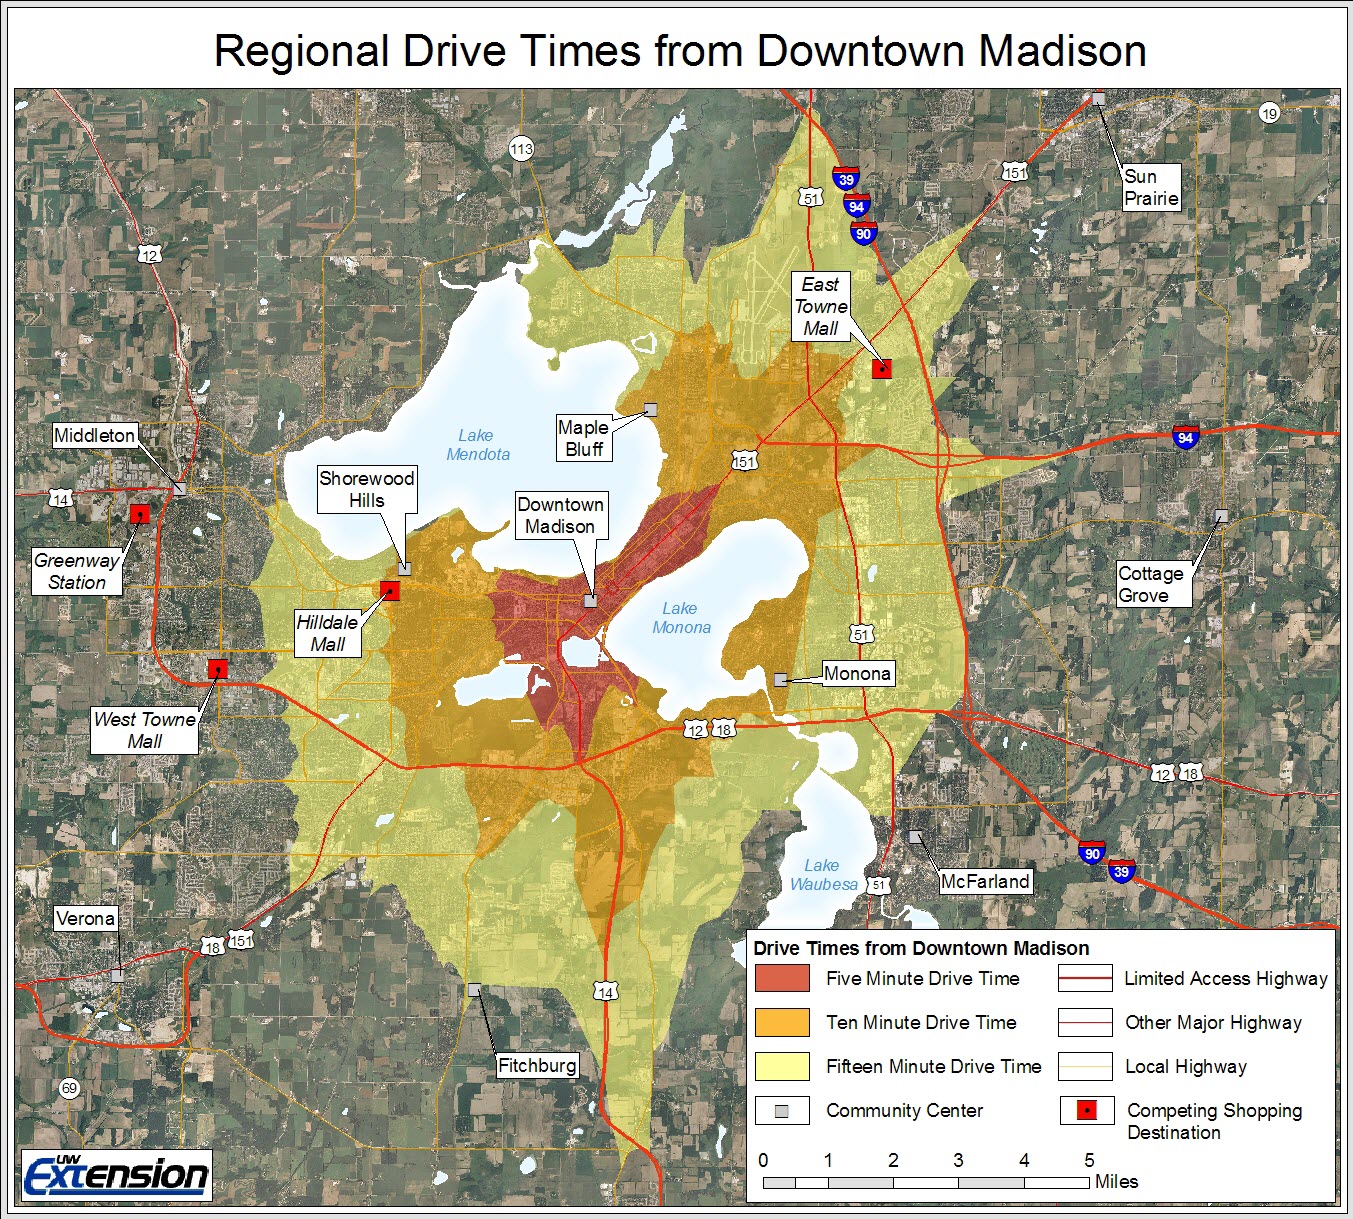
Trade Area Analysis Downtown Market Analysis
Mapping Drives IT Connect

How to Map a Network Drive in Windows 10 TheITBros

27 Map Network Drive Command Line Maps Online For You

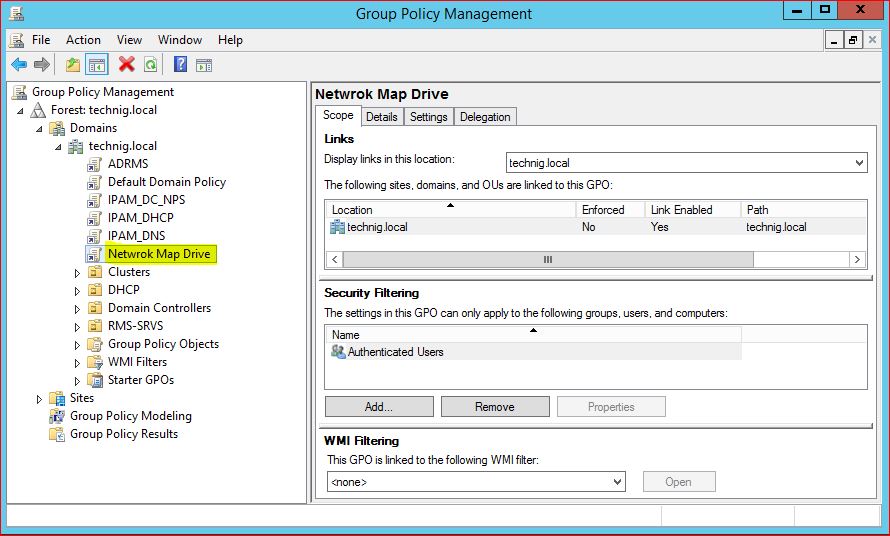
Dynamic drive maps with Group Policy Preferences windowstech net
Map Drive On Drive to My Pc Map One Drive Network Drive
Dynamic drive maps with Group Policy Preferences windowstech net
Map Drive On Drive to My Pc Map One Drive Network Drive
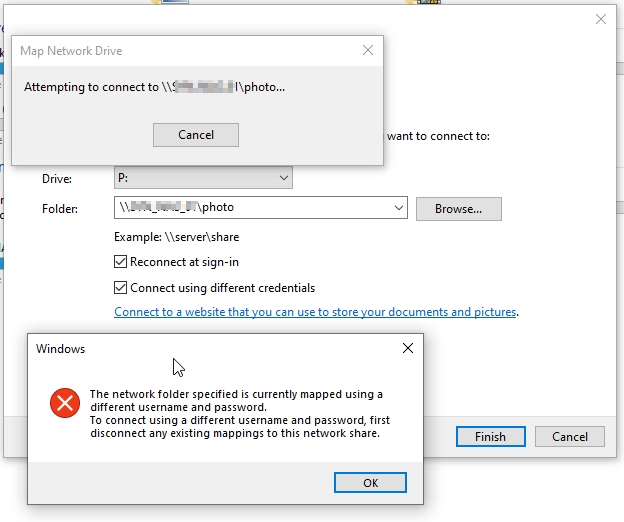
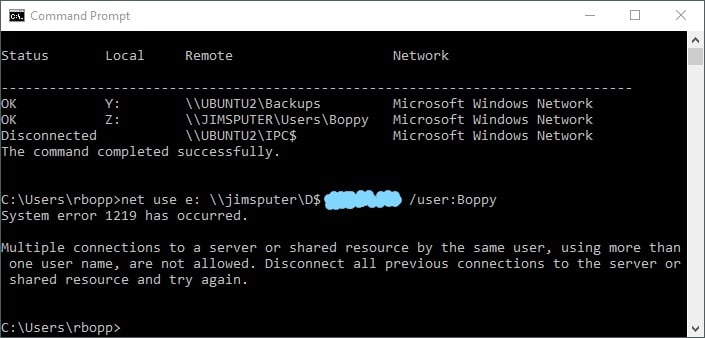
Can t map shared drive says it s already mapped Microsoft Community
Map Network Drive Command Line Password Recovery

Map network drive in Windows 8 1 Windows 8 and Windows 7 4sysops
Connect a Network Drive

T Solve Technology Commentary mapping drives with group policy on

How to Map a Network Drive in Windows College of Education Tech Help
Encrypt your files the free and easy way Remote Administration For

How to Map a Network Drive in Windows 10 TheITBros

Sense Production establish since 1993 Sense Production specializes in
IT Computers Solutions amp Securities How to Create Map Network Drive In

WOW This Is The Reason Why Many Countries Drive On The Right Side
ClassStore and Transfer Instructions College of Design Information

Drive mapping with on demand synchronization for easy remote file access

Windows mapped drives what the hell is going on Blogging for Logging

How to Map a Network Drive in Windows School of Medicine Department

Google Drive now works with custom maps from My Maps TalkAndroid com
Net Use Map Drive Map Of The World

Mapping network drives with Windows 7 Civil and Environmental
How to Map a Network Drive in Windows
how to remove map network drive in windows 10 Windows 10 Forums
How to Access a Computer Remotely Guide plus Free Tools amp Trials

map network drive
I need to map a drive to the D drive on another computer Windows 10

Map Network Drive APK for Android Download
Net Use Map Drive Map Of The World

Map google drive instructions
How To Map The Drive - The pictures related to be able to How To Map The Drive in the following paragraphs, hopefully they will can be useful and will increase your knowledge. Appreciate you for making the effort to be able to visit our website and even read our articles. Cya ~.