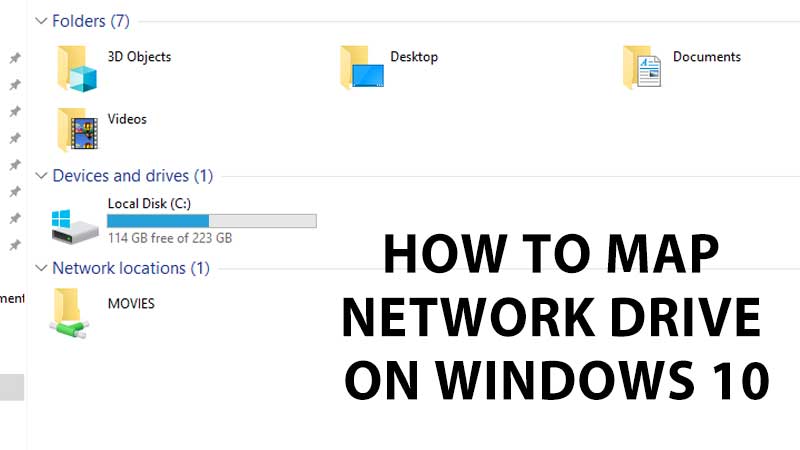
Map A Network Drive In Windows 10
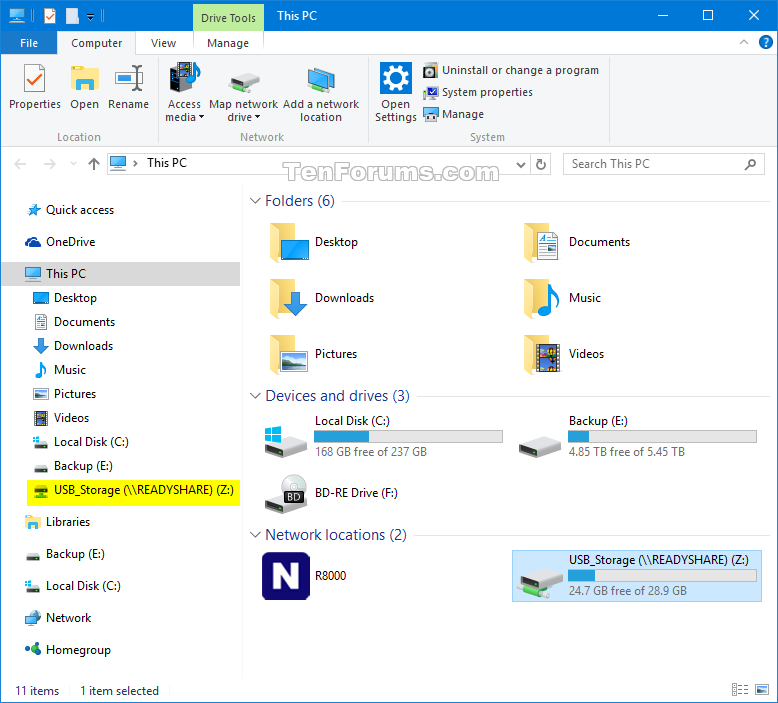
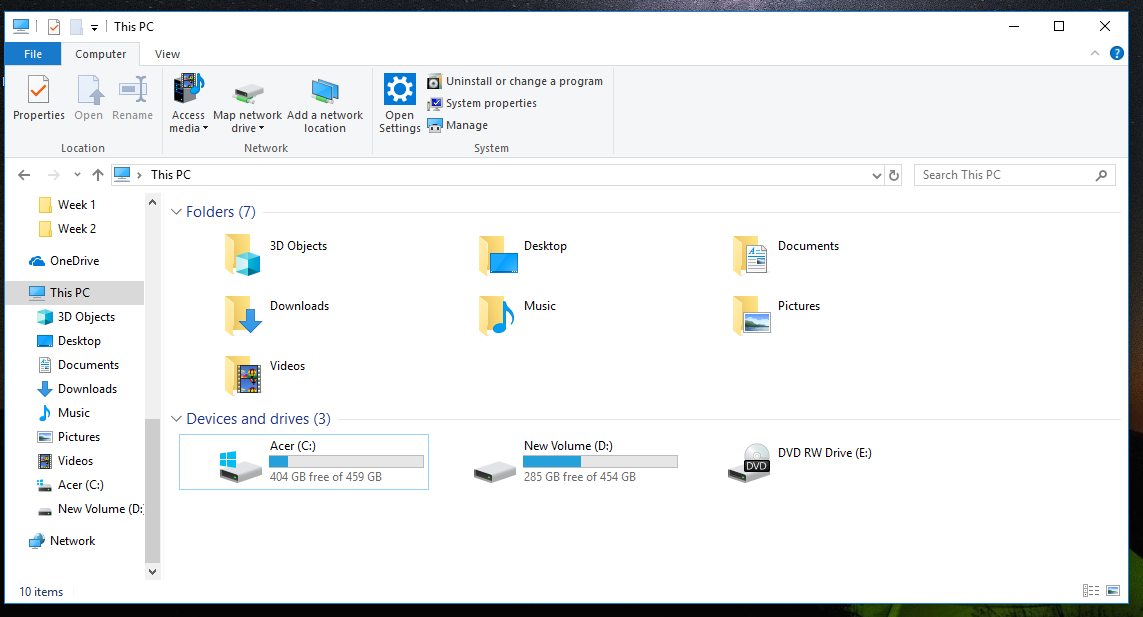
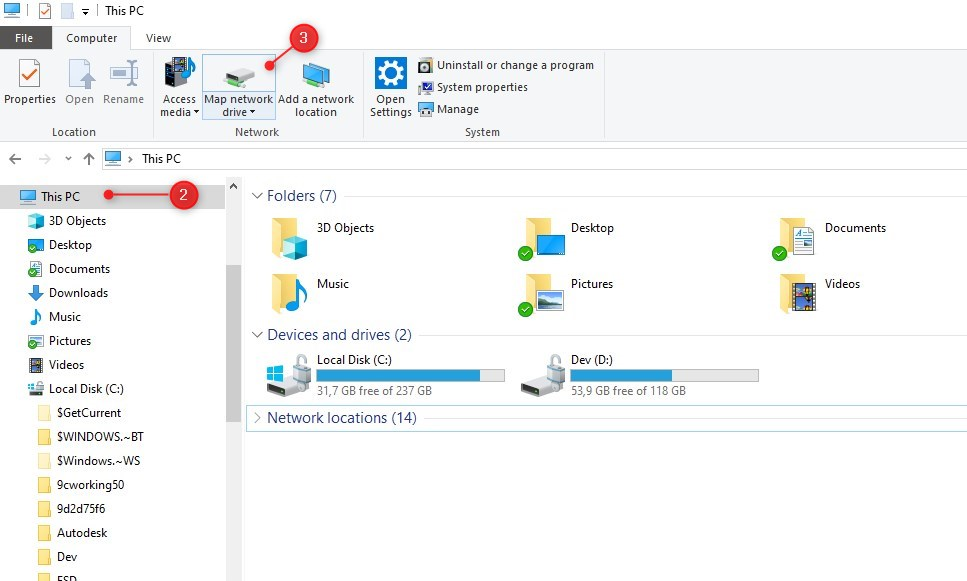
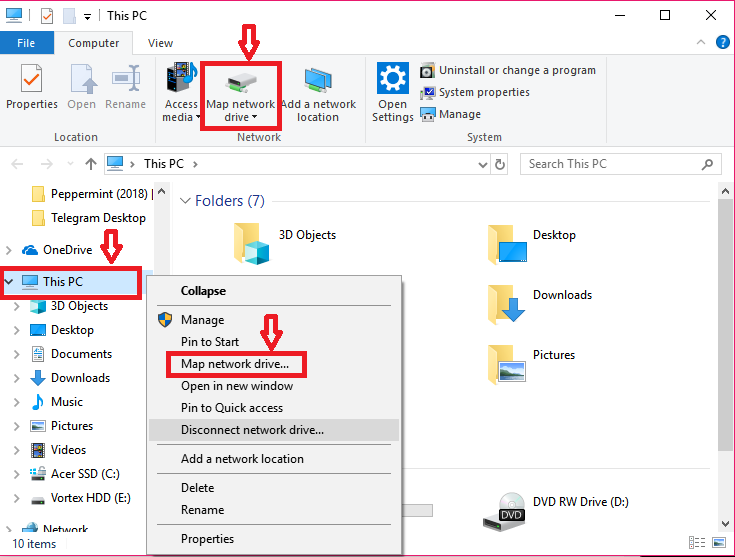
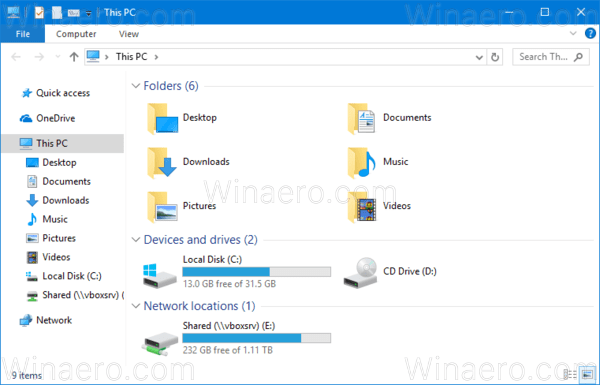
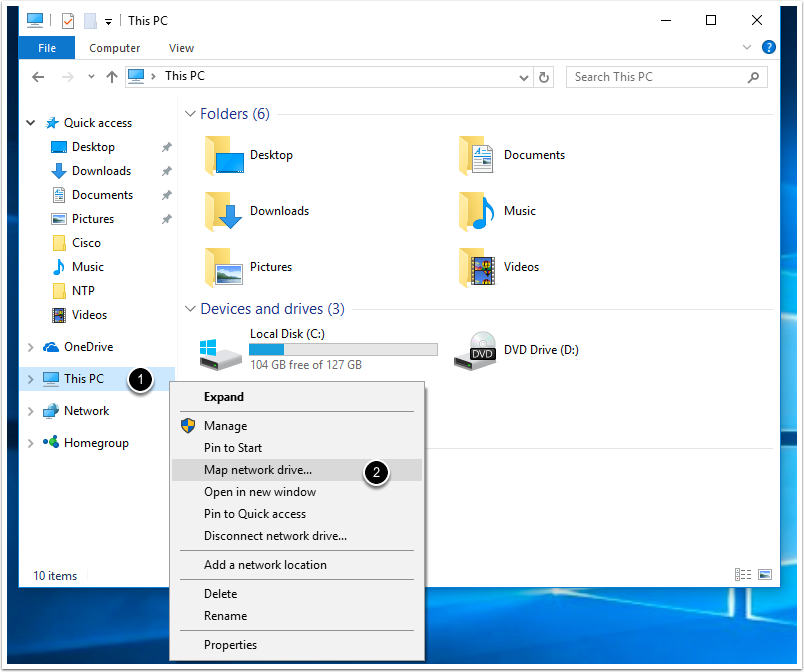
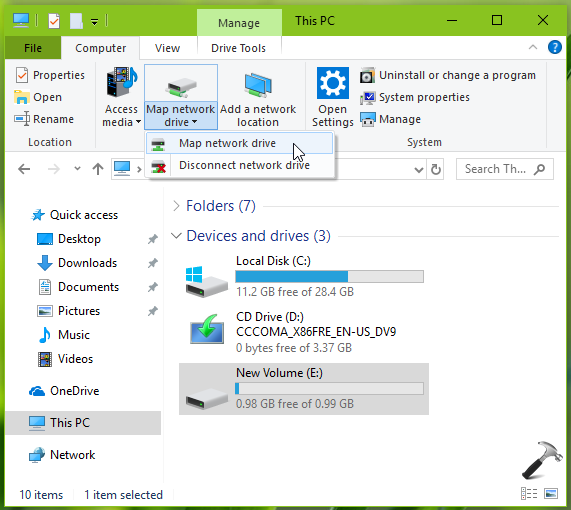
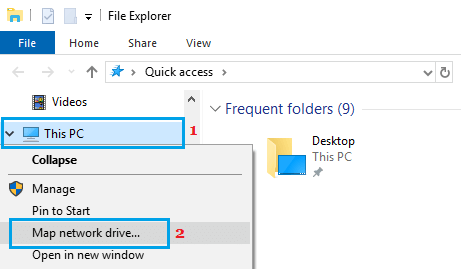
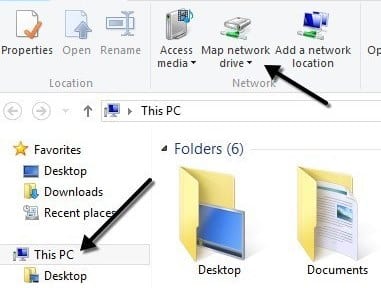
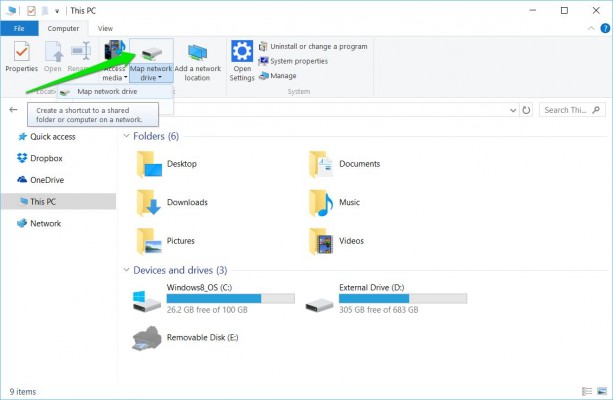
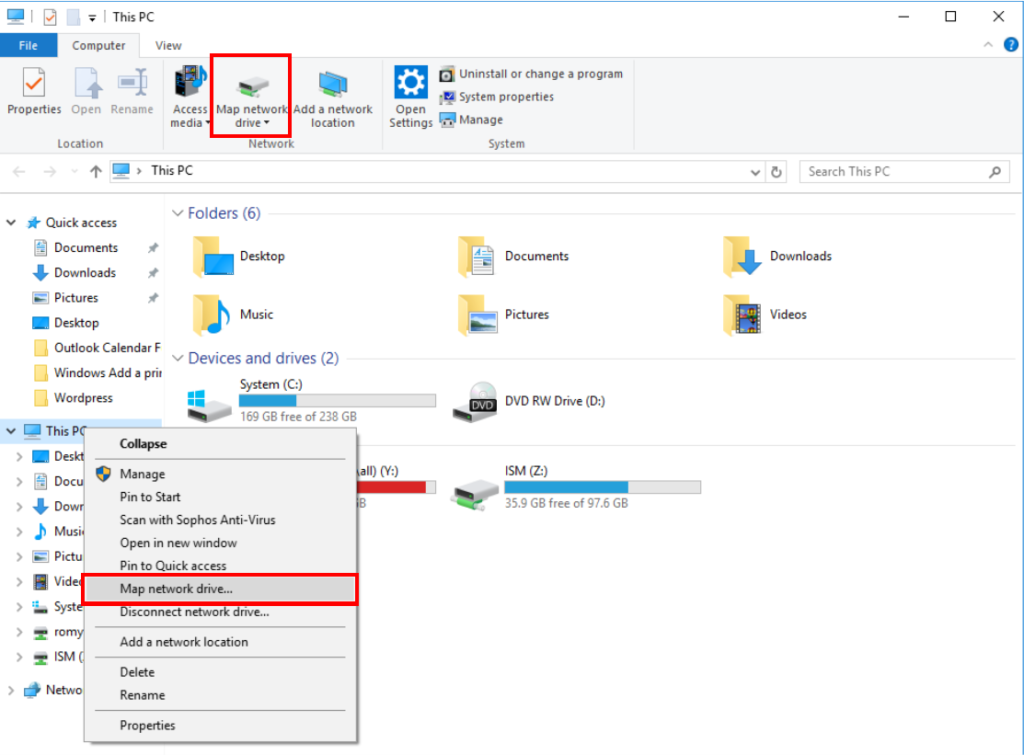
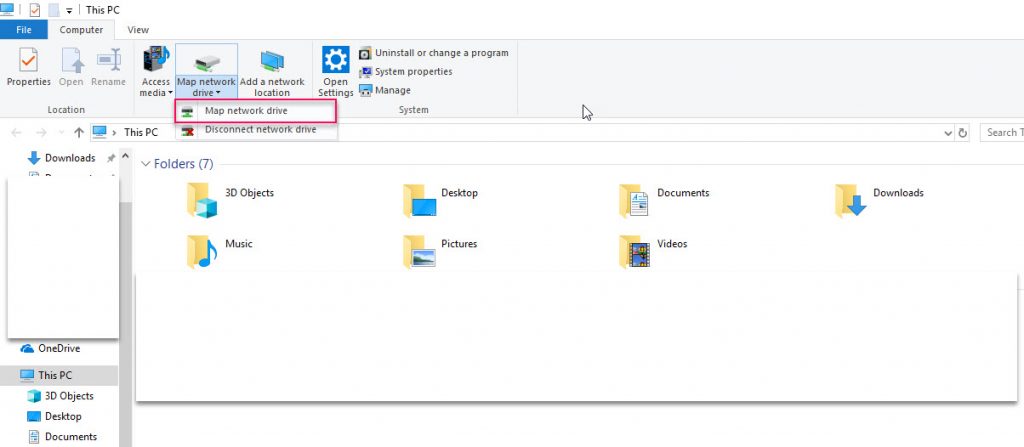
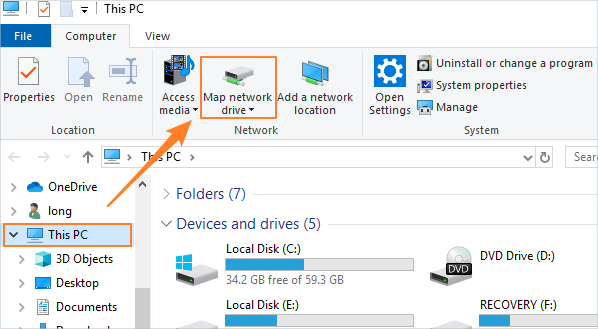
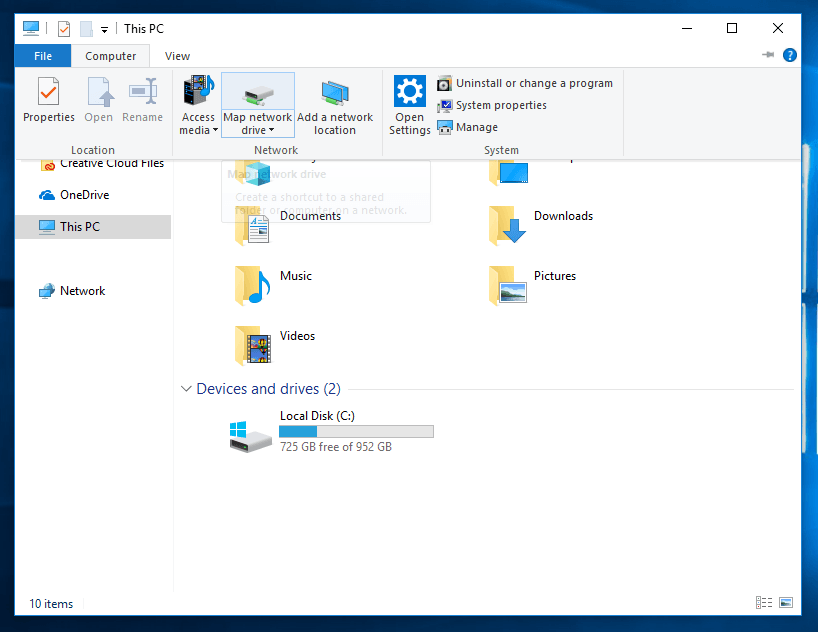
Open File Explorer from the taskbar or the Start menu, or press the Windows logo key + E. Select This PC from the left pane. Then, on the File Explorer ribbon, select More > Map network drive. In the Drive list, select a drive letter. (Any available letter will do.) To map a network drive in Windows, open advanced sharing settings and turn on "Network Discovery." Then go to "This PC" and click "Map Network" to add the network drive to your PC. Creating a mapped network drive allows you to quickly access files and folders on a shared network as if they were on your local machine.
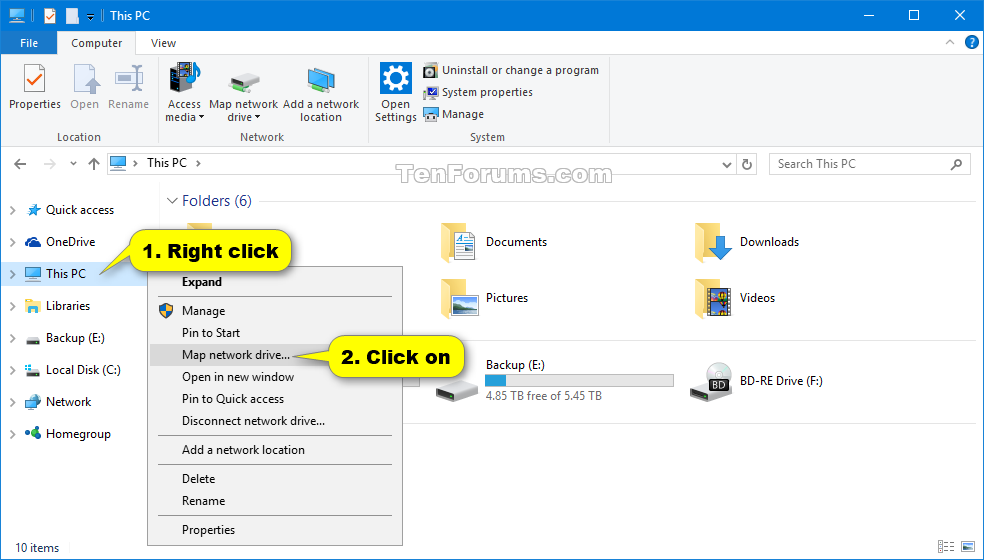
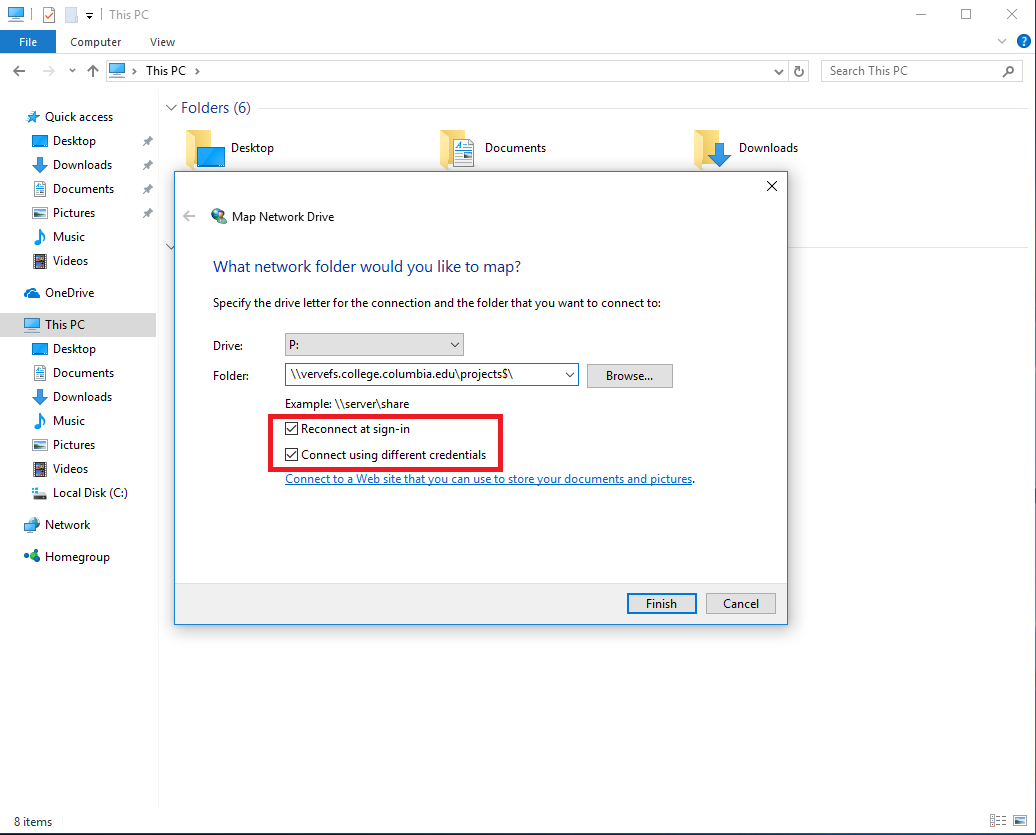
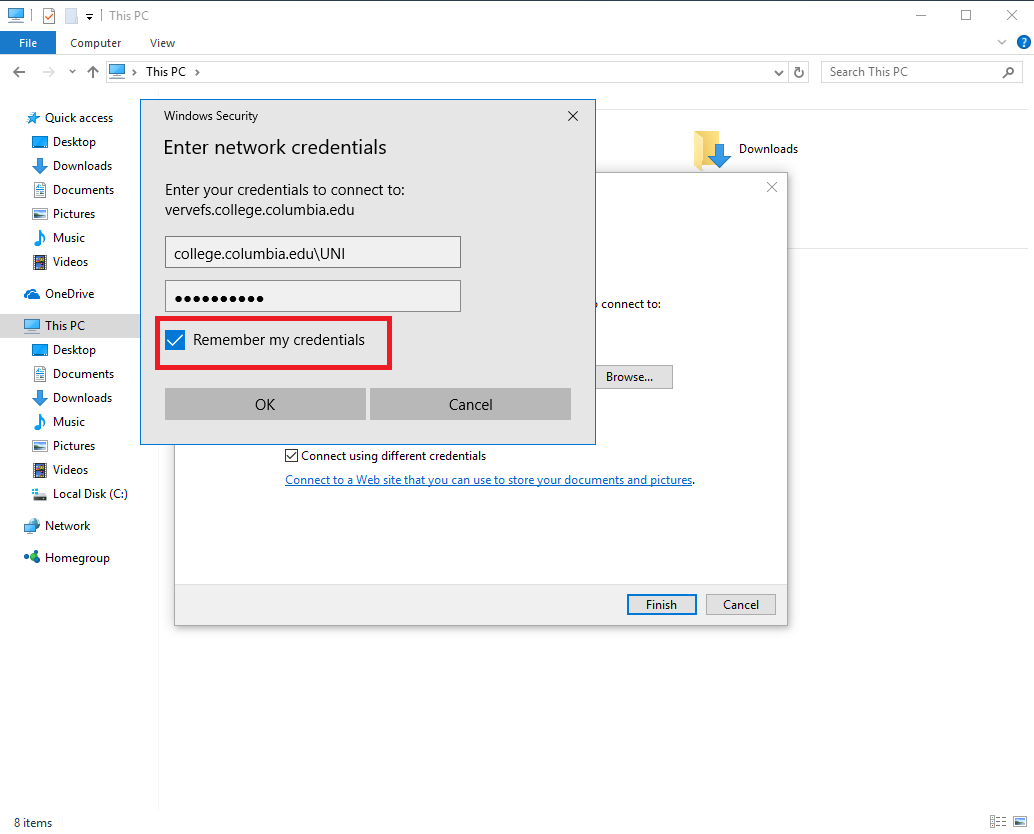
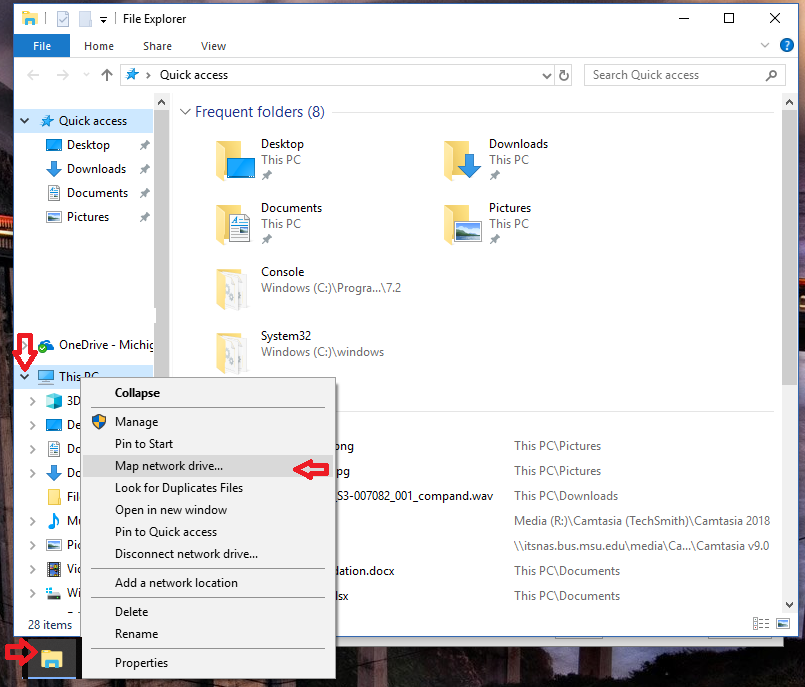
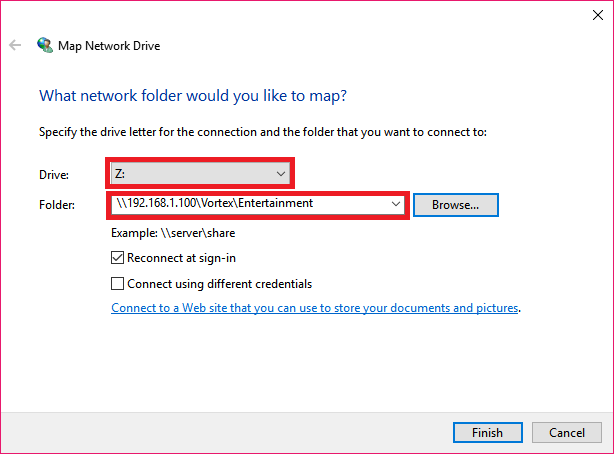
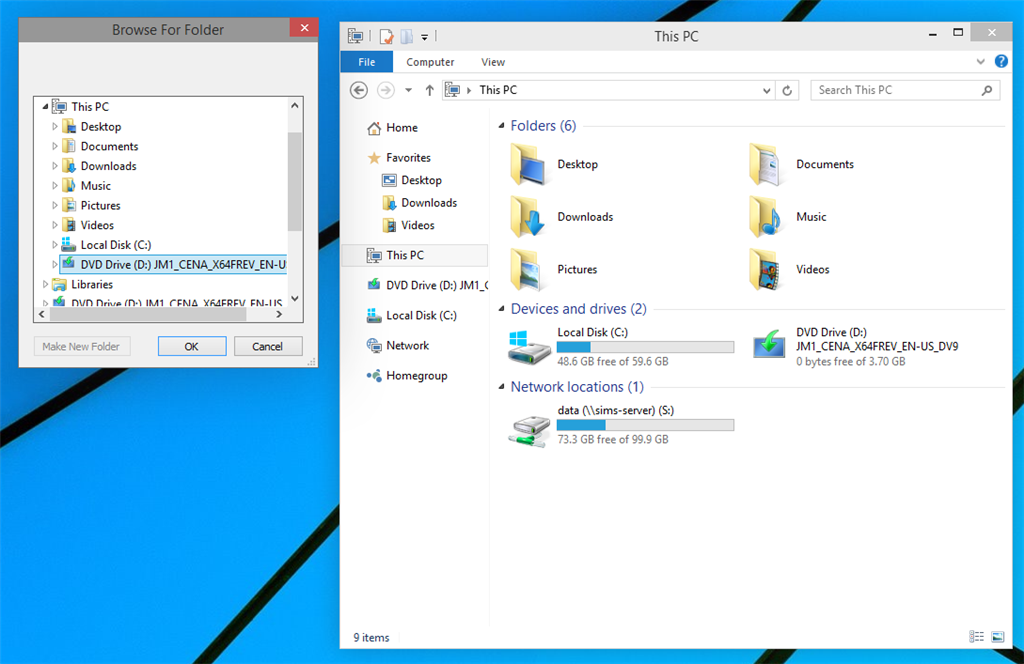
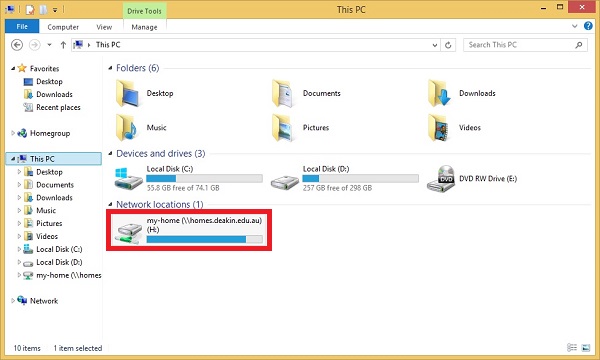
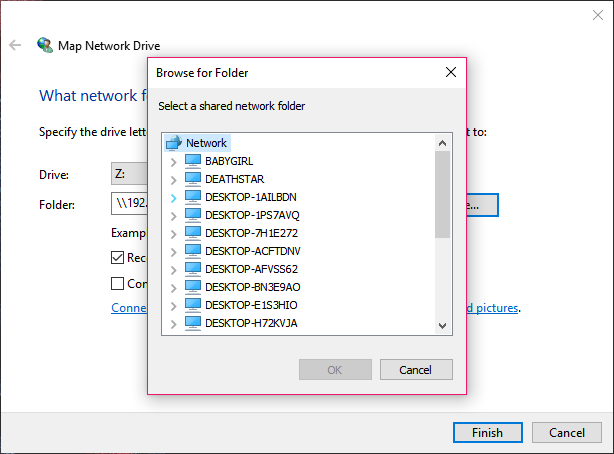
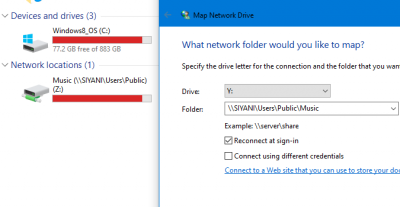
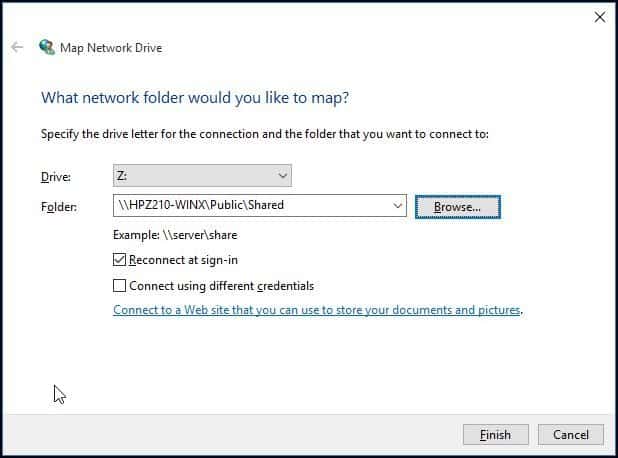
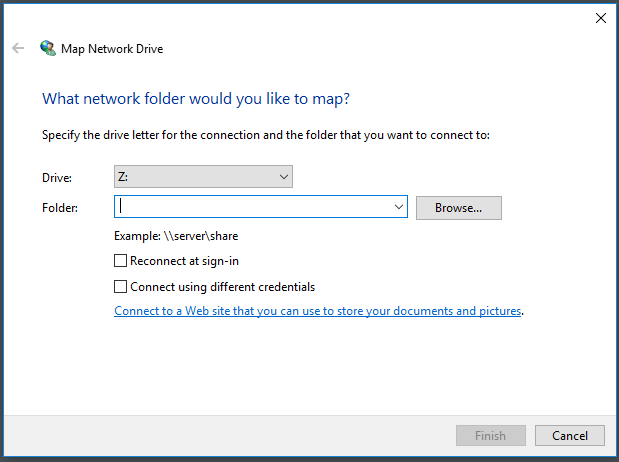
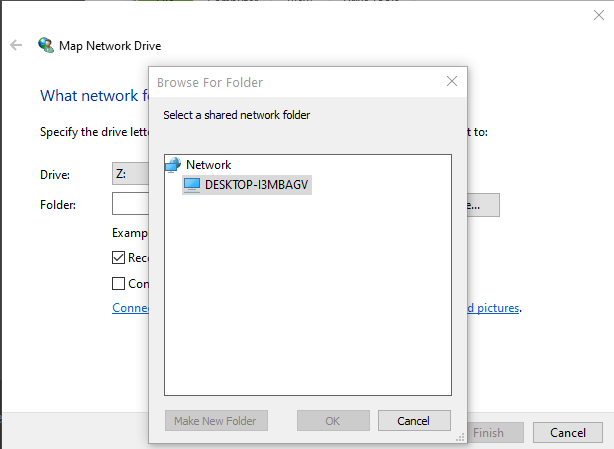
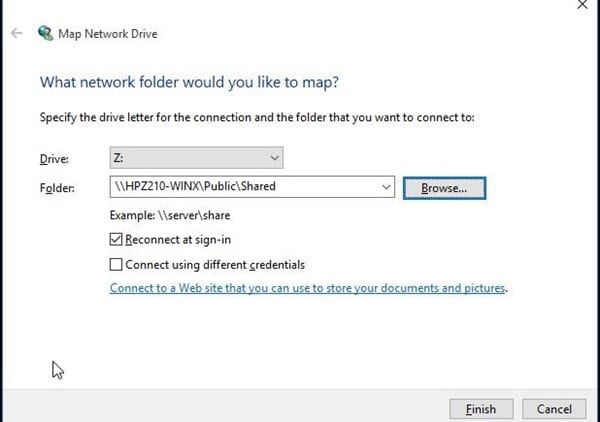
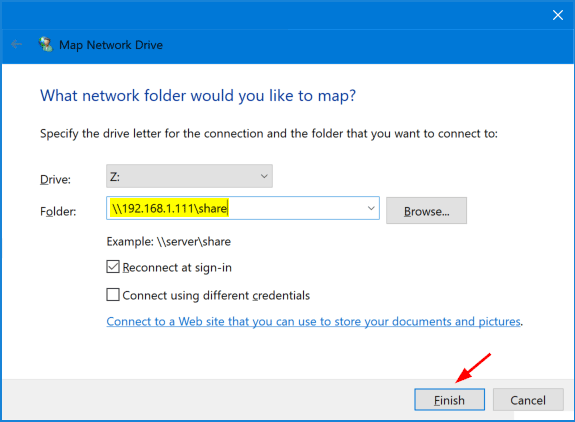
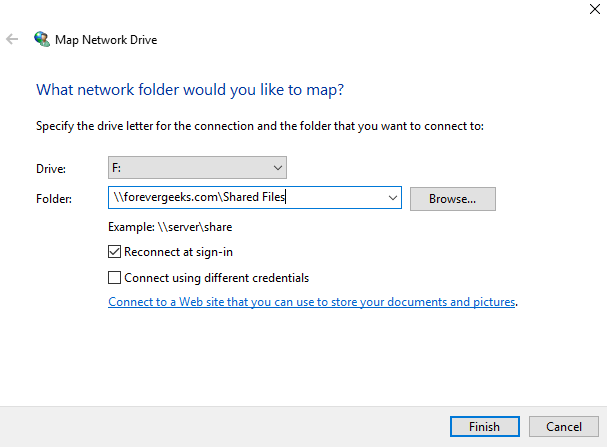
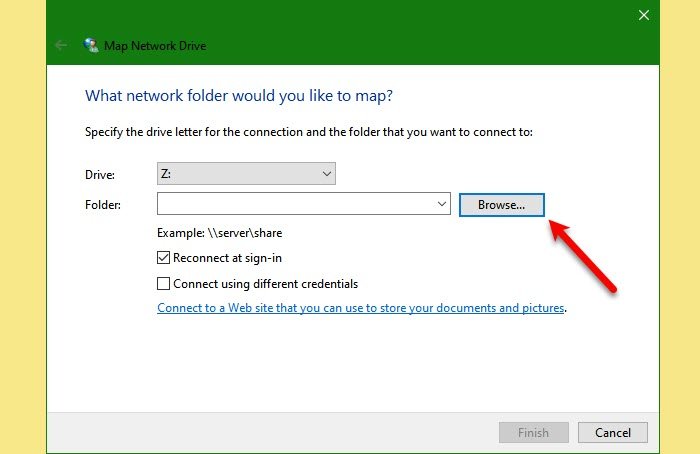
Select This PC from the left pane. Then, on the File Explorer ribbon, select More > Map network drive. In the Drive list, select a drive letter. (Any available letter will do.) In the Folder box, type the path of the folder or computer, or select Browse to find the folder or computer. To connect every time you sign in to your PC, select. How to Map a Network Drive in Windows 11 It takes just a few steps to map a network drive via the This PC window. Open File Explorer ( WIN+E ). Right-click This PC from the left column, and select Map network drive. If you don't see anything in a left column, go to View > Show > Navigation pane.
Related Posts of Map A Network Drive In Windows 10 :
Map Network Drive in Windows 10 Tutorials
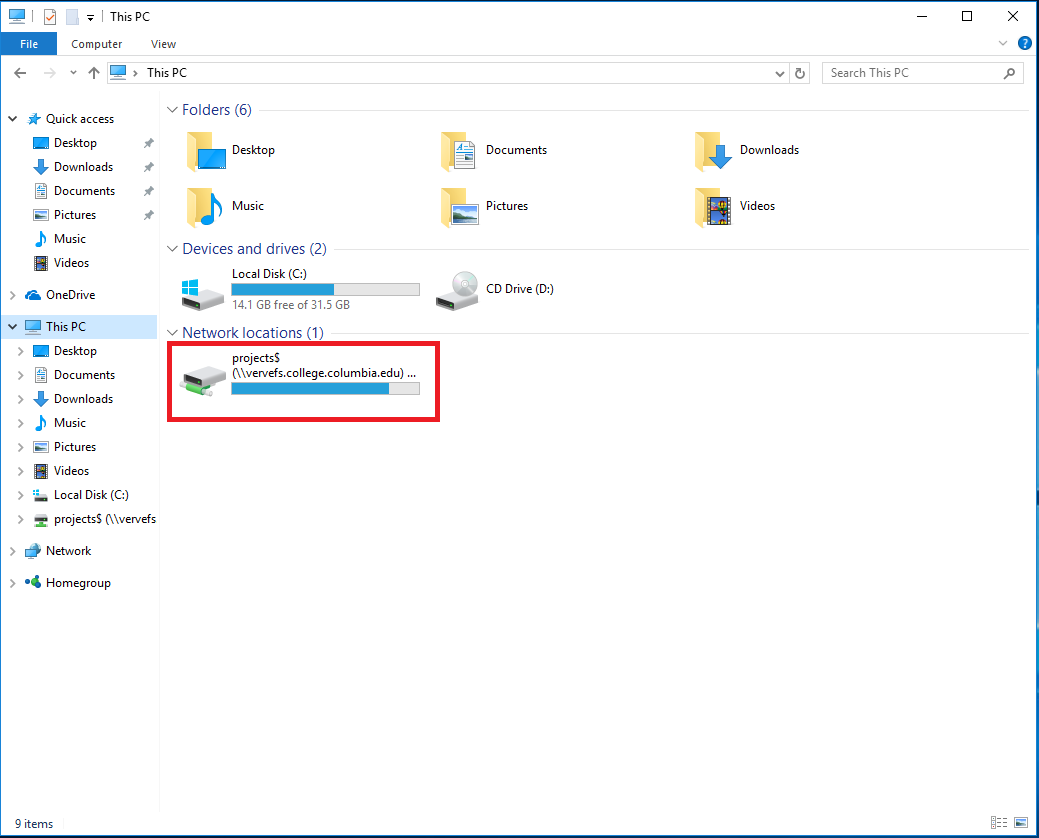
How to Map Network Drives in Windows 10 Columbia College Information
Mapping a Network Drive in Windows 10

How To How To Map A Network Drive In The Windows 10 System

How to Map a Network Drive on Windows 10 Howchoo
How to map a network drive in Windows 10
27+ Images of Map A Network Drive In Windows 10
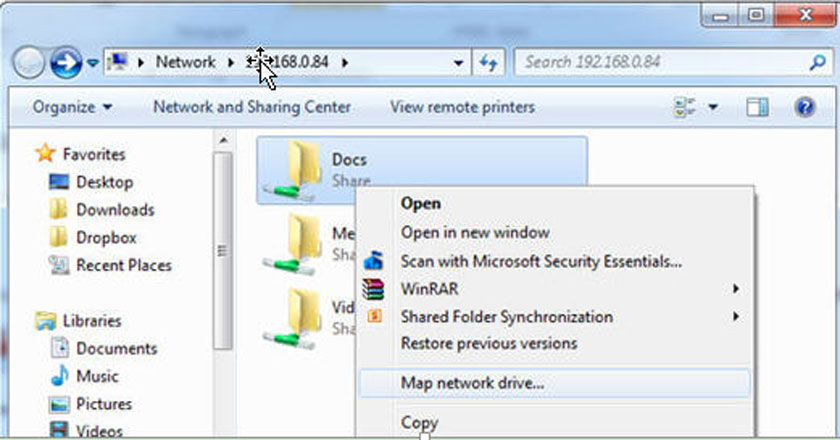
In the "Map Network Drive" window, click the "Drive" drop-down menu and select a drive letter that you will assign to the network drive. It can be any letter in the list, depending on your personal preference. In the "Folder" field, enter the network device and share name.
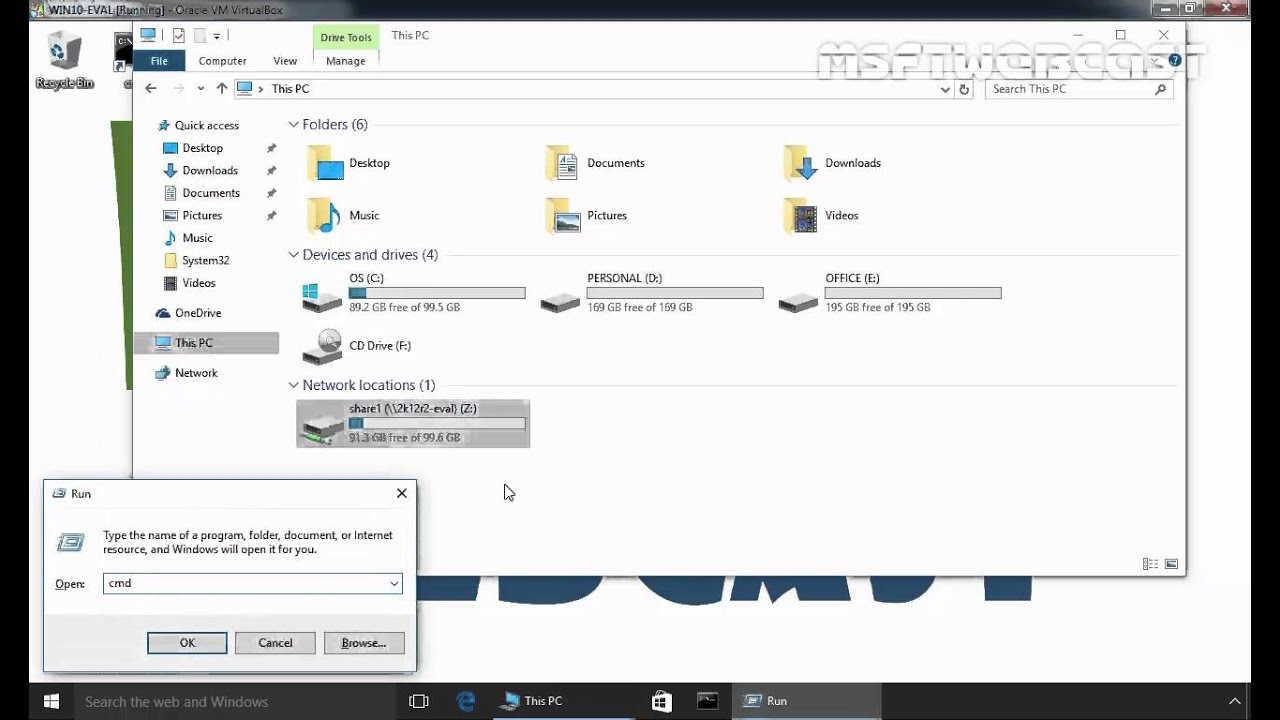
To map a network drive, type the following command and then hit Enter: net use DRIVE: PATH DRIVE is the drive letter you want to use and PATH is the full UNC path to the share. So, for example, if we wanted to map drive letter S to the share \\tower\movies, we'd use the following command: net use s: \\tower\movies
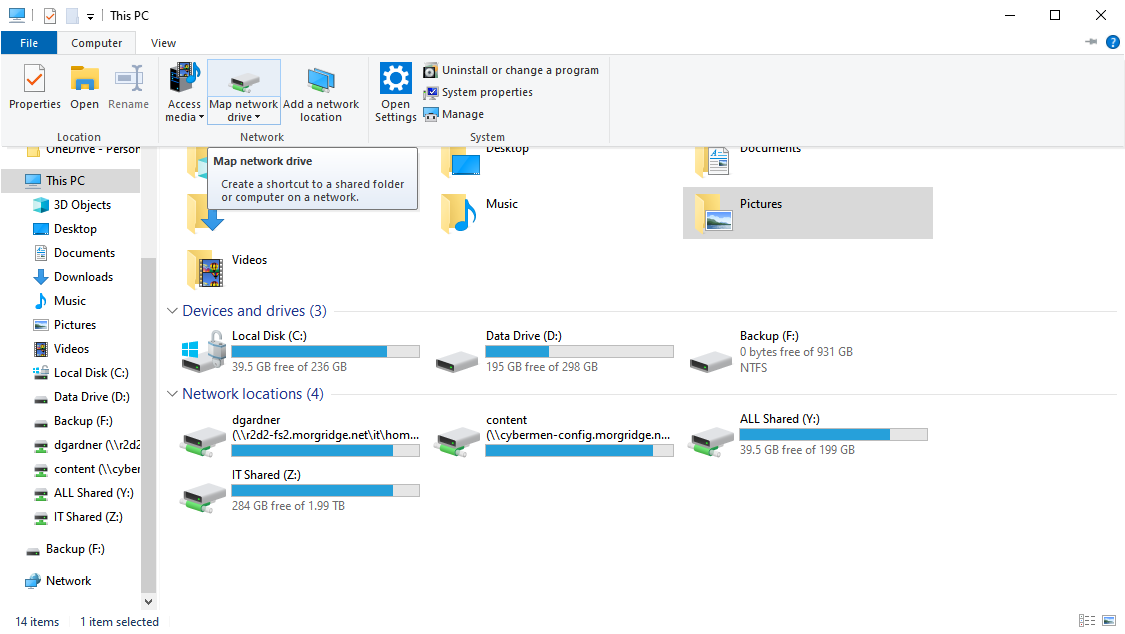
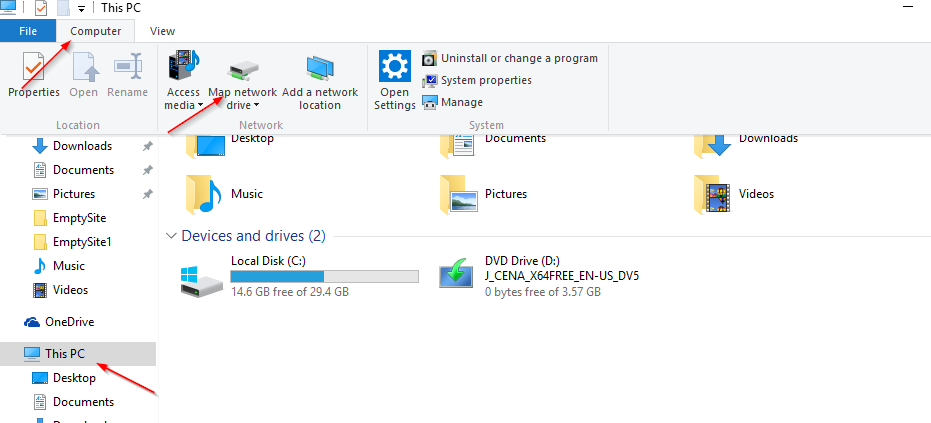
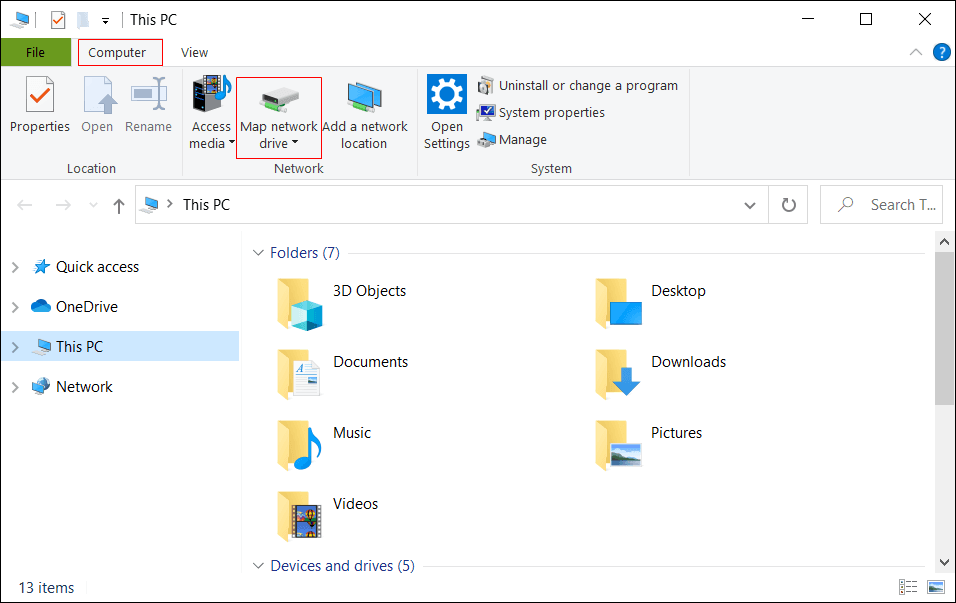
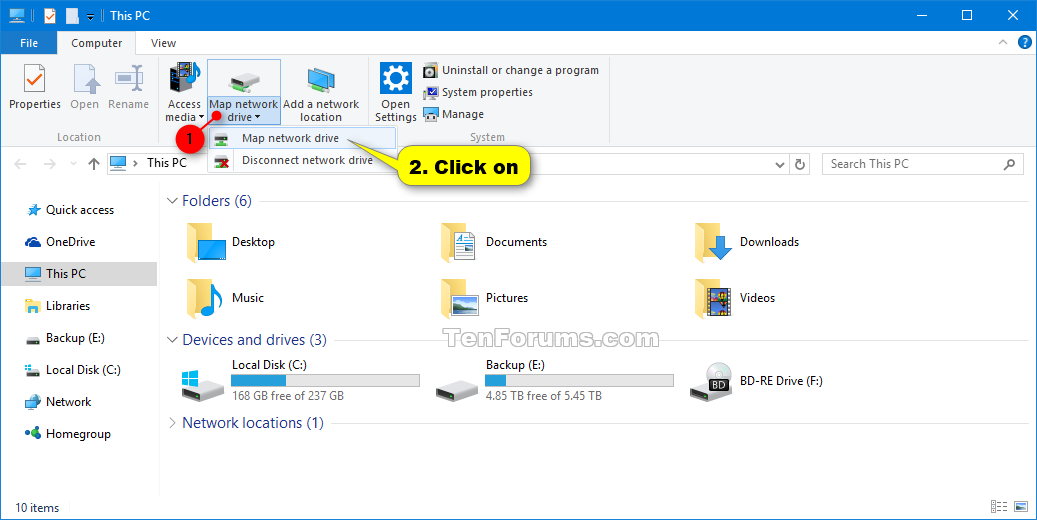
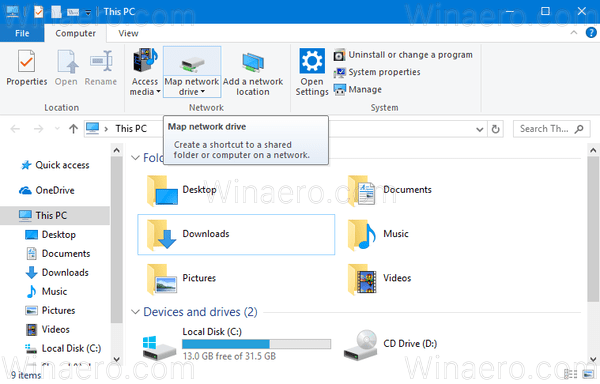
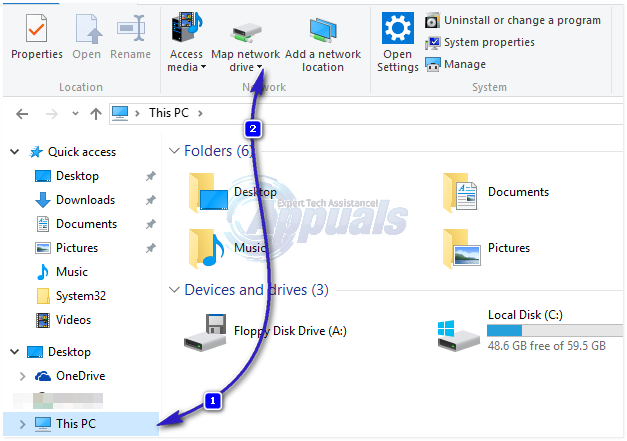
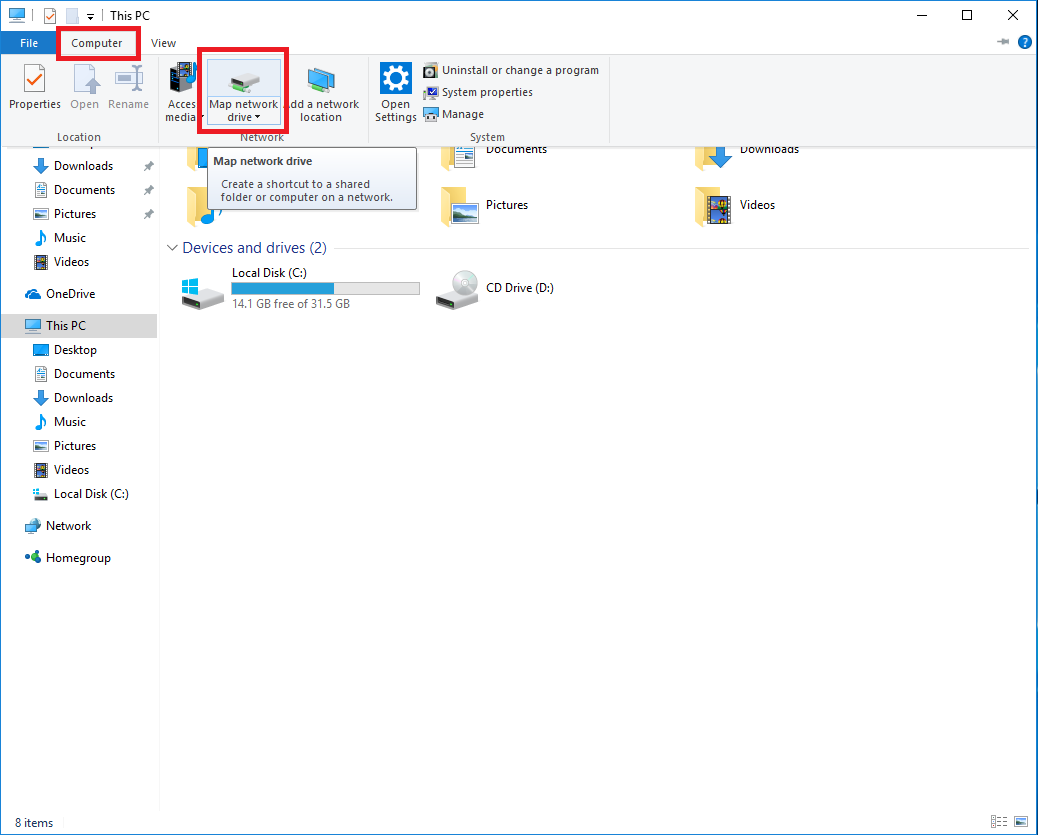
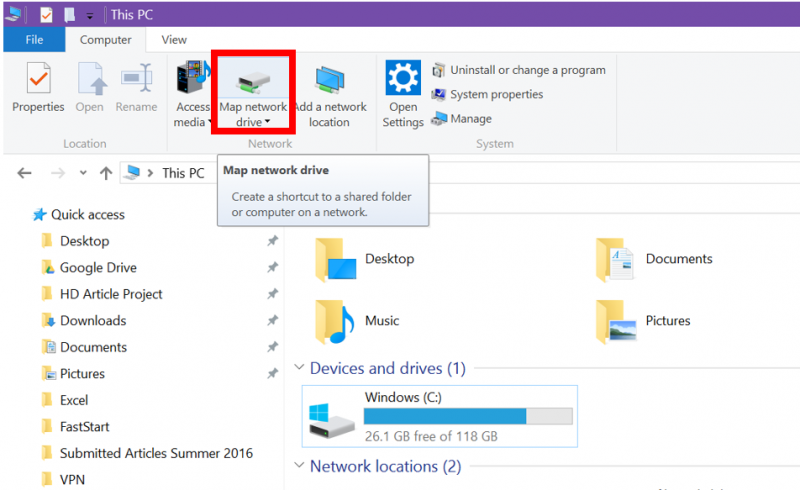
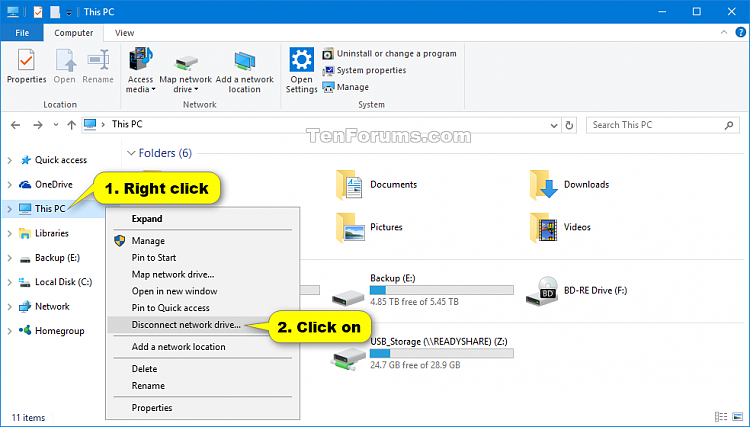
1. Open File Explorer and select This PC. 2. Click the Map network drive drop-down in the ribbon menu at the top, then select "Map network drive." (This is under the Computer tab, which.
Before mapping a network drive, make sure that network discovery is enabled on your computer. Follow the sets below to enable network discovery on Windows: Press Win + I to open the Settings app. Head over to Network & internet from the left pane and click on Advanced network settings on the right.
Open File Explorer by pressing the Windows key + E. Click on "This PC" in the left-hand sidebar. Click on "Map network drive" in the toolbar at the top. In the "Map network drive" window, select a drive letter to use for the mapped drive. In the "Folder" field, enter the UNC path to the network folder you want to map.
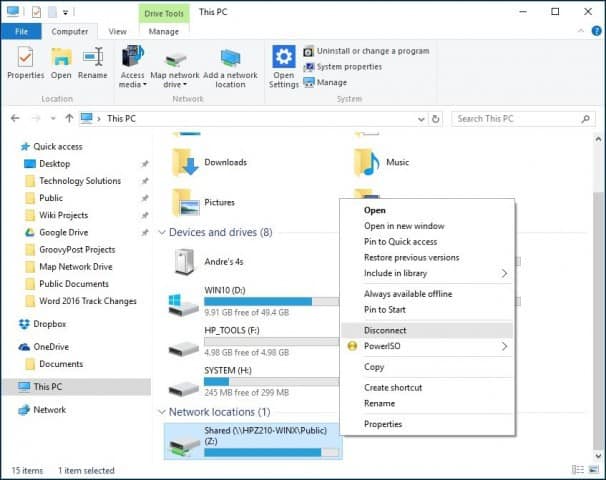
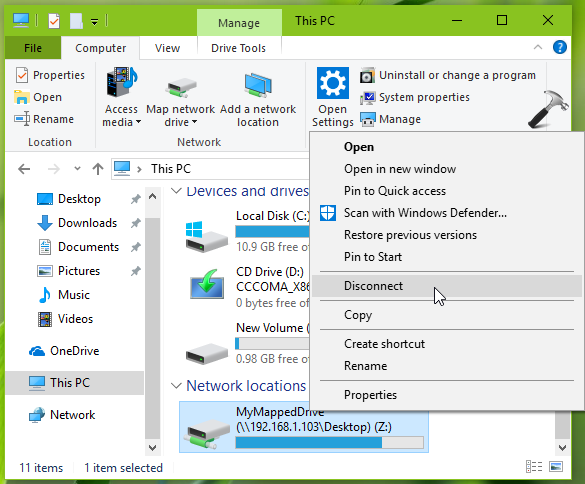
In Windows 8.x, open File Explorer and go to "This PC", and select the network drive you want to remove. Expand the "Computer" tab on the ribbon and click or tap the arrow for "Map network drive". A small menu is displayed, which includes an option that says "Disconnect network drive".
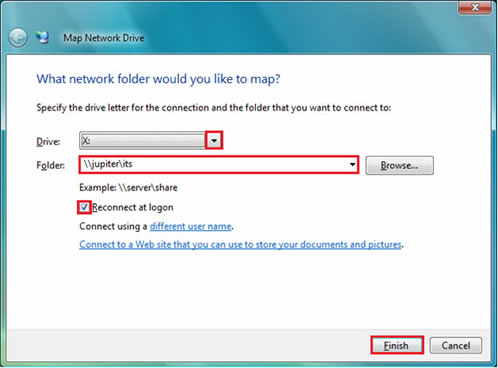
1. Select Start > Computer > Map Network Drive. 3. In the Drive list, select any available drive letter. 4. In the Folder box, type the path of the folder or computer, or select Browse to find the folder or computer. To connect every time you log on to your computer, select the Reconnect at logon check box. 5. Select Finish.
You can then continue the process for mapping the network drive in Windows 10. (Image credit: Future) 2. Open This PC in Windows Explorer Open up file explorer (press the Windows Key and.
To map a network drive in Windows 10 or Windows 8: Click the Start button. In the search box, type This PC, then select This PC from the search results. Click Computer and then click Map network drive. In the window that opens, choose an available letter from the Drive list.
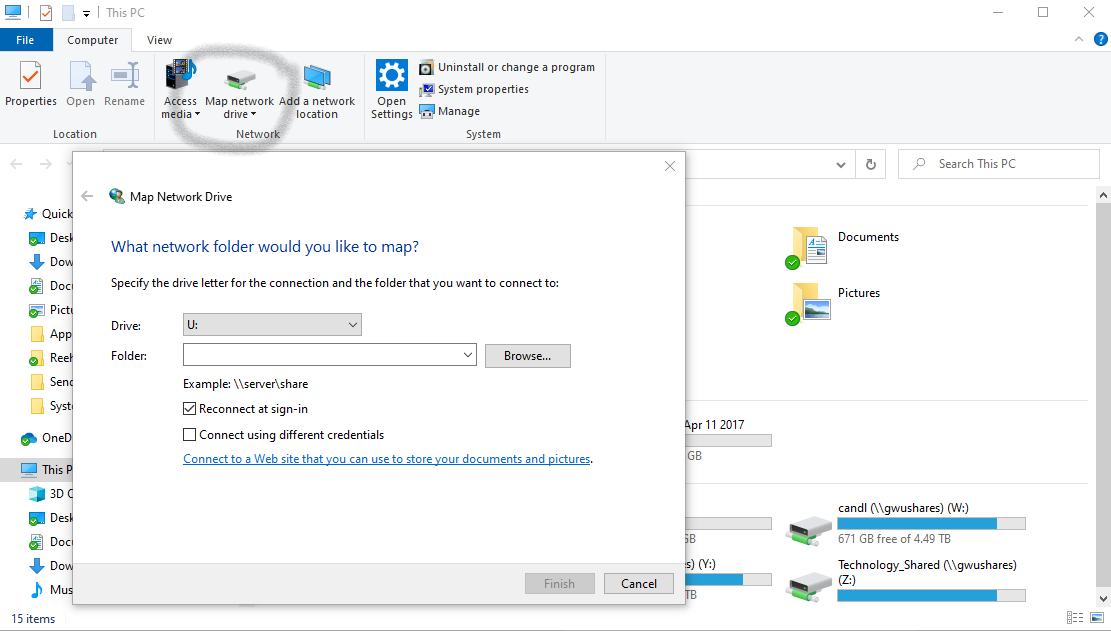
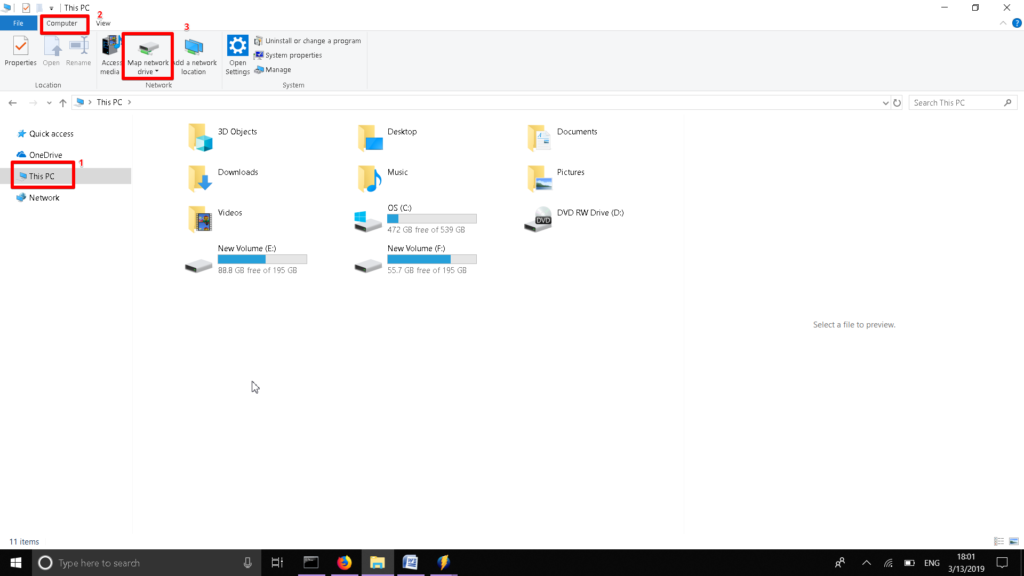
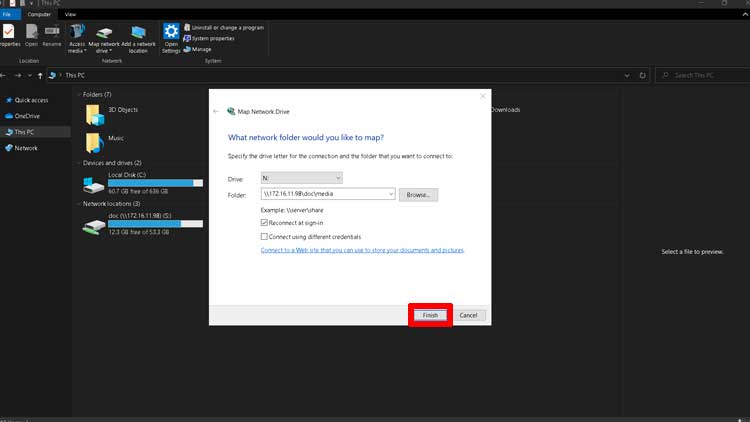
After turning your PC's network discovery option on, follow the steps down below to map a network drive. Open File Explorer by pressing Win + E and click on This PC in the left-hand tab. While in This PC, hit Computer in the top left corner, and then go to Map network drive > Map network drive. In the Map Network Drive panel, choose a drive.
You can map a network drive on both Windows and Mac computers. Method 1 On Windows Download Article 1 Open Start . Click the Windows logo in the bottom-left corner of the screen. 2 Open File Explorer . Click the folder-shaped icon in the lower-left side of the Start window. 3 Click This PC.
Here's how to map a network drive. 1. Click the Start Menu icon in the taskbar. 2. In the Start menu, click the Settings icon. 3. Click on "Network & Internet" in Windows Settings. 4. Under.
Using Map Network Drive Utility. The Map Network Drive utility in the file explorer has barely changed since Windows 7, and the way to use it remains mostly the same. Here are the steps to use this utility: Press Win + E and select This PC from the left pane. Click on the triple-dot icon and select Map Network Drive.
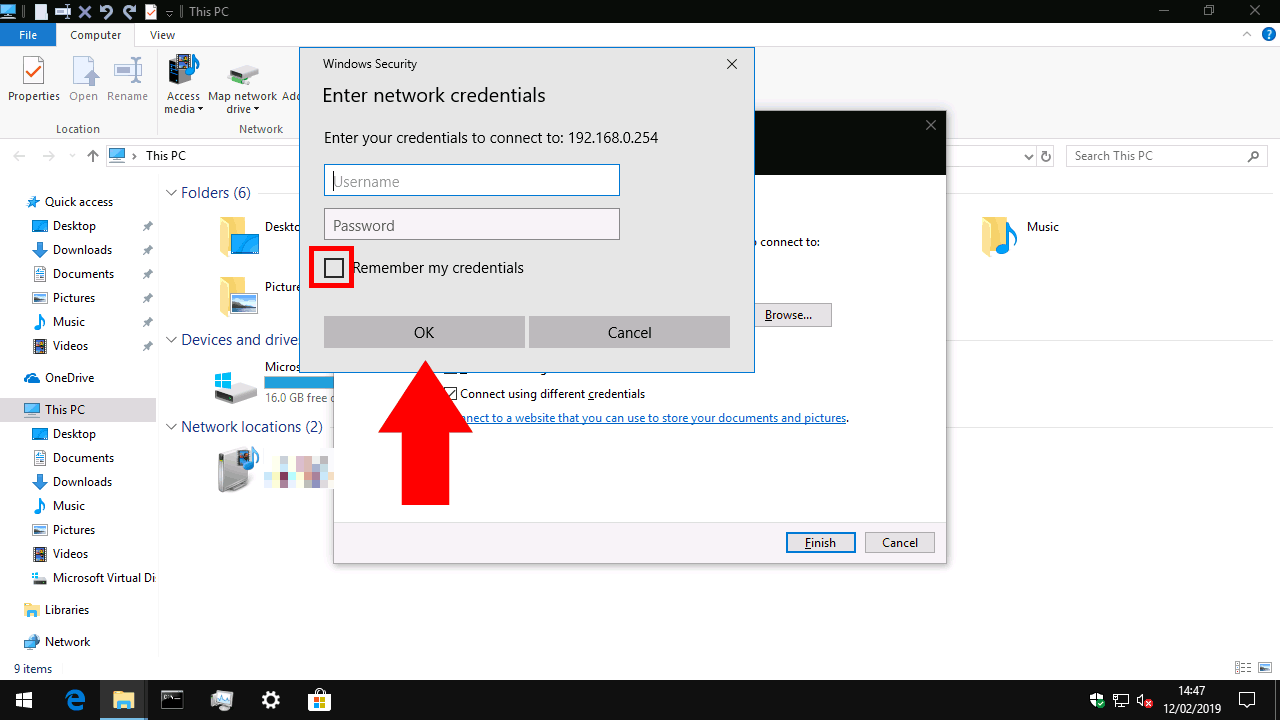
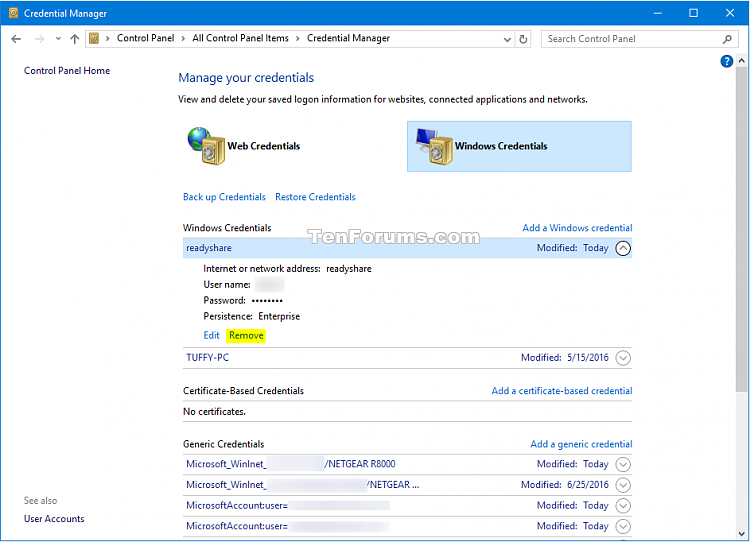
How to Map a Network Drive in Windows 10 Method 1: Delete Your Current Network Drive and Remap Method 2: Update to 20H2 Version Method 3: Disable Offline Files and Re-Enter Your Credentials Method 4: Use Local Group Policy Editor Fixed Can't Map a Network Drive in Windows 10 Issue How to Map a Network Drive in Windows 10
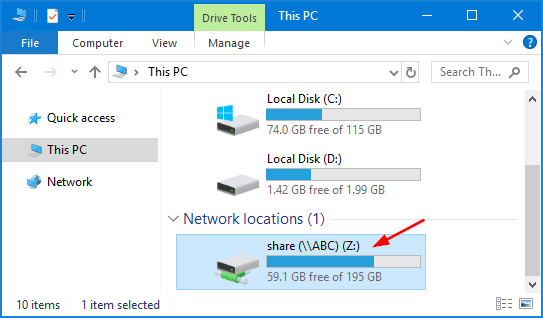
Select This PC . In the windows that opens, select Computer > Map network drive . Select the drive letter for the network drive you would like to map, enter the UNC path in the Folder text field, then select Finish . The UNC path is the location of the shared folders you want to connect to. For example: "\\testserver\share\test" tells the.
Short version. Open Windows File explorer and select 'This PC'. Choose Map network drive. Select an unused drive letter and navigate to a folder. Choose whether the network drive persists.
Gallery of Map A Network Drive In Windows 10 :
How to Map a Network Drive in Windows 10 8 and 7 Step by Step

map network drive windows10 AEM CQ5 Tutorials
Map Network Drive in Windows 10 Tutorials

How to connect to a network share in Windows 10 OnMSFT com
How to Map Network Drives in Windows 10 Columbia College Information
How to Map Network Drives in Windows 10 Columbia College Information

How to Map a Network Drive on Windows 10 Howchoo
How to Map a Network Drive on Windows 10 11 Computers Software Tested
Mapping a Network Drive in Windows 10 How To LazyAdmin
Map a Network Drive in Windows 10 Information Technology Services

How do I map a network drive on Windows 10 EVE Support

IT Computers Solutions Securities How to Create Map Network Drive In
How to Mount and Map a Network Drive in Windows 10 Dignited
How to Mount and Map a Network Drive in Windows 10 Dignited
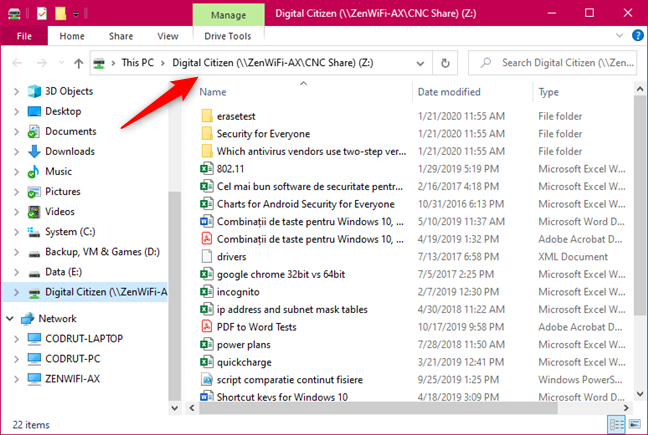
4 ways to delete mapped network drives in Windows 10 Digital Citizen
How to Map A Network Drive on a Windows 10 PC Tech How To

How to Map a Network Drive in Windows 10 Make Tech Easier
How to Map Network Drive in Windows 10 Winaero
How to Map Network Drive Windows 10 5 Methods Itechguides com

How to Map a Network Drive on Windows 10 Howchoo
Windows 10 Map Network Drive Missing Living Room Design 2020

Map a Network Drive in Windows 10 Better Host Review

How to Map a Network Drive in Windows 10 Laptop Mag
/MappedDrive-f1d53207c16a47cbaf87b0a25f0b1276.png)
How to Map a Network Drive
How to Map a Network Drive in Windows 10 YouTube

How to Map a Network Drive in Windows 10 Tom s Hardware
Windows 10 Networking Guide How to Map Network Drive in 2021

Map a Network Drive Windows 10 Oklahoma Christian University
How to Map a Network Drive in Windows 10 Password Recovery

Map a network drive in Windows 10
How to Map Network Drives in Windows 10 8 1 7 Tutorial The

2 Ways To Map Network Drive in Windows 10 TechCult

Map Network Drive in Windows 10 Tutorials
Map a Network Drive in Windows 10 Information Technology Services
Connecting to the madteamdrives from home Windows 10 My Website

How To How To Map A Network Drive In The Windows 10 System
How to Map Network Drive in Windows 10

3 Ways to Map Network Drive in Windows 10 NEXTOFWINDOWS COM
How to Map a Network Drive in Windows 10 Appuals com

How To How To Map A Network Drive In The Windows 10 System
Map A Network Drive In Windows 10
Network drive mapped as X can be seen be not accessed Page 2
How To Map A Network Drive In Windows 10

How to Map Network Drive Windows 10 5 Methods Itechguides com

Map Network Drive Using Ip Address Windows 10 Living Room Design 2020
How to Map Network Drives in Windows 10 Columbia College Information
How to Map a Network Drive in Windows 10 Andi Tech
2 Methods to Map Network Drive in Windows 10 Truegossiper

overview for mribecky

Map a Network Drive in Windows 10
How to Map Network Drive in Windows 10

How to Create Map Network Drive In Windows 10 and Server TECHNIG
What is a Network Drive How is it Set Up Modem Friendly
How to Mount and Map a Network Drive in Windows 10 Dignited
How to Map a Network Drive using Windows 10

How to Map a Network Drive in Windows 10 Modem Friendly

How to Map a Webdav Drive in Windows 10 Make Tech Easier
Map Network Drive in Windows 10 Tutorials
how to remove map network drive in windows 10 Windows 10 Forums
How to map FTP drives network drives and web shares in Windows 10
Windows 10 How To Map A Network Drive Crabtree Valley Mall Map
How to Map Network Drive Windows 10

Map Network Drive in Windows 10 Tutorials
How to connect to a network share in Windows 10 OnMSFT com

Map Network Drive issue Windows 10 Forums

How to map Network Drive Windows 10 Tutorial

3 Ways to Map Network Drive in Windows 10 NEXTOFWINDOWS COM
How to Map OneDrive as a Network Drive to See All Your Files in Windows 10
How To Connect To A Network Drive Windows 10 Cline Hameaced
How to Map a Network Drive using Windows 10
How to map a network drive Windows 10 Academic Technology Help Center

Map a Network Drive in Windows 10 Information Technology Services
How to map a network drive in Windows 10 Htop Skills

How to Map a Network Drive in Windows 10 Laptop Mag

Windows 10 on VMware Workstation 11 Improved VMware Tools Shared Folder

Map Network Drive in Windows 10 Tutorials

Mapping network drives with Windows 10 Civil and Environmental
Can t Map a Network Drive Windows 10 Forums
How to Map Network Drive Windows 10
Map Network Drive in Windows 10 Tutorials
How To Map A Network Drive In Windows 10
Map Network Drive In Windows 10 Maps For You
Windows Map network drive ITS Services for D MTEC

3 Ways to Map Network Drive in Windows 10 NEXTOFWINDOWS COM
How to map network drive on Windows 10 Techbast

How to Map Network Drive Windows 10 via External Hard Drives
How to map a network drive in Windows 10
How to Map a New Network Drive in Windows 10 7

How to Map a Network Drive in Windows

How to Map a Network Drive in Windows
How to map WebDAV as a Network Drive in Windows 11 10
Setup mapped drive in Windows 10 using VeeroTech Storage Linux VPS
Map A Network Drive In Windows 10 - The pictures related to be able to Map A Network Drive In Windows 10 in the following paragraphs, hopefully they will can be useful and will increase your knowledge. Appreciate you for making the effort to be able to visit our website and even read our articles. Cya ~.