Map Network Drive Windows 10
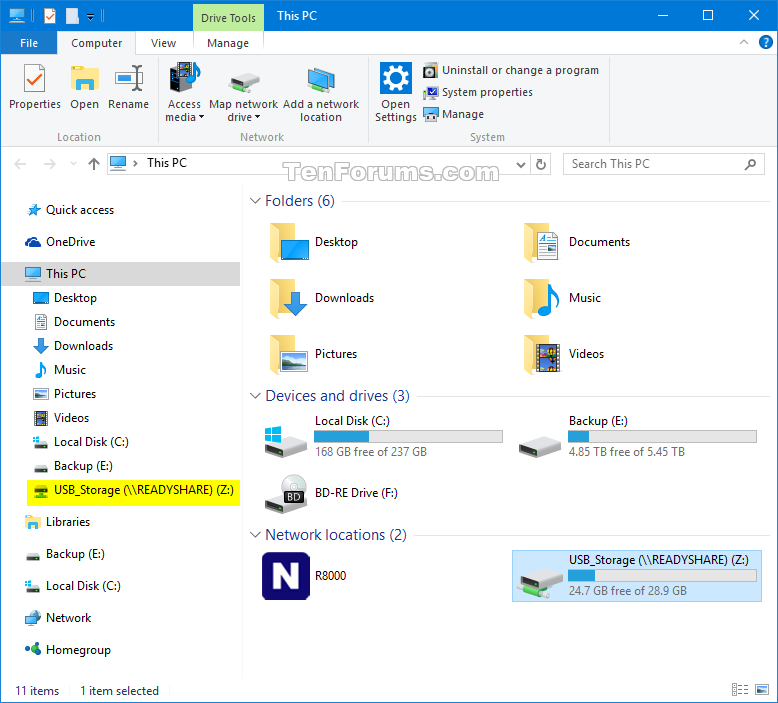
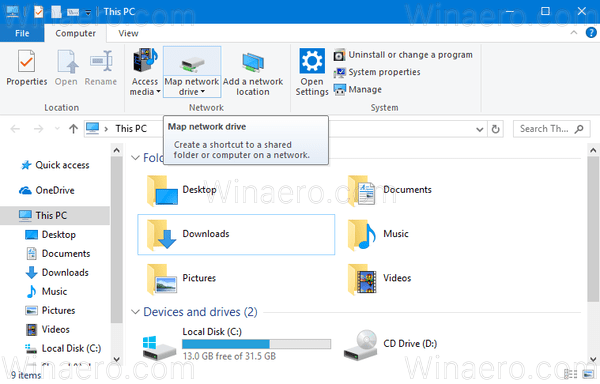
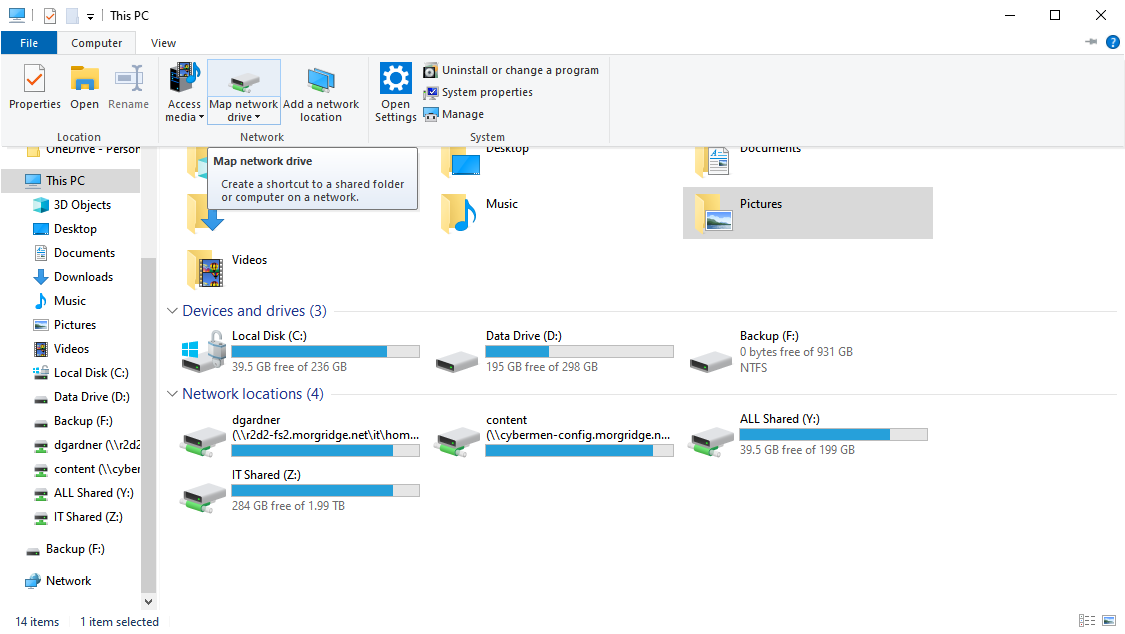
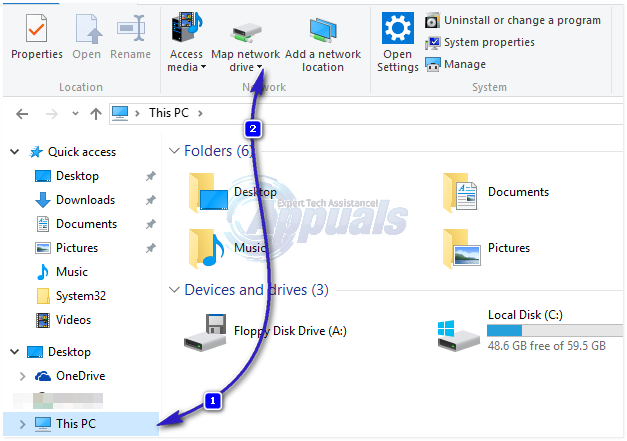
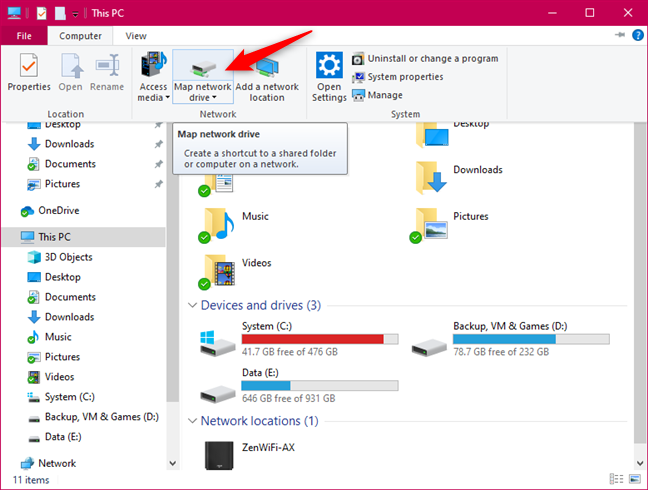
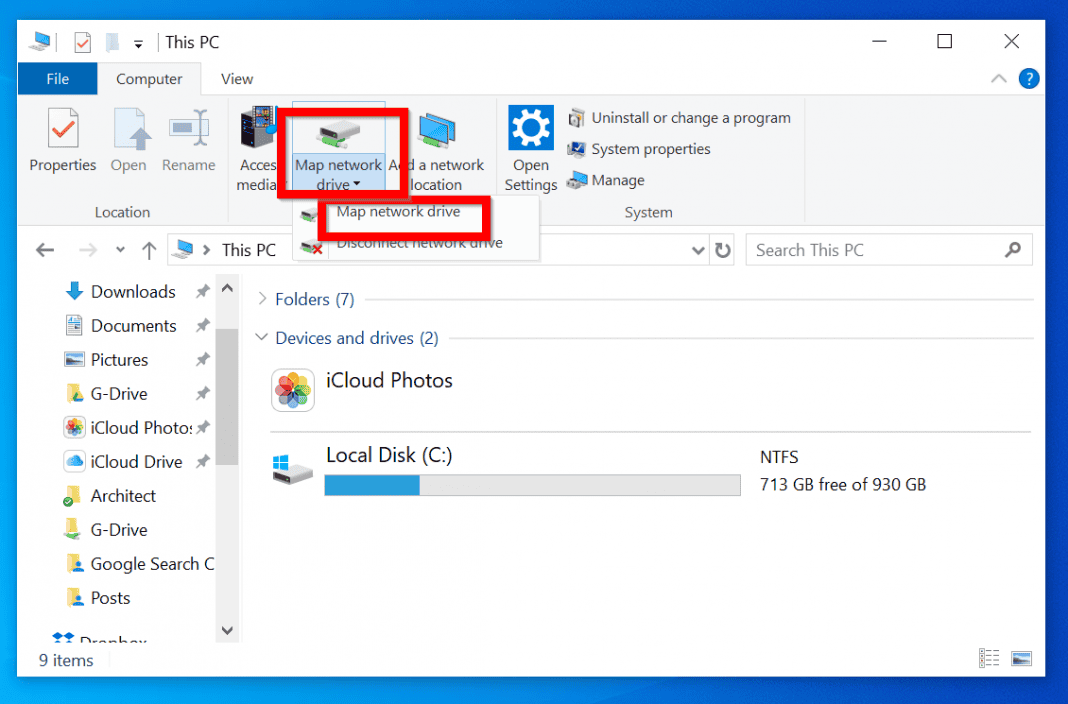
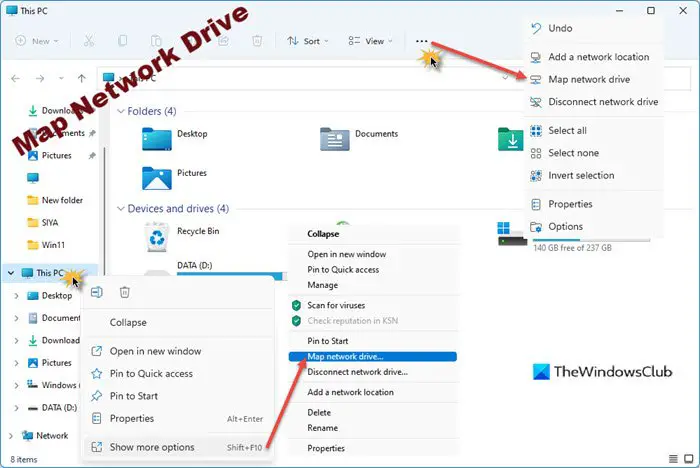
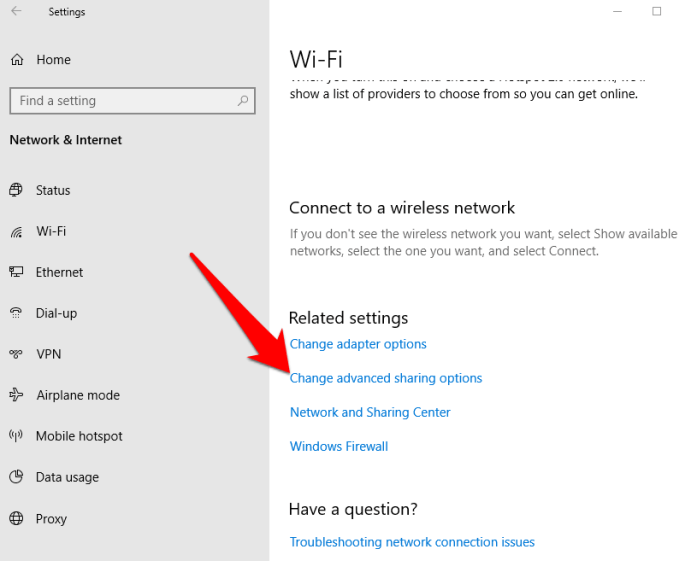
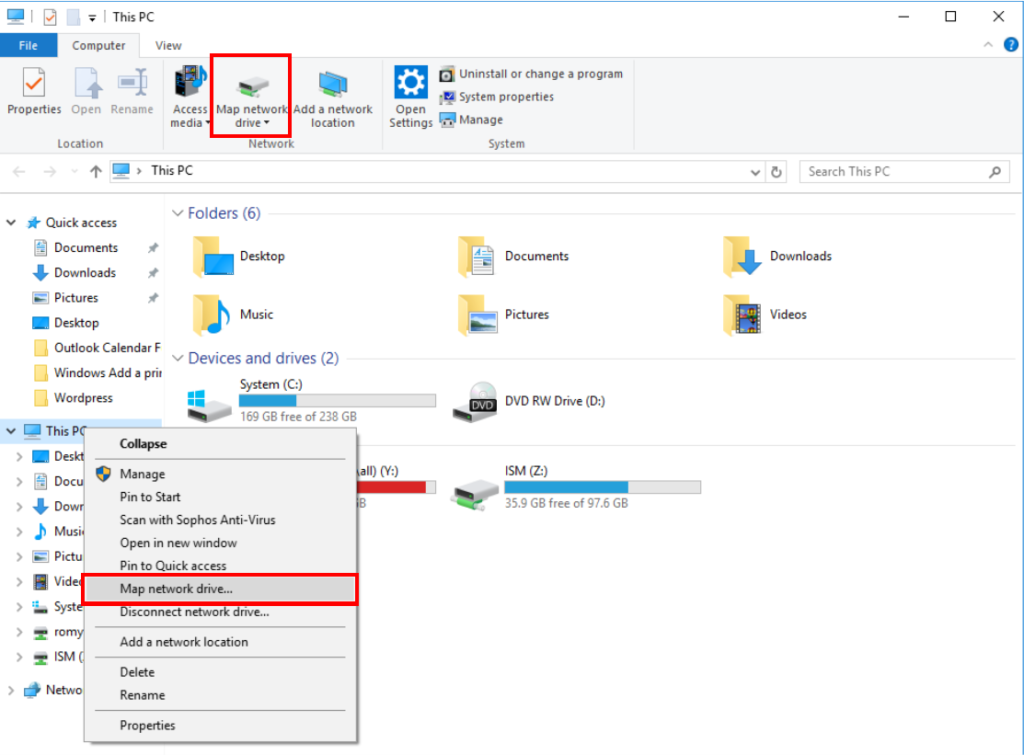
Open File Explorer from the taskbar or the Start menu, or press the Windows logo key + E. Select This PC from the left pane. Then, on the File Explorer ribbon, select More > Map network drive. In the Drive list, select a drive letter. (Any available letter will do.) If you want to map a network drive on your Windows 10 PC, you'll need to enable network discovery first. To do so, open Control Panel and then click "View Network Status and Tasks" under the Network and Internet group. Next, click "Change Advanced Sharing Settings" in the left-hand pane.
So, if you're unsure how to go about mapping a network drive in Windows 10, let's get to our step-by-step walkthrough to show you how to do it: 1. Select Settings from the Start Menu (Image. How to Map a Network Drive in Windows 10 : Read more 1. Open File Explorer and select This PC. 2. Click the Map network drive drop-down in the ribbon menu at the top, then select "Map.
Related Posts of Map Network Drive Windows 10 :
Map Network Drive in Windows 10 Tutorials
How to Map Network Drives in Windows 10 Columbia College Information

How to Map a Network Drive on Windows 10 Howchoo
Map Network Drive in Windows 10 Tutorials

How To How To Map A Network Drive In The Windows 10 System
How to Map a Network Drive on Windows 10 11 Computers Software Tested
45+ Images of Map Network Drive Windows 10
Plug the drive into the wall via the included power adapter, and then connect it via network cable (hopefully included) to one of the ports on the back of your router. You can then continue the.
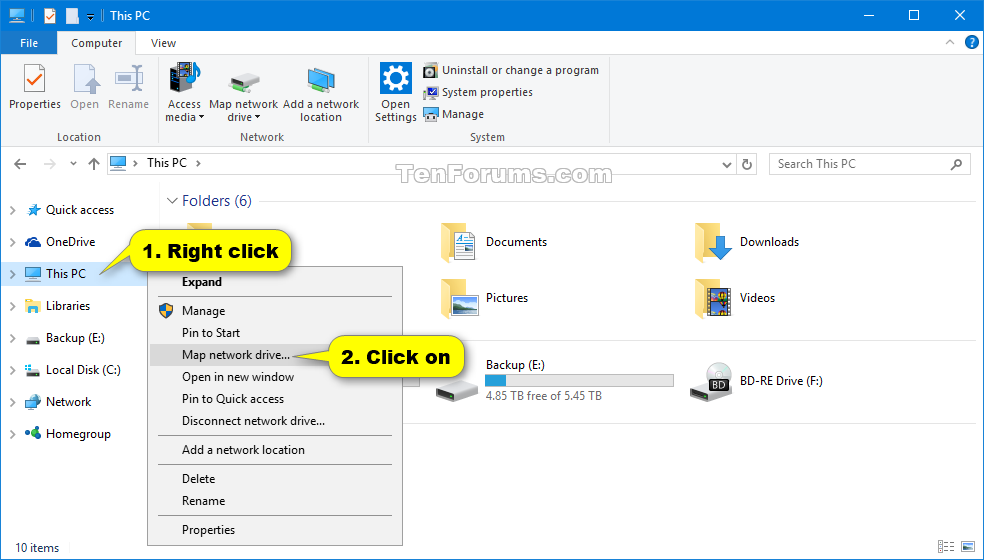
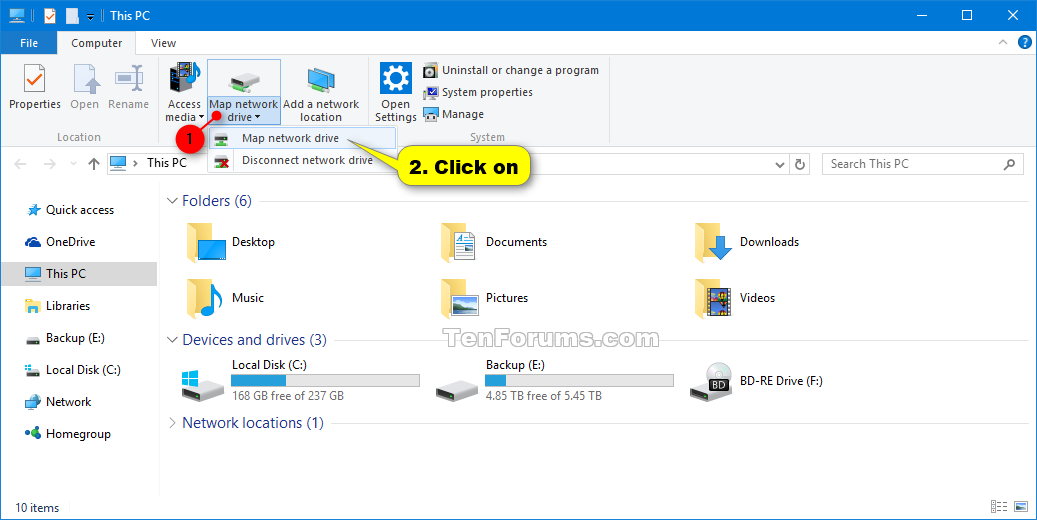
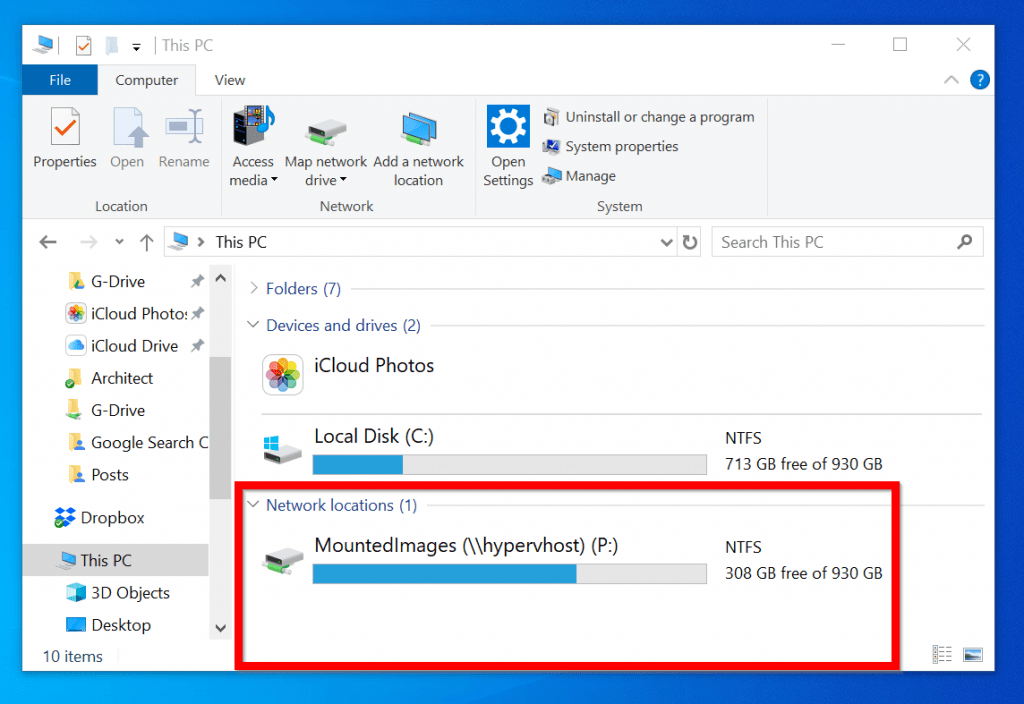
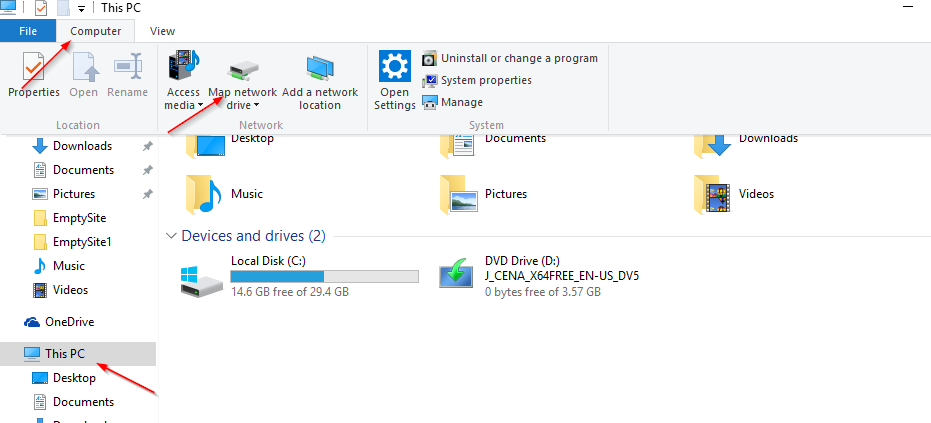
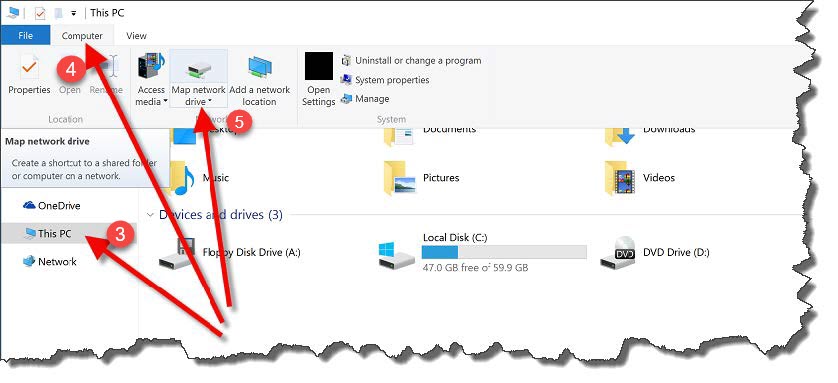
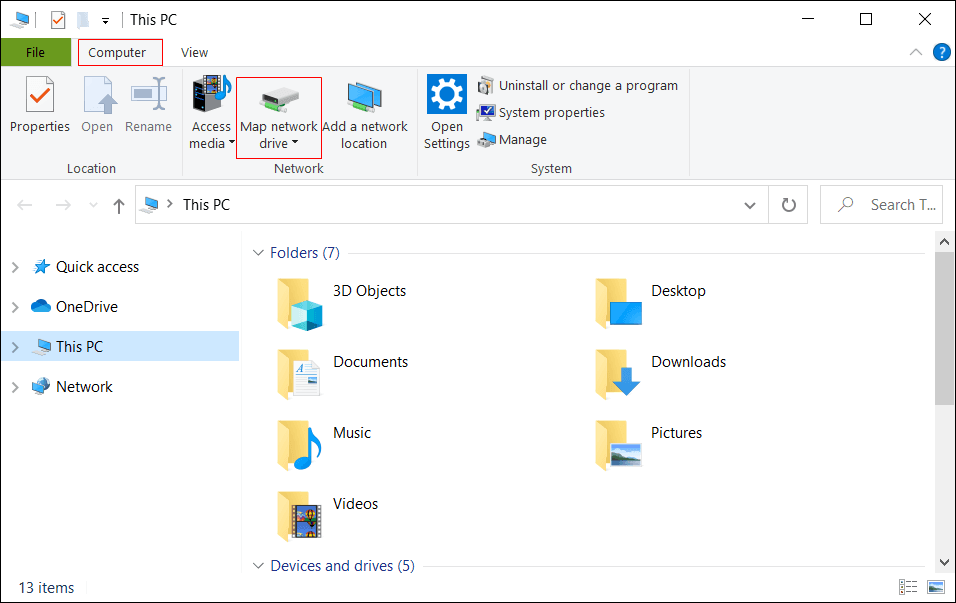
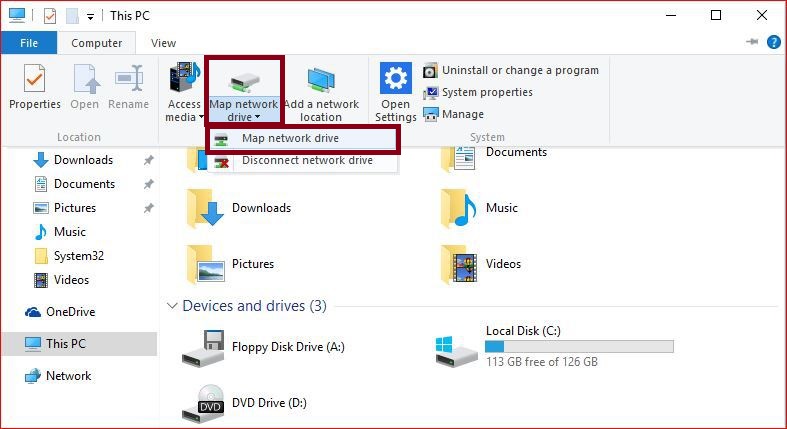
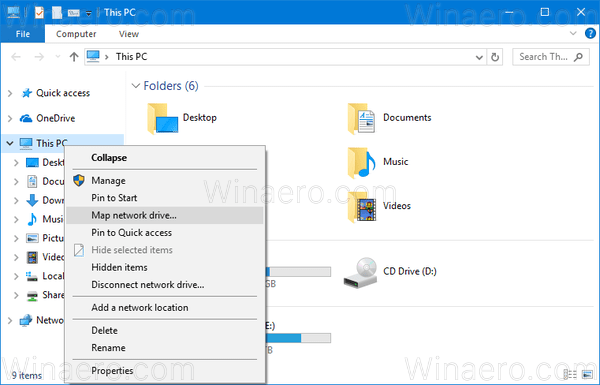
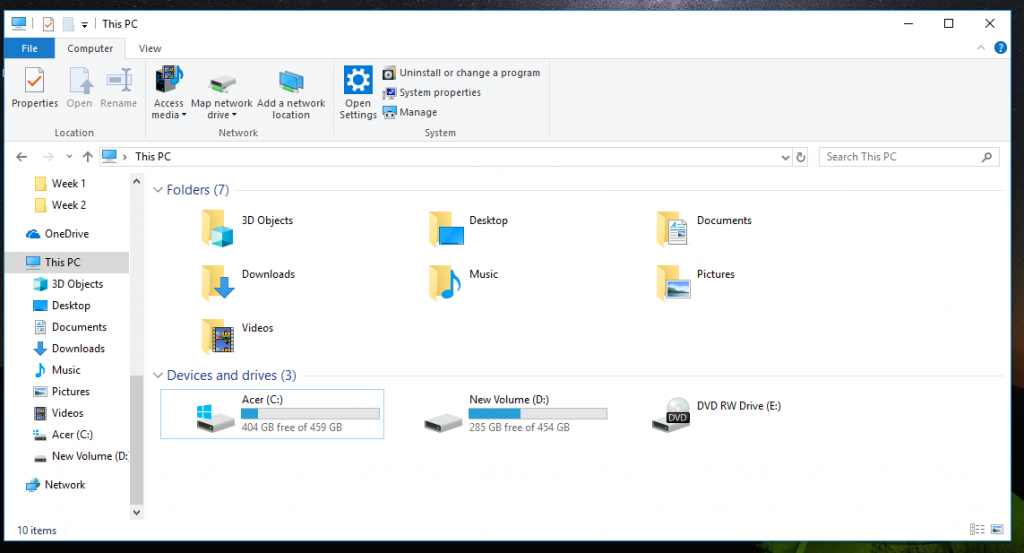
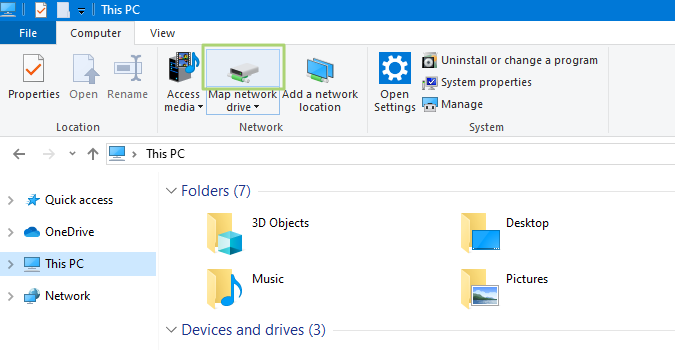
2 Open This PC in File Explorer, click/tap on the Computer tab, click/tap on the Map network drive button in the ribbon, and go to step 5 below. (see screenshot below) 3 Open File Explorer, right click or press and hold on This PC in the navigation pane, click/tap on Map network drive, and go to step 5 below. (see screenshot below)
After turning your PC's network discovery option on, follow the steps down below to map a network drive. Open File Explorer by pressing Win + E and click on This PC in the left-hand tab. While in This PC, hit Computer in the top left corner, and then go to Map network drive > Map network drive.
How to Map a Network Drive in Windows 10 Method 1: Delete Your Current Network Drive and Remap Method 2: Update to 20H2 Version Method 3: Disable Offline Files and Re-Enter Your Credentials Method 4: Use Local Group Policy Editor Fixed Can't Map a Network Drive in Windows 10 Issue How to Map a Network Drive in Windows 10
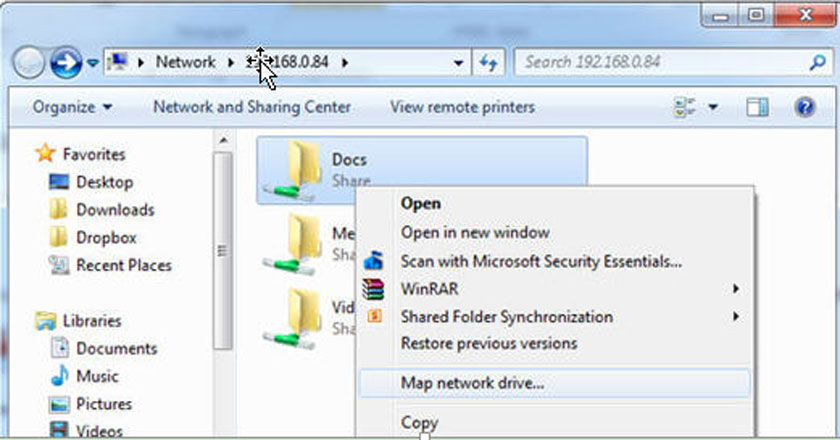
There are three ways to map a network drive through File Explorer in Windows 10. Let's go through them one by one. 1. Click This PC first, then Computer tab at the top, and the Map network drive button that shows up on the ribbon. 2. Navigate to the server that has the shared folder you want to map, right click on that folder and choose Map Drive
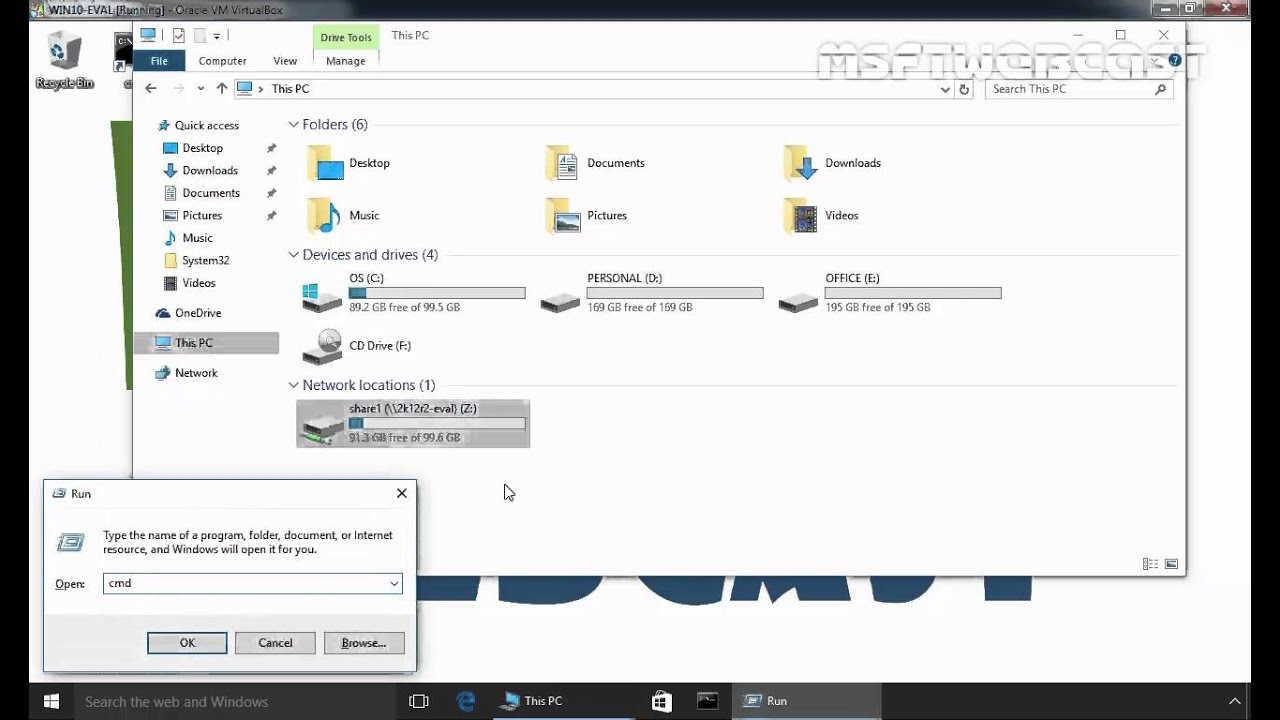
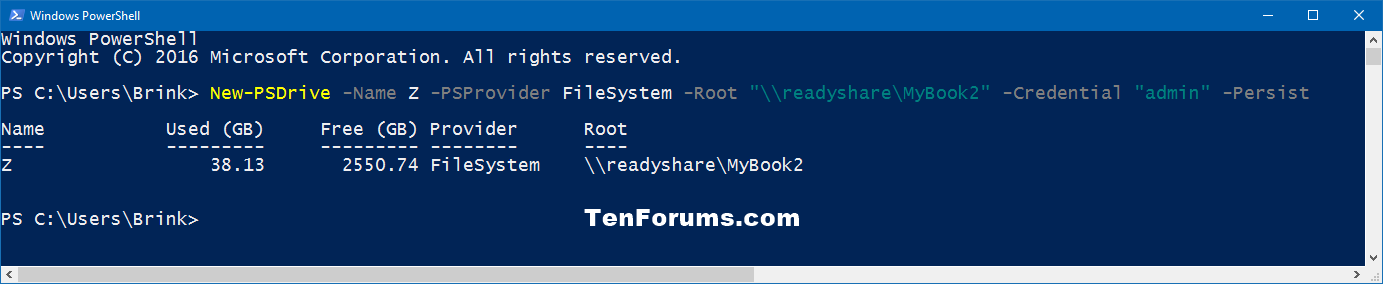
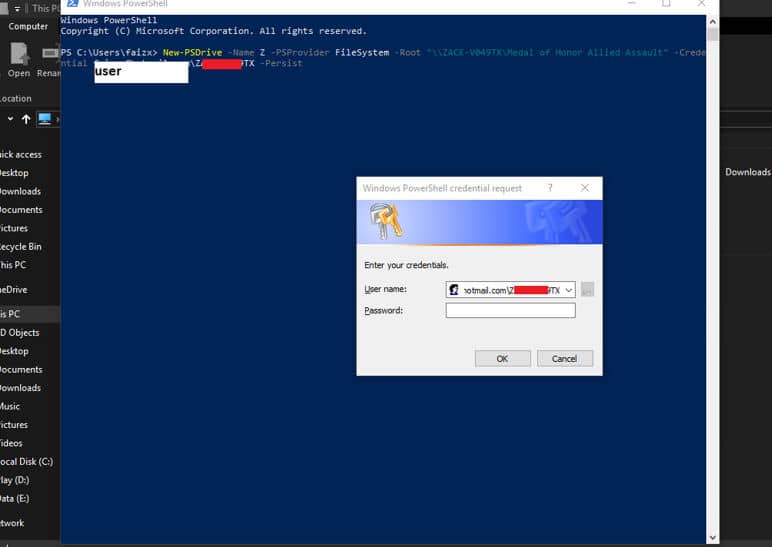
To use the net command to map a shared folder as a drive, use these steps: Open Start on Windows 10. Search for Command Prompt and click the top result to open the console. Quick note: If you run the command as an administrator, the drive may not mount correctly and won't appear in File Explorer. As a result, run the command as a standard user.
How to Map a Network Drive in Windows 10 Step 1 Open File Explorer Open Windows 10 File Explorer by clicking the folder icon in the task bat or pressing Windows Key + E. In the left.
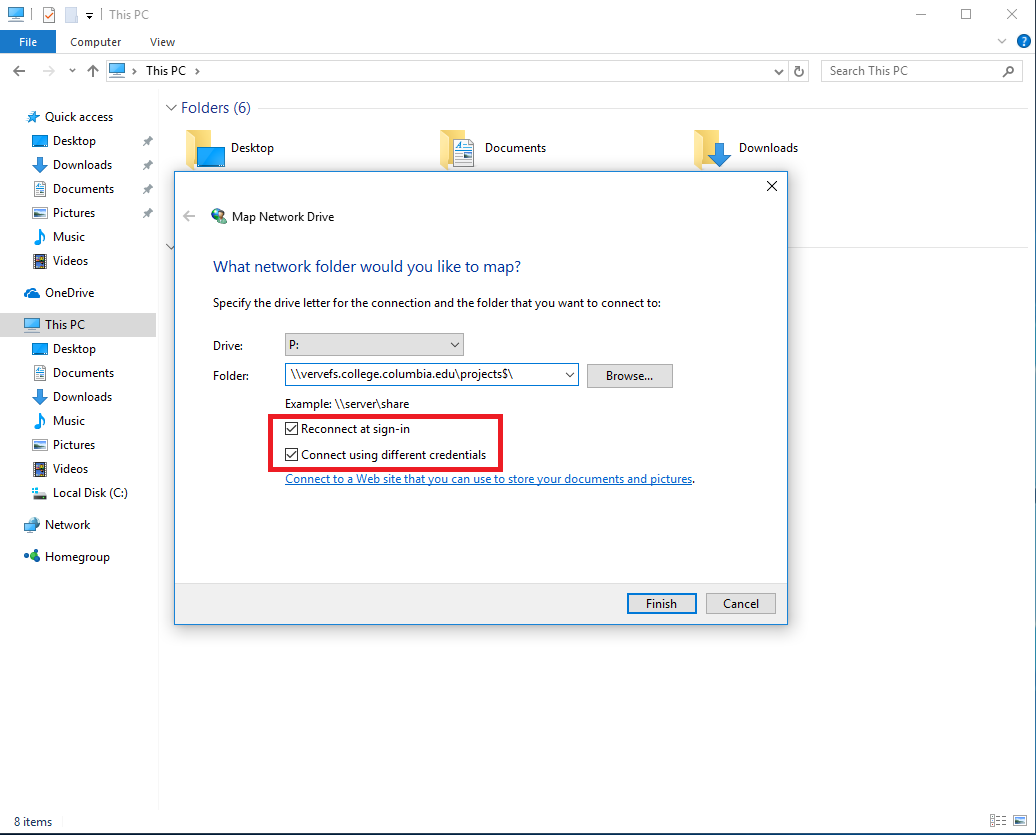
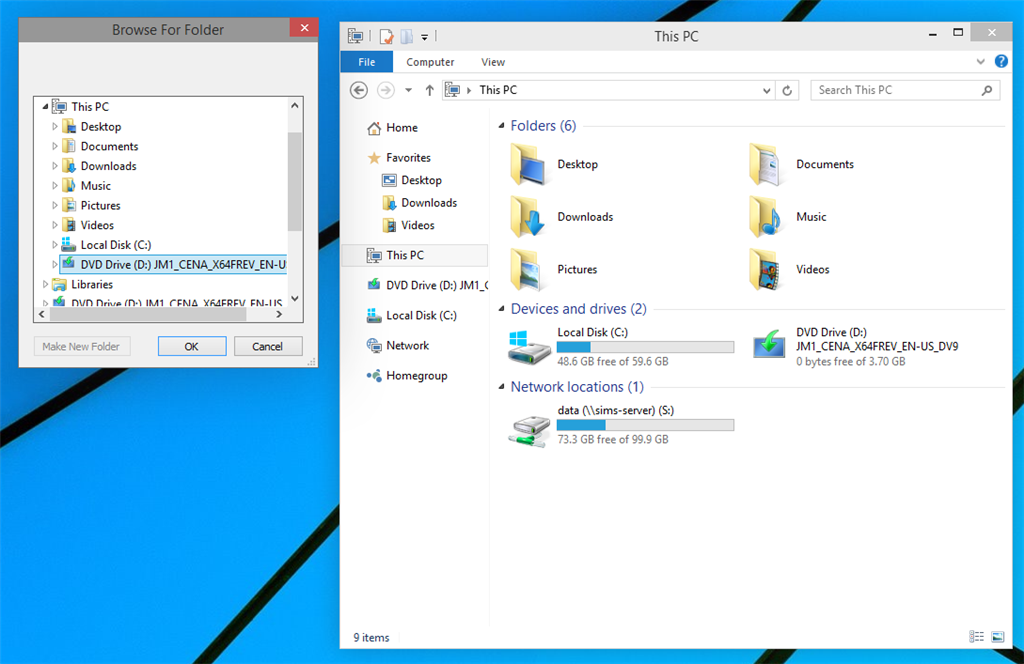
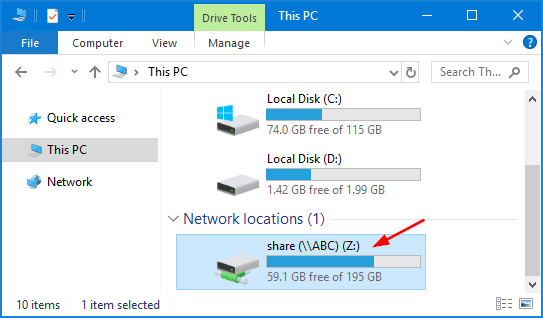
To map a network drive in Windows 10 or Windows 8: Click the Start button. In the search box, type This PC, then select This PC from the search results. Click Computer and then click Map network drive. In the window that opens, choose an available letter from the Drive list. In the Folder box, type the path to the shared network folder (the.
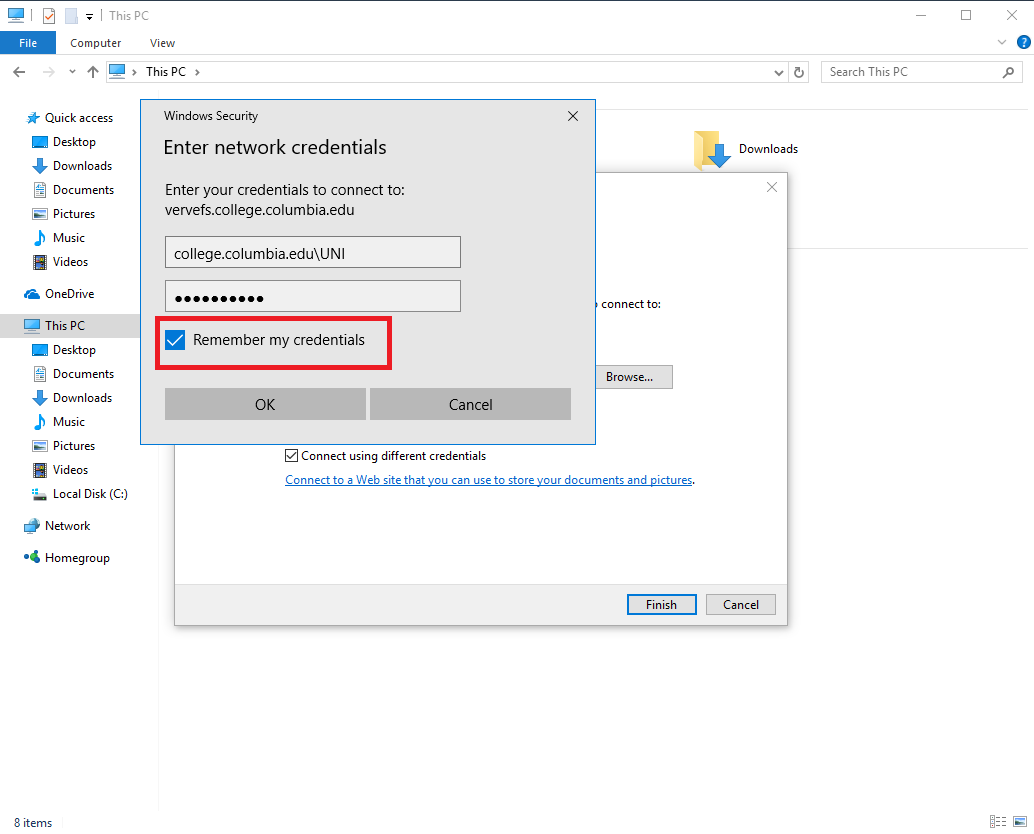
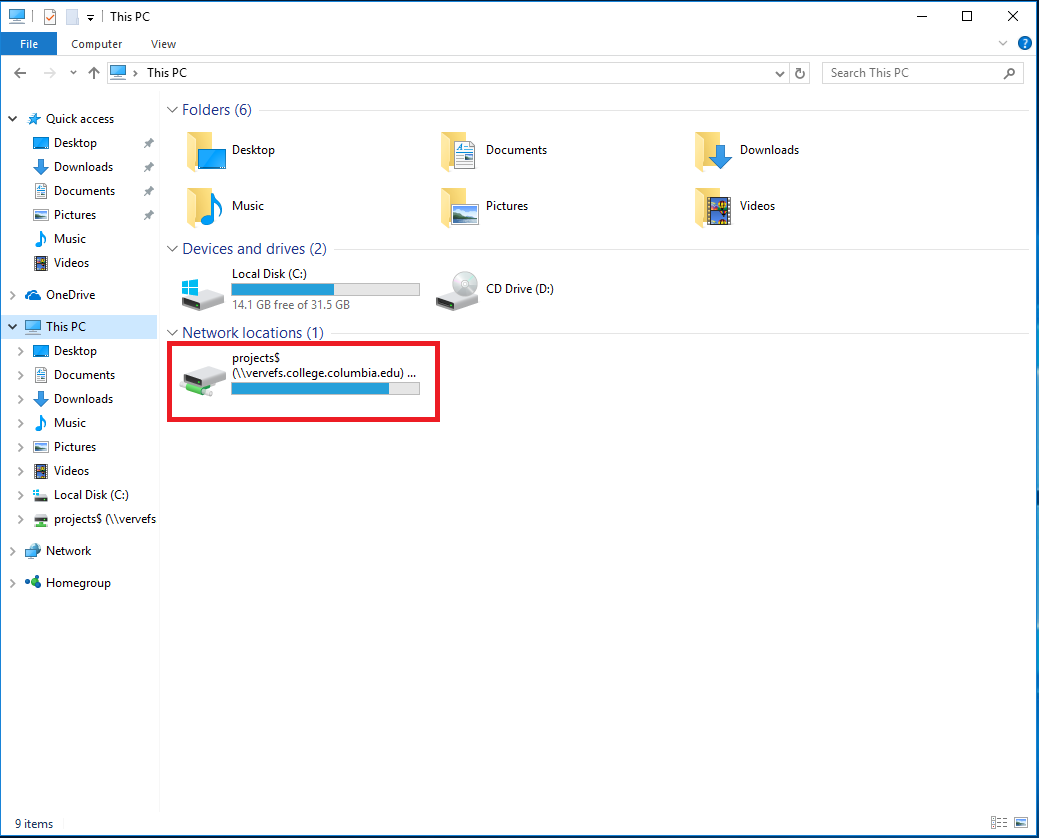
This article details the steps to take for mapping a CCIT administered network share on Windows 10 systems.. In the Map Network Drive window choose which Drive Letter you wish to assign to the Network Drive you're currently mapping. In the Folder field, enter the full network path you wish to map (this path should be provided to you by your.
01:13. To map a network drive, type the following command and then hit Enter: net use DRIVE: PATH. DRIVE is the drive letter you want to use and PATH is the full UNC path to the share. So, for example, if we wanted to map drive letter S to the share \\tower\movies, we'd use the following command: net use s: \\tower\movies.
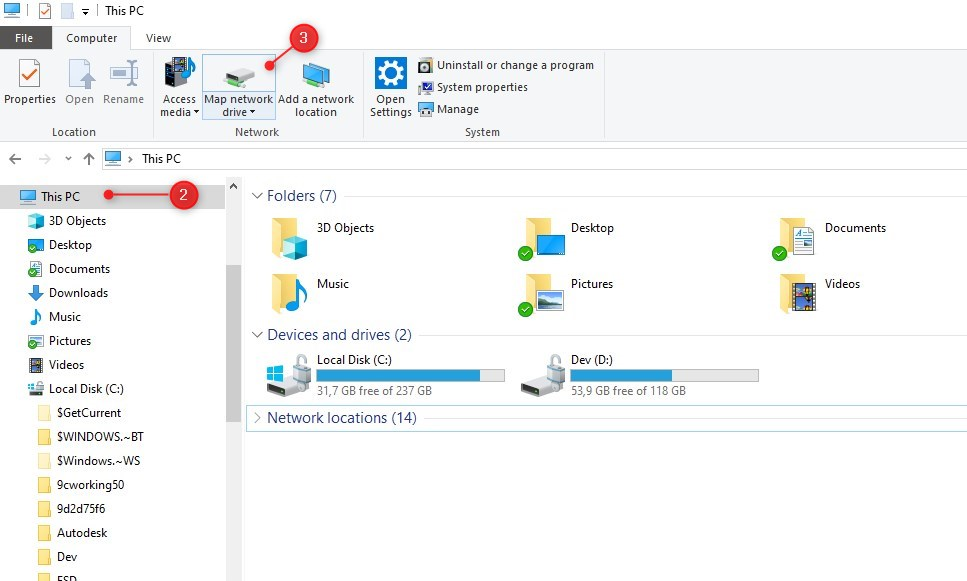
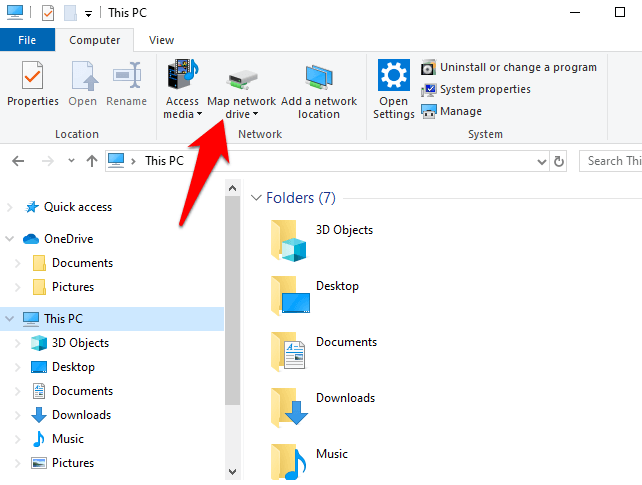
Launch File Explorer. You can open it with the keyboard shortcut, Windows key + E, or by simply clicking on the folder icon in the taskbar. On the File Explorer window, click on This PC on the left pane. Next, navigate to and click the Computer tab next to File at the top-left. Next, select Map Network Drive from the ribbon menu.
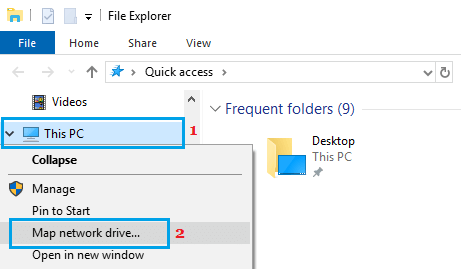
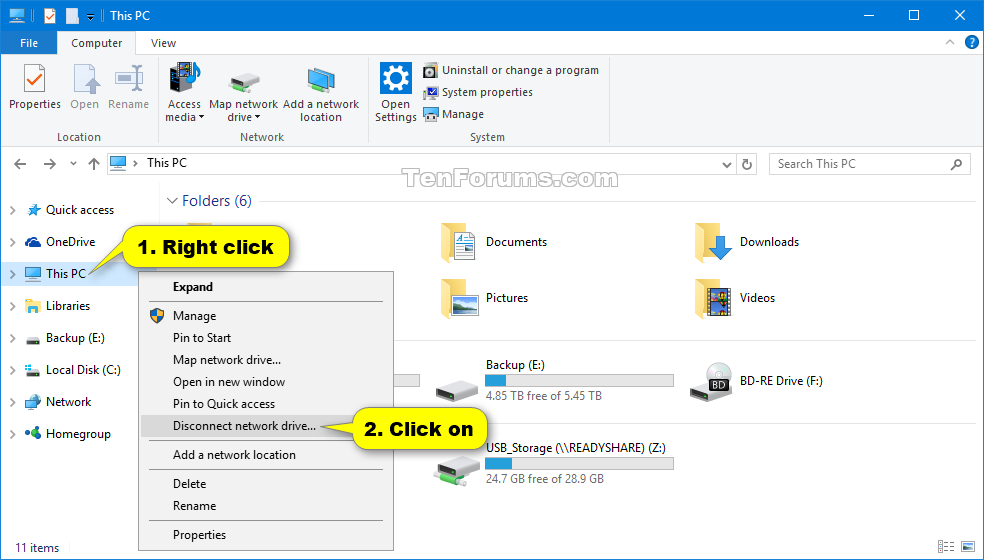
Follow the steps below to map network drive in Windows 10 and create a shortcut to a Shared Folder located on your network. 1. Right-click on Start and click on File Explorer. 2. On the File Explorer screen, right-click on This PC and click on Map network drive… option. 3. On the next screen, you can use the default Drive Letter or choose an.
On the General tab in the Create Task dialog box, type a name (such as Map Network Drives) and description for the task. Select Change User or Group, select a local user or group (such as LocalComputer\Users) and then select OK. On the Triggers tab, select New, and then select At log on for the Begin the task field.
Mapping a network share on a Windows 10 and 11 computer allows the ease of use and access to network storage content. Select one of the options listed below to map a network share using the device name or IP address. For My Passport Wireless products, please refer to Answer ID 24800: My Passport Wireless: Samba SMBv2 Connection Message Details
Click on the Conditions tab. Select the Start only if the following network connection is available option. Select the Any connection option. Click the OK button. After completing the steps, sign.
Gallery of Map Network Drive Windows 10 :
How to Map Network Drive Windows 10 5 Methods Itechguides com

Map network drive in Windows 8 1 Windows 8 and Windows 7 4sysops
How to map a network drive in Windows 10
How do I map a network drive on Windows 10 EVE Support
How to Map Network Drive in Windows 10

How To Map Network Drive Windows 10 Maping Resources
How to Map a Network Drive in Windows 10 8 and 7 Step by Step
Map a Network Drive Windows 10 Information Technology
Mapping a Network Drive in Windows 10 How To LazyAdmin

Map Network Drive in Windows 10 Tutorials
Mapping a Network Drive in Windows 10
How to Map a Network Drive in Windows 10 YouTube

How to Map a Network Drive on Windows 10 Howchoo
How to Map a Network Drive in Windows
How to Map Network Drive in Windows 10

map network drive windows10 AEM CQ5 Tutorials
How to Map Network Drive in Windows 10
Network mapped drives not available on WIndows 10 TP Microsoft Community

Map Network Drive in Windows 10 Windows 10 Forums
How to Map Network Drives in Windows 10 Columbia College Information
How to Map a Network Drive in Windows
How to Map a Network Drive on Windows 10 Computers Software Tested

How to map a network drive in Windows 10
How to Map Network Drive in Windows 10
map network drive windows10 AEM CQ5 Tutorials
How to Map Network Drive in Windows 10

2 Ways To Map Network Drive in Windows 10 TechCult
Network mapped drives not available on WIndows 10 TP Microsoft Community
Map Network Drive in Windows 10 Windows 10 Forums
How to Map Network Drives in Windows 10 Columbia College Information

How To Map A Network Drive In Windows 10 In 2020 Trickbugs

How to Map a Network Drive on Windows 10 Howchoo
How to Map a Network Drive in Windows 10 Appuals com
Map Network Drive in Windows 10 Tutorials
How to map FTP drives network drives and web shares in Windows 10
2 Methods to Map Network Drive in Windows 10 Truegossiper

How to Map a Webdav Drive in Windows 10 Make Tech Easier

3 Ways to Map Network Drive in Windows 10 NEXTOFWINDOWS COM

Map a network drive in Windows 10
How to Map Network Drive Windows 10 5 Methods Itechguides com
How to Map Network Drives in Windows 10 Columbia College Information

Map Network Drive in Windows 10 Tutorials

How to Map Network Drive Windows 10 5 Methods Itechguides com

Map a Network Drive in Windows 10 Better Host Review
Solved how to remove map network drive in windows 10 Windows 10 Forums

Map a Network Drive in Windows 10 Better Host Review
Map Network Drive in Windows 10 Tutorials

How to Create Map Network Drive In Windows 10 and Server TECHNIG
Map a Network Drive in Windows 10 Better Host Review
Map Network Drive in Windows 10 Tutorials
How to Create Map Network Drive In Windows 10 and Server TECHNIG
How to map a Network Drive or add an FTP Drive in Windows 11 10
Windows 10 Map Network Drive Map Of Aegean Sea

How to Map a Network Drive on Windows 10 Howchoo

How To Map Network Drive Windows 10 Maping Resources

Windows 10 How to Map a Network Drive YouTube
/MappedDrive-f1d53207c16a47cbaf87b0a25f0b1276.png)
How to Map a Network Drive

How To map network drives in windows 10 YouTube

How to Map Network Drive in Windows 10 YouTube
How to Map a Network Drive in Windows

How to Map A Network Drive on a Windows 10 PC Tech How To
How to Map a Network Drive in Windows 10 Tom s Hardware

Map Network Drive in Windows 10 Tutorials

How to Map Network Drive Windows 10 5 Methods Itechguides com
How To Easily Map A Network Drive In Windows 10

How to Map Network Drive Windows 10 5 Methods Itechguides com

Map Network Drive Using Ip Address Windows 10 Living Room Design 2020
How to Map a Network Drive in Windows 10 Tom s Hardware

PCSC Map Network Drive Tutorial
Windows Map network drive ITS Services for D MTEC

How to Map Network Drive Windows 10
:max_bytes(150000):strip_icc()/002-map-a-network-drive-windows-10-4689016-1f4a3773ac3e471fa5f2eb38d492dd08.jpg)
How to Map a Network Drive in Windows 10
How to map Network Drive Windows 10 Tutorial

How To Map A Network Drive In Windows 10 KeepTheTech

How to Map Network Drive Windows 10 5 Methods Itechguides com

How to map a network drive in Windows 10 ITS Knowledge Base Bethel
Map Network Drive Windows 10 - The pictures related to be able to Map Network Drive Windows 10 in the following paragraphs, hopefully they will can be useful and will increase your knowledge. Appreciate you for making the effort to be able to visit our website and even read our articles. Cya ~.